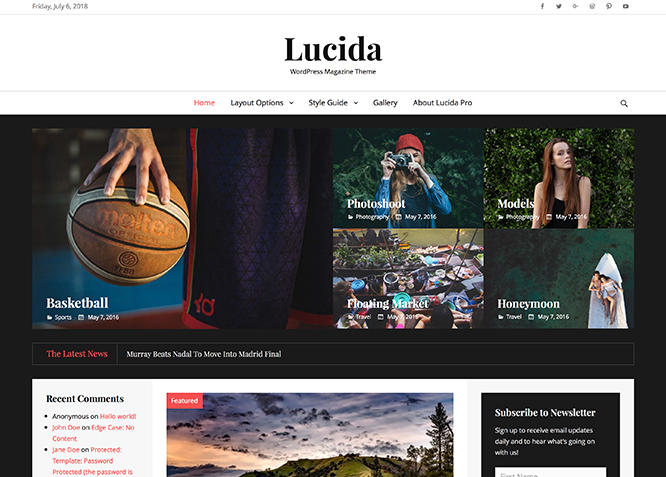
Lucida, the WordPress Theme for Magazine and Blogs represents simplicity and clarity. Lucida is completely responsive and minimalistic, all you need for magazine and blog websites. The clean, super user-friendly interface and HTML5 and CSS3 codes used make it so stress-free to both use and view. Its vast range of features make it adept to be used in almost any site. With Lucida, create an individual online presence while worrying nothing of coding. Lucida takes care of everything. This theme is translation ready. For more details check out Theme Instructions
Features
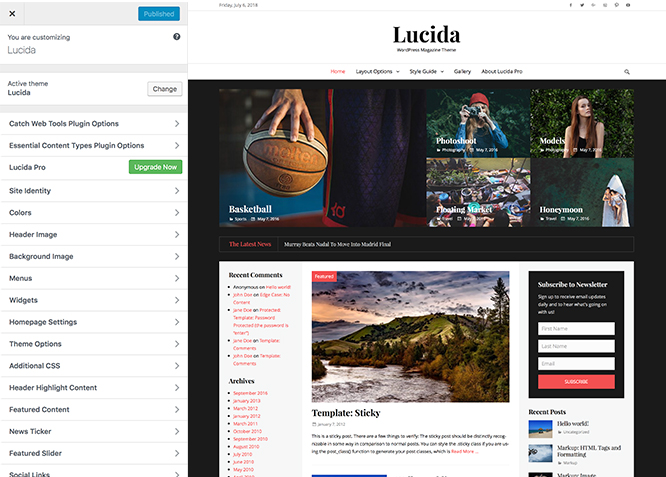
Theme Options
The most powerful feature of Catch Themes is its Theme Options which will allow you to easily customize your website with clicks. So, now you no longer need to be a designer or a programmer to build customized websites. Theme Options allow you to toggle on and off features, adjust layouts, change colors, fonts, logo, favicon, background, add social links and custom CSS.
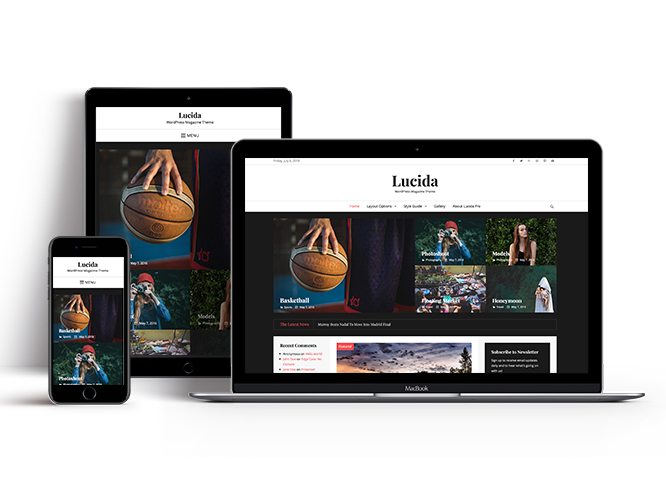
Responsive Design
One of the key features of our themes is that your website will magically respond and adapt to different screen sizes delivering an optimized design for iPhones, iPads, and other mobile devices. No longer will you need to zoom and scroll around when browsing on your mobile phone.
Webmaster Tools
Webmaster Tools option helps you to minutely manage your site. Firstly, it helps to verify the site in Google, Yahoo and Bing. Additionally, whether it is something like site optimization, keeping track of your site traffic or overseeing and altering your display settings, you can call the shots for you site through Webmaster tools. These tools also allow you to add to your site Header and Footer Scripts like Google Analytics, Site Stats, Facebook, twitter and much more.
Incredible Support
We have a great line of support team and support documentation. You do not need to worry about how to use the themes we provide, just refer to our Tech Support segment. Further, if you need to do advanced customization to your website, you can always hire our theme customizer!
Featured Page Slider
Featured Page Slider is an option that is helpful to highlight noteworthy pages on your site. You can have columns of content as well as selected images set on your page slider. The fun part is, you get to decide for how long a page stays on your page before something else comes up on the slider. How will you make that happen? By exercising your control over different slide effects and their timing!
Featured Page Grid Content
Featured Page Grid Content is an option that is helpful to highlight noteworthy pages on your site. You can have columns of content as well as selected images set on your grid container.
Hero Content
You can now display the best assets of your website with the Hero Content feature. The feature allows you to highlight the most important content in a fashion that is easily attention-grabbing. You can enable the hero content either on Homepage or the entire site. Hero Content - the easiest way to display your strengths.
WordPress Standard Codes
Our code is secure and optimized. We do proper data validation and sanitization and follow core theme guidelines. Our developers are active contributors to WordPress theme review and WordPress core. Our themes will always be updated as things change in WordPress.
More Features
- Theme Options
- Responsive Design
- Featured Slider
- Webmaster Tools
- Page Templates
- Featured Thumbnail
- Threaded Comments
- Dropdown Menu
- Excerpt Length
- Localized for translations
- Custom Header / Logo
- Custom Favicon
- Custom Menu
- Custom Layout
- Custom CSS
- Header Highlight Content
- Hero Content
- WordPress Standard Codes
Free Vs Pro (Premium)
| Free | Features | Pro (Premium) |
|---|---|---|
| Responsive Design | ||
| Super Easy Setup | ||
| Color Options for various sections | ||
| Header Media | ||
| Primary Menu | ||
| Secondary Menu | ||
| Header Top Menu | ||
| Header Right Menu | ||
| Footer Menu | ||
| Menu Options | ||
| Breadcrumb | ||
| Comment Options | ||
| Excerpt Options | ||
| Feed Redirect | ||
| Font Family Options | ||
| Footer Editor Options | ||
| Header Right Sidebar Options | ||
| Header Top Options | ||
| Default Layout:Three Columns(Secondary Sidebar,Content,Primary Sidebar) | ||
| Default Layout:Three Columns(Content,Secondary Sidebar,Primary Sidebar) | ||
| Default Layout:Three Columns(Primary Sidebar,Secondary Sidebar,Content) | ||
| Default Layout: Primary Sidebar, Content | ||
| Default Layout: Content, Primary Sidebar | ||
| Default Layout: No Sidebar(Content Width) | ||
| Default Layout: No Sidebar(One Column) | ||
| Default Layout: No Sidebar(Full Width) | ||
| Archive Content Layout: Excerpt Image Left | ||
| Archive Content Layout: Excerpt Image Right | ||
| Archive Content Layout: Excerpt Image Top | ||
| Archive Content Layout: Show Full Content(No Featured Image) | ||
| Single Page/Post Image | ||
| WooCommerce Layout | ||
| Pagination Options | ||
| Promotion Headline Options | ||
| Scroll Up Options | ||
| Search Options | ||
| Single Post Navigation | ||
| Update Notifier | ||
| WooCommerce Options | ||
| Header Hightlight content: Post Content | ||
| Header Hightlight content: Page Content | ||
| Header Hightlight content: Category Content | ||
| Header Hightlight content: Image Content | ||
| Header Hightlight content: Embed Content | ||
| Featured content: Featured Widget Content | ||
| Featured content: Featured Post Content | ||
| Featured content: Featured Page Content | ||
| Featured content: Fetured Category Content | ||
| Featured content: Feature Image Content | ||
| News Ticker: Post News Ticker | ||
| News Ticker: Page News Ticker | ||
| News Ticker: Category News Ticker | ||
| News Ticker: Custom Text News Ticker | ||
| Featured Slider: Post | ||
| Featured Slider: Page | ||
| Featured Slider: Category | ||
| Featured Slider: Image | ||
| Social Links Custom | ||
| WPML Ready | ||
| WooCommerce Ready |
Theme Instructions
#How to install theme?
Go to this link
#How to update theme to the latest version?
Go to this link
Always Set Featured Images
This theme relies heavily on Featured Images. If your post is missing a Featured Image, the post image will not show up on homepage, on archived pages and on Featured Page Slider Content. Click Here to see how to add Featured Image in your Post/Page.
#Image Sizes in px:
Post Thumbnail
Width: 620
Height: 413
Slider
Width: 1920
Height: 800
Featured
Width: 880
Height: 660
Landscape
Width: 480
Height: 320
Thumbnail Size
Width: 90
Height: 68
Custom Header Image
Width: Flexible (recommended width 1920px)
Height : Flexible (recommended height 800px)
#How to add Featured Image in Post/Page?
Go to this link.
#Regenerate Thumbnails
For regenerate thumbnails got to this link
#Widget Area (Sidebar)
Lucida currently has 5 widgetized (Sidebar) areas thay are: 1. Primary Sidebar, 2. Secondary Sidebar, 3. Footer Area One, 4. Footer Area Two and 5. Footer Area Three. Go to “Appearance => Widgets” or “Appearance => Customize => Widgets” in WordPress.
#Menus
Lucida offers exciting Menu Options! This theme supports and recommends using “Custom Menus”. You can create Custom Menu through “Appearance => Menus” from your WordPress Dashboard.
Select Menu Locations
You can assign your custom menu in 2 different locations. You assign it either from “Appearance => Customize => Menus => Manage Location” or from “Appearance => Menus => Manage Location”
Select your Custom Menu as Primary Menu to display it as the Main Menu, which will replace the default Page Menu
Select your custom menu as Header Top Menu to display Menu in Header Top Area
#Customizer (Theme Options)
You can customize this theme using cool additional features through Customizer at “Appearance => Customize” from your WordPress Dashboard.
#How to add Logo?
Go to this link
#How to enable/disable Site Title and Tagline
Go to this link
#How to add Site Icon (Favicon/Web Clip Icon)?
Go to this link
#Header Image
Go to this link
#How to Change and Enable Custom Header Image?
Go to this link
#How to enable/disable Breadcrumb
Go to this link
#How to Change the Excerpt Length and Read More Text?
Go to this link
#How to Disable header top and disable date and disable social icon on Header Top?
- Go to “Appearance => Customize => Theme Options => Header Top Options”
- Click on “Check to disable date” to disable date
- Click on “Check to disable social icons” to disable social icons
- Finally, click on “Save & Publish”
#How to Set Certain Categories to Display in Homepage/Frontpage?
Go to this link
#Layout Options
Lucida has 8 Default Layout options, 8 Woocommerce Layout options, 4 Archive Content Layout options and various Single Page/Post image layout to choose from “Appearance => Customize => Theme Options => Layout Options”
Default Layout
Once you are in Layout Options, you can Check the box below “Default Layout Options” which will set our site layout. Further, you have the choice of selecting custom layout for individual pages and posts through “Lucida Options => Layout Options”, which you shall find below individual posts and pages, when you click on them for adding/editing.
Archive Content Layout
Once you are in Layout Options, you can Check the box below “Archive Content Layout” which will set our site archive layout.
Single Page/Post Image Layout
Once you are in Layout Options, you can Check the box below “Single Page/Post Image Layout” which will set our posts/page image layout. Further, you have the choice of selecting Single Page/Post Image Layout for individual pages and posts through “Lucida Options => Single Page/Post Image Layout”, which you shall find below individual posts and pages, when you click on them for adding/editing.
How to edit individual posts/pages layout?
This can be achieved through custom meta box by following the steps below:
- Go to Add/Edit option of Page/Post
- There you can find Lucida Options
- Then click on Layout Options
- You select required option under “Default”
- Finally Click on “Publish/Update”
How to select optional sidebar for individual Page/Post?
This can be achieved through custom meta box by following the steps below:
- Go to Add/Edit option of Page/Post
- There you can find Lucida Options
- Then click on Select Sidebar
- You can make the required changes by clicking on options under “Select Sidebar”
- Finally Click on “Publish/Update”
How to enable/disable Header Featured Image for individual Page/Post?
This can be achieved through custom meta box by following the steps below:
- Go to Add/Edit option of Page/Post
- There you can find Lucida Options
- Then click on Header Featured Image Options
- You can select option “Enable or Disbale”
- Finally Click on “Publish/Update”
How to select Single Page/Post Image Layout for individual Page/Post?
This can be achieved through custom meta box by following the steps below:
- Go to Add/Edit option of Page/Post
- There you can find Lucida Options
- Then click on Single Page/Post Image Layout
- You can select various size options under Single Page/Post Option
- Finally Click on “Publish/Update”
#How to change Pagination Options?
Go to this link
#How to add Promotion Headline?
Go to this link for promotion headline
#How to enable/disable Scrollup feature?
Go to this link
#How to change default text in search box?
Go to this link
#Additional CSS
Go to this link
#Header Highlight Content
Header Highlight Content is used to Highlight your content in header.
Lucida Page Content. For Header Highlight Content, go to “Appearance => Customize => Header Highlight Content”.
#How to enable Header Highlight Content?
- Go to “Appearance => Customize => Header Highlight Content” from your WordPress Dashboard
- To enable Header Highlight Content, select “Homepage/Frontpage or Entire Site” option under “Enable Header Highlight Content on”
- Finally, click on “Save & Publish”
Page Content:
Page content is created to highlight your Page as Header Highlight Content. So, first you need to create a Page and then add Featured Image to the Page.
How to enable Page Content?#
- Make sure Header Highlight Content is enabled
- Go to “Appearance => Customize => Header Highlight Content” from your WordPress Dashboard
- Under “Select Content Type”, you need to select “Page Content”
- Finally, click on “Save & Publish”
Note:
When you select page, make sure your Page have Featured Image. Click here to watch our Video Screencast to add Featured Image.
#How to change Headline and Sub-headline for Header Highlight Content?
- Make sure Header Highlight Content is enabled
- Go to “Appearance => Customize => Header Highlight Content” from your WordPress Dashboard
- Under “Headline for Header Highlight Content”, you can add desired text or leave it empty if you dont want to disable fields”
- Under “Sub-headline for Header Highlight Content”, you can add desired text or leave it empty if you dont want to disable fields”
- Finally, click on “Save & Publish”
#How to change number of Highlight Content?
- Make sure header highligh content is enabled
- Go to “Appearance => Customize => Header Highlight Content” from your WordPress Dashboard
- Under “No of Header Highlight Content” set number of Header Highlight Content as required(You need to save and refresh the page after changing number of Featured Content)
- Then, select your pages in “Page Content #”
- Finally, click on “Save & Publish”
#How to select Page Content in Header Highlight?
- Make sure page content is enabled
- Under Page 1, Page 2 and so on, add the desired “Page”
- Finally, click on “Save & Publish”
Note: Page is determined according to selectedNumber of Header Highlight Content.
#How to Display/Hide Content?
- Make sure header highlight content is enabled
- Go to “Appearance => Customize => Header Highlight Content” from your WordPress Dashboard
- Under Display Content, you can select “Show Excerpt, Show Full Content or Hide Content” to display excerpt as content, whole content as content or not display content respectively, as per you need
- Finally, click on “Save & Publish”
#Featured Content
Lucida supports Featured Page Content. For Featured Content Options, go to “Appearance => Customize => Featured Content”.
Go to this link
#News Ticker
Lucida supports Page News Ticker. For News Ticker, go to “Appearance => Customize => News Ticker”.
Go to this link
#Featured Slider
Lucida supports Featured Page Slider. For Featured Slider Options, go to “Appearance => Customize => Featured Slider”.
Go to this link
a class=”anchor” href=”#add-social-icons”>#Social Media Icons <
You can activate the social icons you want by adding in your social profile links through “Appearance => Customize => Social Links => Social Links”, in your WordPress Dashboard.
Further, you can add your own custom social image, title, links through “Appearance => Customize => Social Links => Custom Social Links”, in your WordPress Dashboard.
#Widgets
Lucida has 4 Widgets to choose from. They are: 1. CT:Advertisement Images, 2. CT:Featured Posts, 3. CT:Instagram and 4. CT: Social Icons. You can add widget in widget area as per your need.
#How to add Widgets in widget area?
Go to this link
#How to add “Advertisement Image” in widget area(CT:Advertisement Codes)?
This widget is used to add Image as Advertisement.
- Add CT: Advertisement Images to desired widget area. More Info
- Add “Title”, change “Layout” and “No of Items” under respective fields
- Then under “Image Url” add Url of image, you can further add “Image Link” and “Alt Text”
- Finally, click on “Save & Publish”
Note: Please do not add CT:Advertisement Images widget in Header Top Left and Header Top Right widget area
#How to add “Featured Images” in widget area(CT:Featured Images)?
This widget is used to add Featured Images.
- Add CT:Featured Images to desired widget area. More Info
- Add “Title”, change “Layout”, “No of Items”, “Image Alignment” under respective fields
- Then under Image# add “Title”, “Image Url”, “Image Link”, “Alt Text” and “Content” in respective fields
- Finally, click on “Save & Publish”
#How to add “Featured Posts” in widget area(CT:Featured Posts)?
This widget is used add Featured Image.
- Add CT:Featured Posts to desired widget area. More Info
- Add “Title”, change “Select Post From”, “No of Post”, “Order By”, “Order”, “Layout”, “Image Alignment” and “Image Size “under respective fields
- You can further change “Post Meta Info”
- Finally, click on “Save & Publish”
#How to add “Instagram” in widget area(CT:Instagram)?
This widget is used to display your latest Intagram photos
- Add CT:Instagram to desired widget area. More Info
- Add “Title”, “Username”, change “Layout”, “Number of photos”, “Instagram Image Size and “Link Text” under respective fields
- To open in new tab check “Check to Open Link in new Tab/Window” option
- Finally, click on “Save & Publish”
#How to add “Social Icon” in widget area(CT:Social Icon)?
This widget is used to add social icons as a widget.
- Add CT:Social Icon to desired widget area. More Info
- Add “Title” under the respective field.
- Finally, click on “Save & Publish”
#Embed Multimedia into Posts or Pages
For externally hosted videos (for example a YouTube or Vimeo video), you can directly paste the link of your video page into the content editor. You do not necessarily have to paste the embed code in the content. WordPress will automatically embed the video from the link.
#Webmaster Tools
Go to this link
Recommended Plugins
* Catch Web Tools for Webmaster Tools, To Top, Catch IDs and so on
* Essential Content Type
* Contact Form 7 for Contact Form
* WP-PageNavi for Numeric Pagination
* Regenerate Thumbnails to for Regenerating Thumbnails
* Jetpack for Infinite Scroll, Gallery, Stats, Image CDN and many more
Change Log
1.9.1 (Released: February 26, 2024)
- Updated: WordPress 6.4 ready
1.9 (Released: February 03, 2023)
- Added: Fitvids Option (Fixed Video Spacing issue)
1.8.1 (Released: August 21, 2022)
- Updated: Google Font hosted locally (https://make.wordpress.org/themes/2022/06/18/complying-with-gdpr-when-using-google-fonts/)
1.8 (Released: February 16, 2022)
- Added: Core Blocks Support
- Bug Fixed: Added underline on the anchor tag
- Updated: WordPress 5.9 ready
1.7.2 (Released: February 03, 2021)
- Updated: data-vocabulary-org-schema deprecated now replaced by schema-org's JSON-LD
1.7.1 (Released: October 28, 2020)
- Enhanced: HTML structure for Site Title and Page/Post Title
1.7 (Released: September 05, 2020)
- Bug Fixed: Slider Issue on Image loader set to true on WP 5.5
- Removed: Cycle slider shuffle not compatible with theme check so it has been removed
- Updated: Readme
- Updated: Screenshot image
1.6 (Released: May 21, 2020)
- Bug Fixed: Keyboard navigation issue
- Updated: readme.txt and style.css as per the new requirements
1.5 (Released: April 18, 2019)
- Added: Support for wp_body_open action
- Added: Core Privacy Policy link support in footer
- Bug Fixed: CT:Instagram widget image size issue
- Updated: Upgrade to pro button css update
- Updated Content delivered through the_content filter
- Updated: Content type label updated
- Updated: Metabox UI
- Updated: Readme file as per new requirement
1.4.2 (Released: April 17, 2018)
- Bug Fixed: Design issue with Catch Infinite Scroll plugin
- Updated: CT: Instagram Widget updated due to changes in instagram.com
1.4.1 (Released: January 13, 2018)
- Bug Fixed: CT: Instagram Widget thumbnail and small image sizes issue
- Updated: JS compression
1.4 (Released: July 18, 2017)
- Bug Fixed: Metabox not taking Header Image Values
- Bug Fixed: Header Highlight Content Image not refreshing when changing Post Image, caused by transients (Reported By: fizzgigg)
- Bug Fixed: Breadcrumb custom post archive link
- Removed: changelog.txt file and added changelog in readme.txt file
1.3.9 (Released: June 8, 2017)
- Bug Fixed: Removed unnecessary code that gave undefined index errors
- Bug Fixed: social icon styles
- Bug Fixed: Footer widget area layout
- Compatible with WordPress 4.8
1.3.8
- Bug fixed: Promotion Headline - $headline displayed instead of $sub_headline ( Reported By: sachyya )
1.3.7
- Compressed: Images
- Removed: Unnecessary images
1.3.6 (Merged 1.3.4 and 1.3.5)
- Bug Fixed: Output Sanitization Issues
- Bug Fixed: Translation Issues
- Bug Fixed: excerpt_length and excerpt_more hooks now do not affect admin side
- Bug Fixed: Removed use of create_function for initializing widgets
- Bug Fixed: Prefixed localized objects
- Bug Fixed: Replaced wp_reset_query() with wp_reset_postdata() when used with WP_Query Class
- Removed: Unnecessary sidebar check on 404.php and sidebar-footer.php
1.3.3
- Removed: Image widget
- Removed: Text addition for social icon widget
- Enhanced: Style for blockquote, q and alignment
1.3.2
- Bug Fixed: Upgrade to Pro button link in customizer
1.3.1
- Bug Fixed: Widget layout issue in footer widget area
1.3
- Updated translation strings
- Internationalized footer date
1.2
- Added: Option to Display all Categories in Customizer
- Added: Display content option in customizer featured slider
- Bug Fixed: Drop down toggle arrow issue in Primary and Secondary menus
- Bug Fixed: Entry meta color css issue
- Bug Fixed: Slider Meta data
- Bug Fixed: jquery offset error on hide date option
- Enhanced: HTML structure to remove multiple h1
1.1
- Updated: Custom CSS to Additional CSS( Core Support ) for WP version 4.7
- Code Optimization
1.0.4
- Bug Fixed: Layout issue in responsive design
- Bug Fixed: Secondary menu issue in responsive design
- Bug Fixed: Undefined variable error in core.php
1.0.3
- Bug Fixed: Compressed production version scripts
- Bug Fixed: Whitespace issues error hampering xml files display
- Updated: HTML script loading from lucida_head() function and added it as wp_enqueue_script() in lucida_scripts() function
- Updated: Used the_archive_title() and the_archive_description() in archive.php
- Updated: Styles/Scripts handle standardized
1.0.2
- Revert: "Used wp_add_inline_style for custom css" from v1.0.1 as this is method does not override light.css in light color scheme
- Removed: update_option for thumbnail image size and added new image sizes as lucida-small
1.0.1
- Bug fixed: custom style not enqueued. (Reported by jailma-santos)
1.0
- Initial Release