1. Purchase and My Accounts

2. WordPress Basics

What is WordPress?

WordPress is a free, open source content management system (CMS). It’s a software that allows people to create, organize, and update websites without having to manually code every page. WordPress actually started as a blogging platform, however, it has grown into something much more than that now.  It has evolved to be used as full content management system and so much more through the thousands of plugins, widgets and themes. WordPress is currently powering more than 26% of the web.

The most important part of WordPress is that it comes in two forms—WordPress.com and WordPress.org. WordPress.com is a blog hosting service that allows users to setup a free website that operates on custom version (limited) of the WordPress software. And then there is WordPress.org, a software with which you can do just about anything without any limitations. In simple words, WordPress.org is basically the home of the open source WordPress software.  Most importantly, WordPress is an all-in-one feature-packed website platform, it can do just anything!

What are WordPress themes?

According to WordPress.org, themes are collections of files “that work together to produce a graphical interface with an underlying unifying design for a weblog.” In simple, a WordPress theme is what controls the functionality, the look, and the feel of a WordPress website. WordPress themes come in a variety of flavors, from basic, free themes to more complex, premium themes. The key takeaway about WordPress themes for any beginner is that at any moment a WordPress website’s theme may be changed without adversely affecting the actual content of the website.

How to add Privacy Policy Page in WordPress?

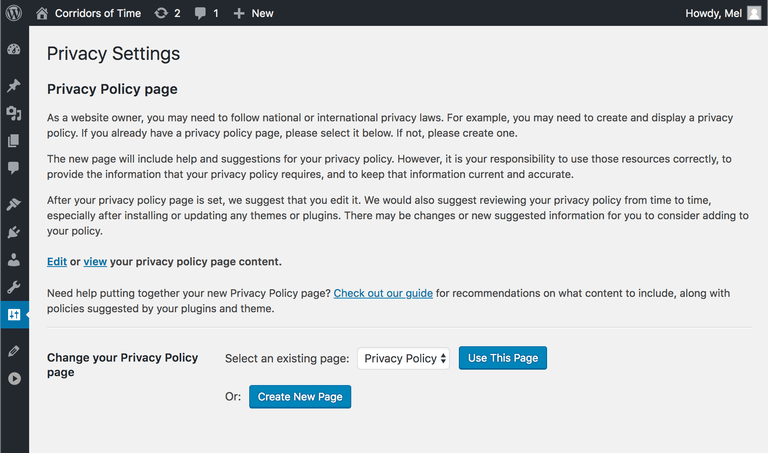
WordPress 4.9.6 update has made it super easy to add a Privacy Policy page on your website. The update allows site owners to designate a privacy policy page, which would be shown on the login and registration pages.

You need to manually add a link to your policy to every page on your website. A footer menu is considered to be a great area to include your privacy policy.

Moreover, the development team has created a guide that includes insights from WordPress and participating plugins on how they would handle personal data. These can be pasted into your site’s privacy policy to help you get started easily.

You can also add a privacy policy page manually. Below is how:

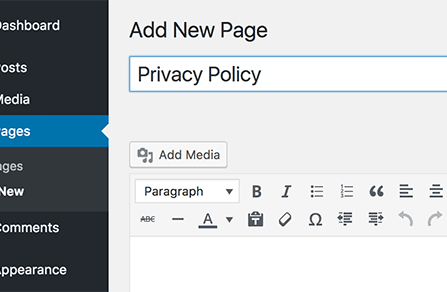
You can add a privacy policy page in WordPress by simply creating a new page and naming it Privacy Policy so that your users will immediately know what this page is about. For that, go to Pages > Add New in your WordPress dashboard.

Now you need to add the text for your privacy policy including all the information mentioned above. You can also use an online privacy policy generator or even use a plugin like Auto Terms of Service and Privacy Policy to generate the content for your website.

Also, add your own contact information and business name before hitting the publish button.

How to create custom menu?

  • Go to “Appearance => Menu” from your WordPress Dashboard
  • Click on “create a new menu”, give menu name and click on “Create Menu”
  • On your left side you can see option for Pages, Links and Category from there add items to your custom menu(pages, categories or links) you want to display in your custom menu and click on “Add Menu”
  • Finally click on “Save Menu” button
  • To assign menu in position then click on “Manage Location”, assign the position of menu you want to display from drop down option and click on “Save Changes”
  • Learn more at DevotePress

How to add Service in Homepage/Frontpage using Essential Content Type?

Follow these steps to showcase services on your site:

  1. First you need to install Essential Content Type
  2. After that you can find Essential Content Type option in your WordPress Dashboard
  3. Click on “Essential Content Type”, there you can see “Service” option then you need to on the button of Service option(This option is enabled by default)
  4. Then click on “Add New” and create your own content, click on Publish
  5. Then go to “Appearance => Customize => Theme Options => Service”, make sure services is enabled
  6. Under “Select Content Type”, you need to select “Custom Post Type”
  7. Then, under Service #1, Service #2 and so on add the content you have made to display as service
  8. Finally, click on “Save & Publish”

Note: To change number of services to be shown change option from No of items

Requirements to run WordPress

Please go to this link to know about the requirements to run WordPress.

3. Installation and Update

How does the payment process work? When will I get my themes?

  • After you select the theme and click on “Buy Now”. You will reach the Checkout page where you will need to fill in billing details and then choose the means of payment as per your convenience, you can pay through Paypal, Credit Card or Debit Card using Stripe or Paypal
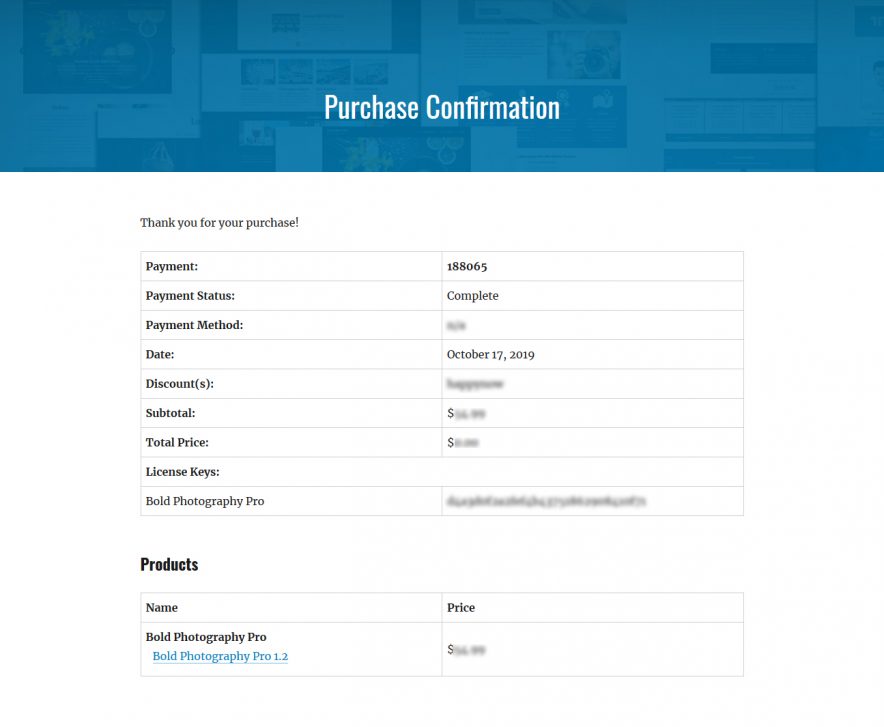
  • After your payment has been completed, you will see a payment completion message on thank you page and you will be automatically redirected to My Account page, where you can see and download your purchased goods.

But if you failed to purchase a theme through this process or have any sales questions then please contact us at https://catchthemes.com/contact-us/.

What is an FTP client and how is it used?

File Transfer Protocol (FTP) is application software which is used to transfer files between a web server and a computer over a TCP-based network, such as the Internet. We recommend FileZilla, open-source software distributed free of charge under the terms of the GNU General Public License. Put simply, an FTP client is what most website owners use when they need to download, edit, and upload their website’s files. Most FTP connections require a host name, a username, and a password. These are most often supplied by web hosting providers in the following form:

Read more information about FTP Clients in the WordPress Codex.

How do I update my theme to the latest version?

There are two ways you can update your theme: (A) ONE CLICK UPDATE and (B) MANUAL UPDATE.

A. ONE CLICK UPDATE

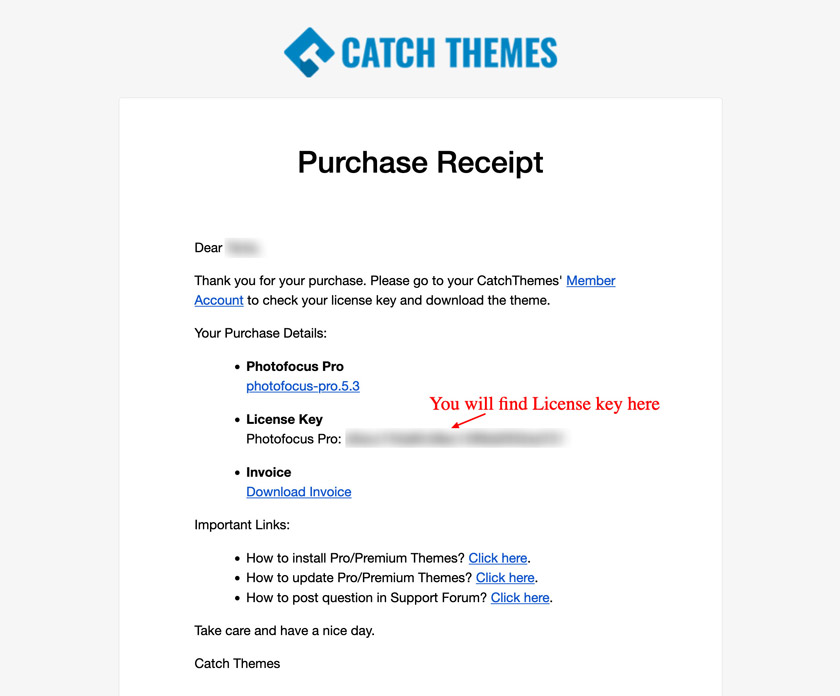
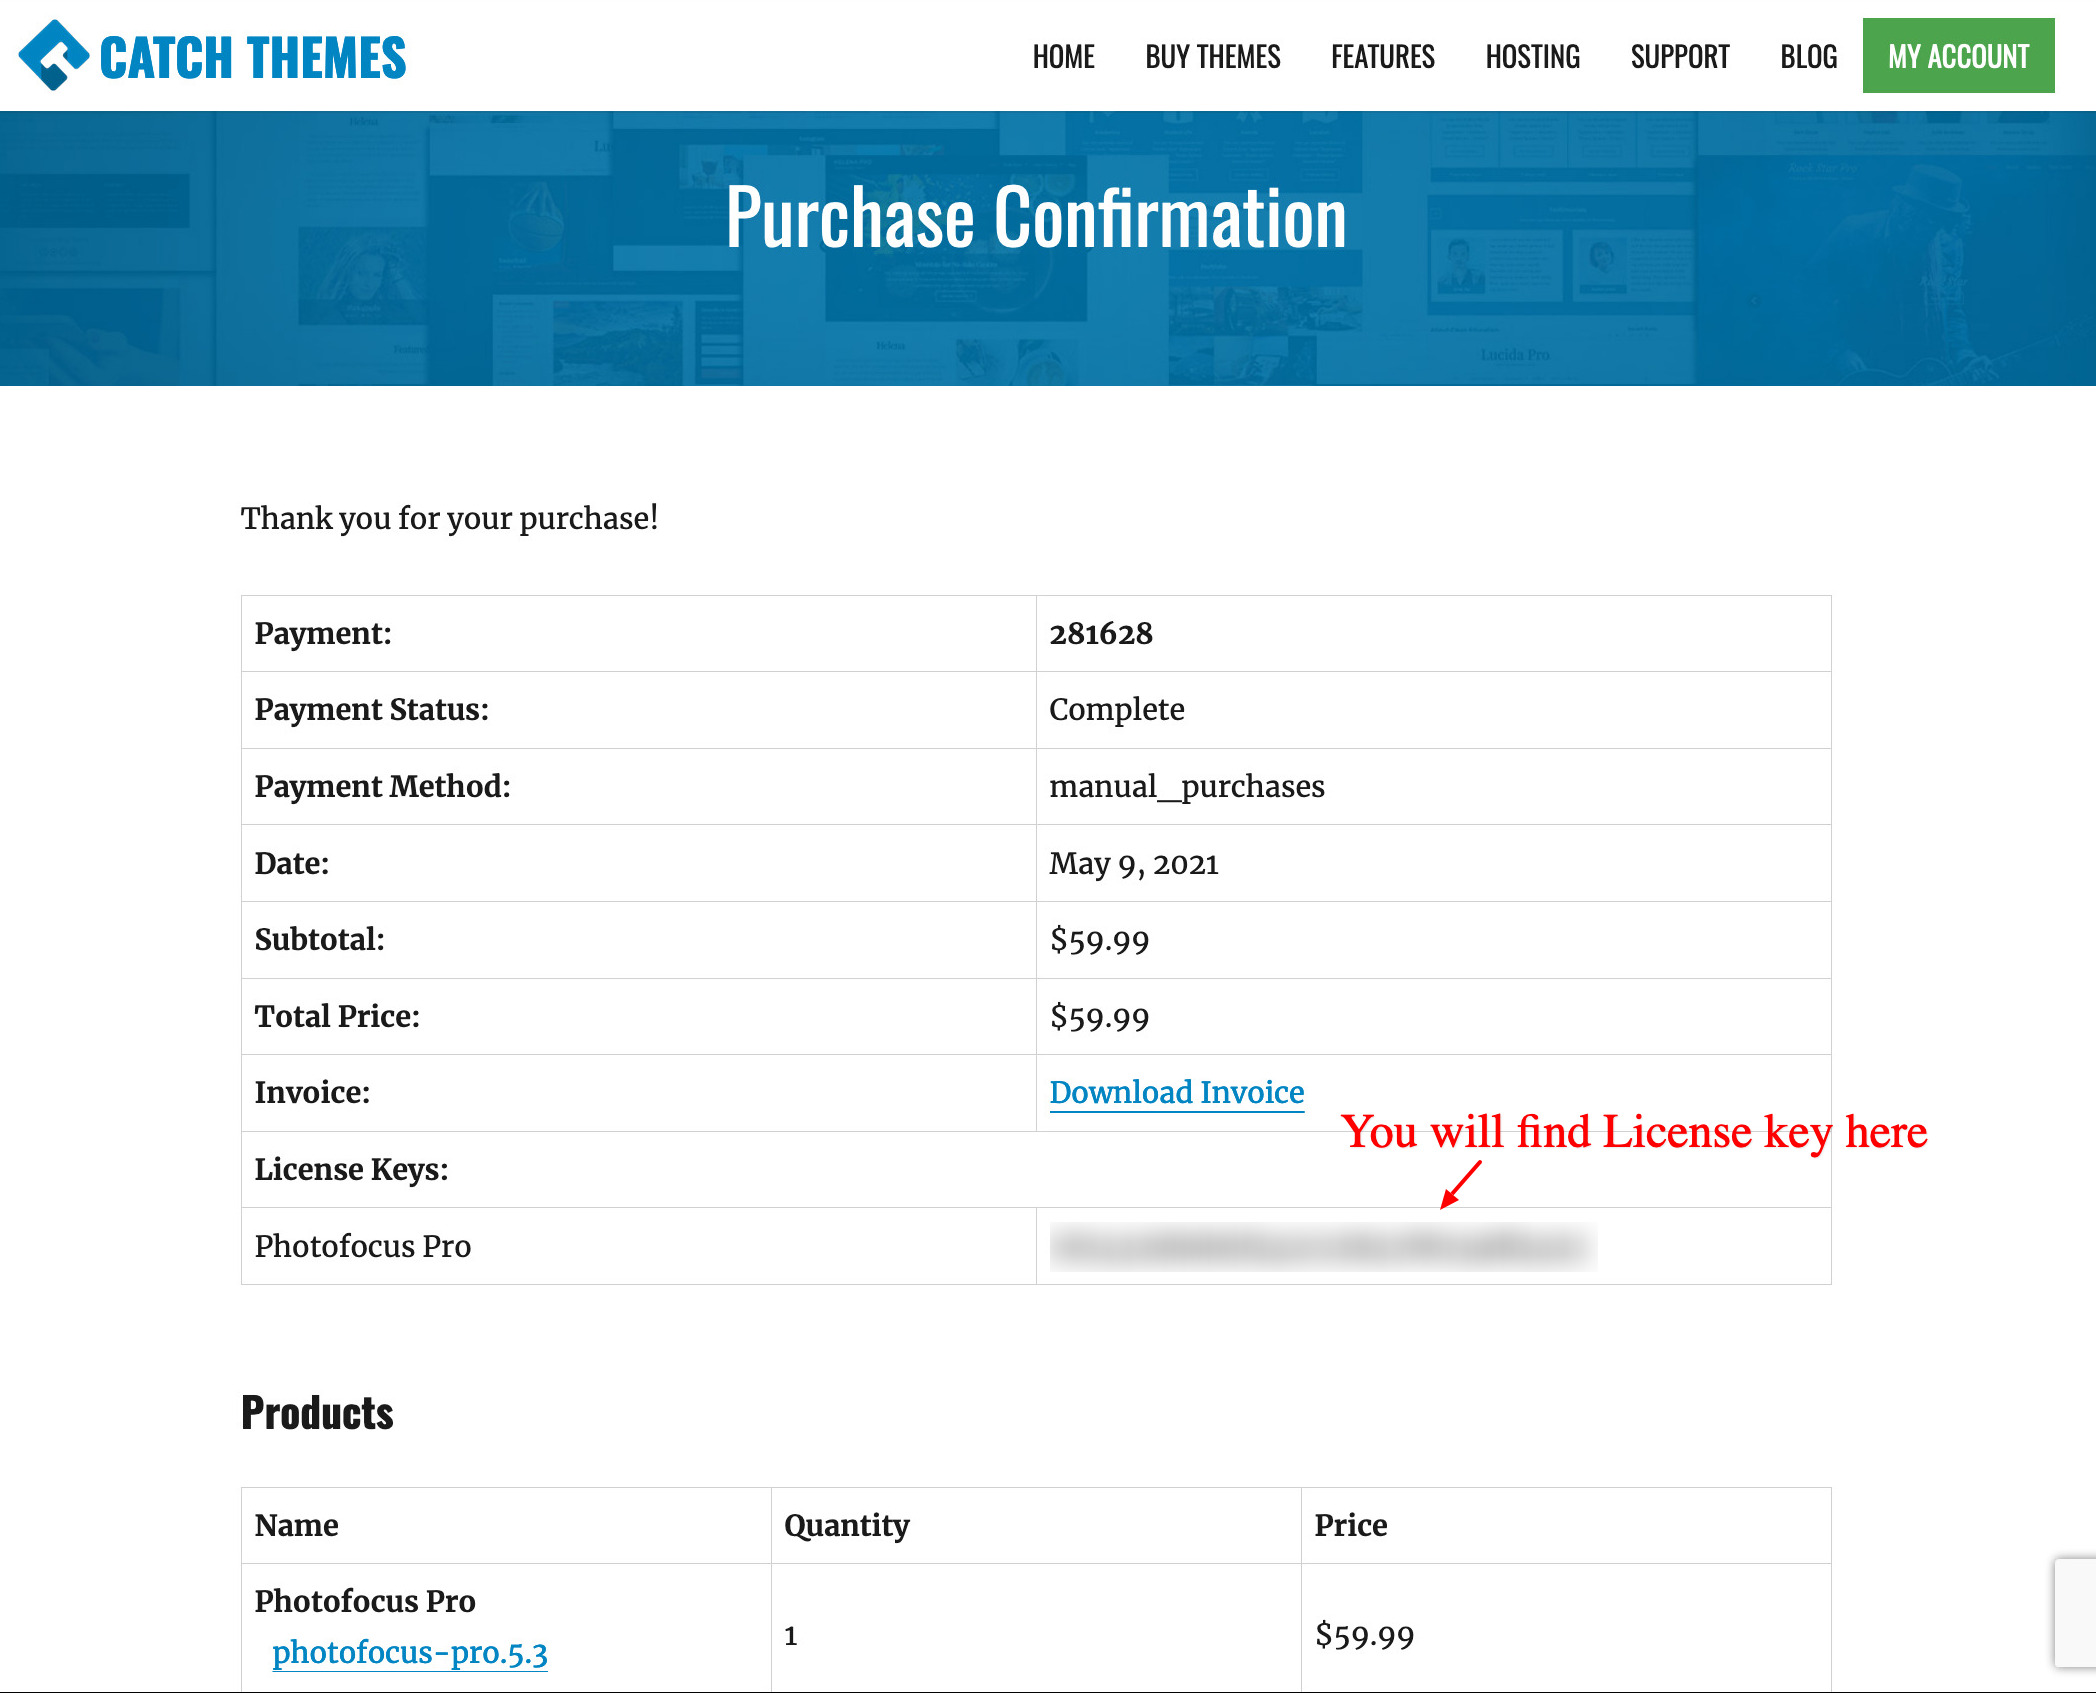
Themes now can be updated by adding License Key. After purchasing the theme, you will get a license key in your email. Also, you will find the license key in the “View Details and Downloads” section on My Account page

Note: License key is only valid for 1 year of purchase. You can check the status of your license key from My Account page

Follow these steps to your theme:

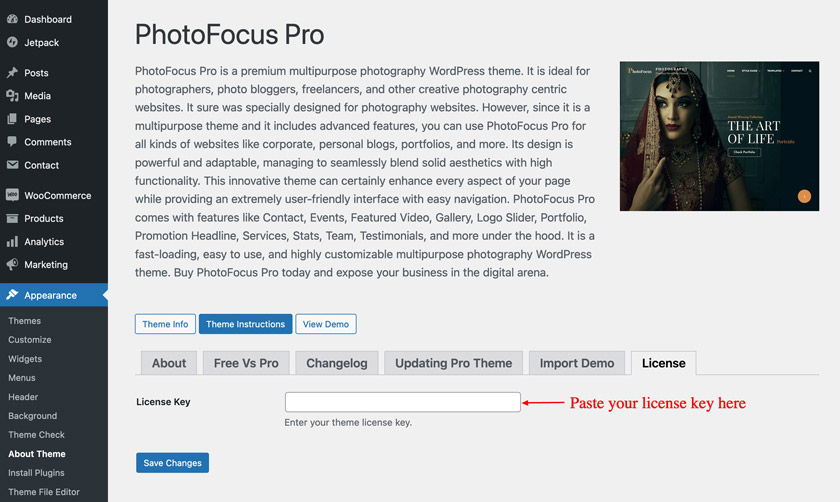
  1. Go to “Appearance => About Theme”
  2. Click on the License tab
  3. Add the License key under the “License Key” section
  4. Click on the “Save Changes” and “Activate License” buttons

Note:

  • All our premium themes come with 1 year of update subscription. So, if you do not have an active subscription, then renew your subscription to get your license key.
  • You can use the provided License Key to add a one-click theme update for only one site. For multiple sites, you will have to purchase them individually or update them individually using manual updates.
  • This system was implemented in our themes in November 2019. So, if you are using an older version of the theme which was released before that then first you need to follow MANUAL UPDATE, and then for next time you can update using ONE CLICK UPDATE.

If you get any problems with automatic updates please feel free to contact our support forum

B. MANUAL UPDATE

I. UPDATING THEME BY UPLOADING ZIP FILE

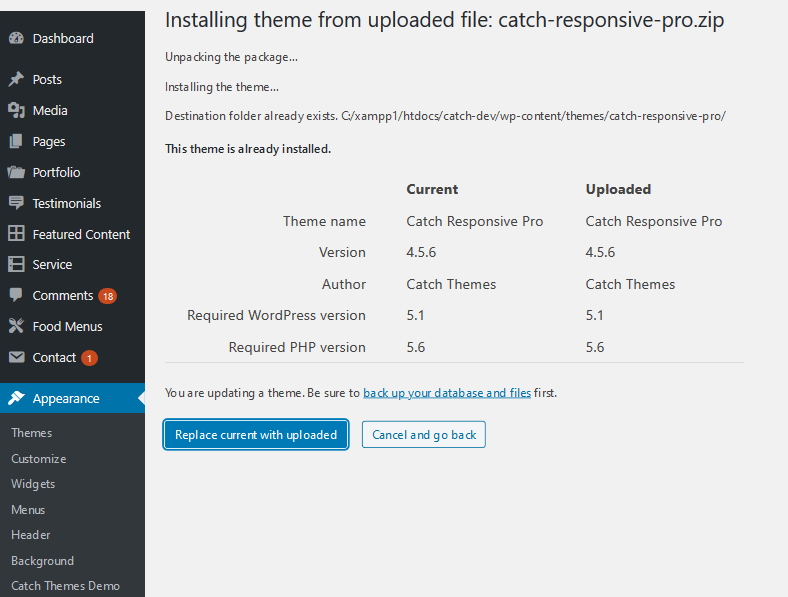
Starting in WordPress 5.5, it will be possible to update a plugin or theme by uploading a ZIP file. After uploading the ZIP file, a comparison table will be displayed to the user, detailing the differences between the uploaded ZIP and the version of the theme currently installed.

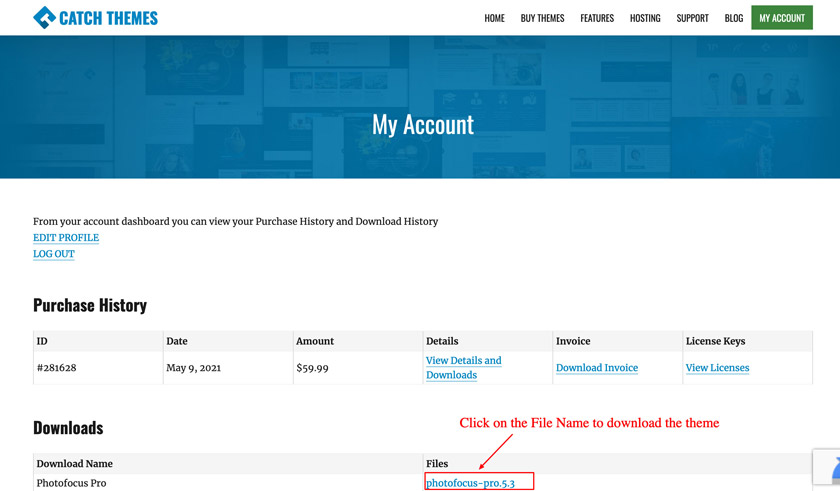
  1. Go to your member My-Account page and then on the Download Section, click on the File name to download your theme zip file
  2. Note: Some modern browser like Safari has an auto zip extractor and will extract the zip file as soon as you download the zip file. In this case, open Safari and go to “Safari => Preferences” and in the “General” tab, uncheck Open “safe” files after downloading. This will stop Safari from automatically unzipping the files and then you can download the zip file
  3. Log in to the WordPress Administration Panel
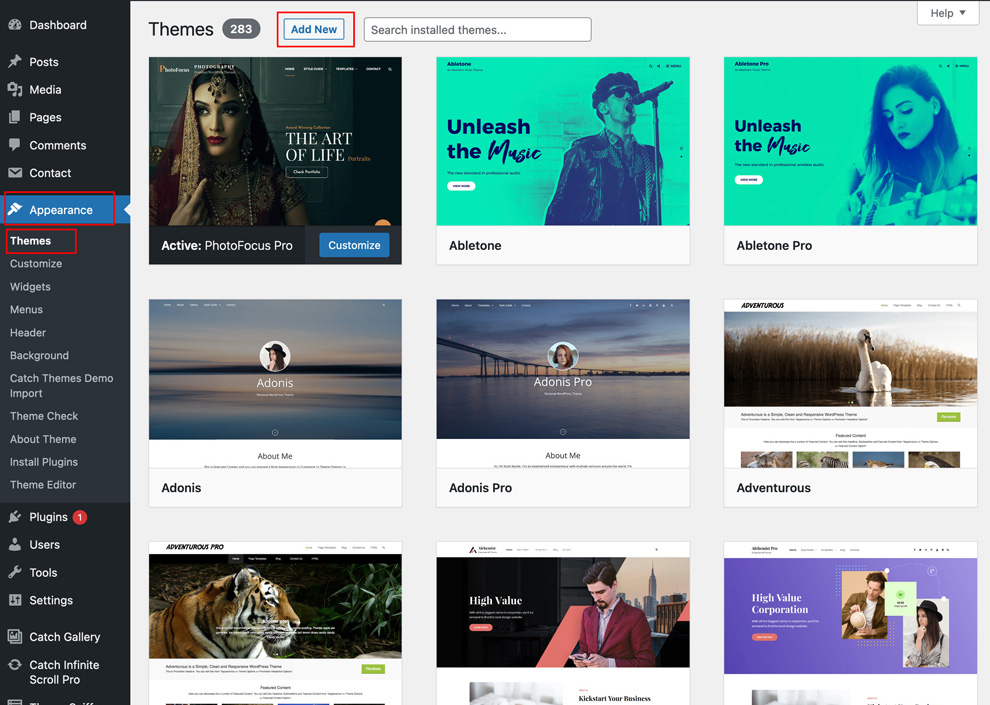
  4. Go to “Appearance => Themes => Add New”

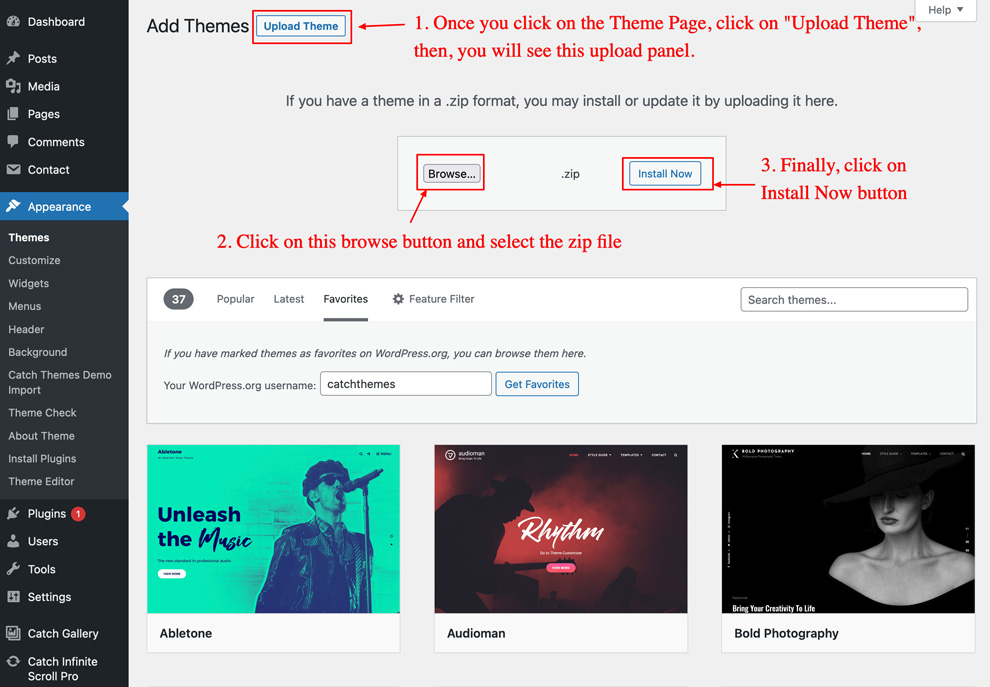
  5. Click on “Upload Theme” and Browse the downloaded .zip file from the desktop where you have it downloaded and click on “Install Now” button to start the installation process.

  6. Finally click on “Replace current with the uploaded

  7. If your WordPress version is less than 5.5 please use one of the option below:

    II. Updating Theme Using Catch Web Tools Plugin

    You can update Themes directly from the Administration Panel using Catch Web Tools plugin. Click here to read details about Catch Web Tools plugin. Let’s follow the steps below:

    • Login to your WordPress Administration Panel.
    • Go to “Plugins => Add New” and in the Search Bar, just search for “Catch Web Tools” and it will show you the “Catch Web Tools” plugin. From there, just click on the “Install Now” button and then “Activate” it.
    • Now, once the Catch Web Tools plugin has been activated. Go to “Catch Web Tools => Dashboard”, where you will see a list of modules that you can activate as per your need. But for updating you just need to activate the “Catch Updater” module. So, just click on the “Activate” button in Catch Updater box.
    • Installing “Catch Web Tools” plugin and activating the “Catch Updater” module is needed only one time. Once this is activated, you can skip these steps for next time and only follow the following steps.
    • Download your theme zip file from your Catch Themes member My-Account to your Desktop. Just for your note, some modern browser like Safari has auto zip extractor and will extract the zip file as soon as you download the zip file. In this case, open Safari and go to “Safari => Preferences” and in the “General” tab, uncheck Open “safe” files after downloading. This will stop Safari from automatically unzipping the files and then you can download the zip file.
    • Then go back to your WordPress Administration Panel and go to “Appearance => Themes => Add New”.
    • Click on “Upload Theme” and Browse the downloaded file theme zip file from the desktop where you have downloaded it.
    • Click “Install Now” and it will update to the latest version. It also creates a backup of your existing theme in Media Library

    You can go through the YouTube video for  Catch Updater

    iii. Updating Theme Using FTP

    To update the Theme through FTP, follow these basic steps:

    1. Download the latest version of theme from your Catch Themes member My-Account to your Desktop
    2. Unzip zip file to your Desktop
    3. Using an FTP client to access your host web server, go to /wp-content/themes/ and upload your new copy of Pro Theme which shall replace the old files

How to buy themes?

  • First click on the “BUY THEMES” button from our website Menu, you can see all our premium themes
  • Choose the theme you want to buy click on the “MORE INFO” button it comes after hovering in the theme, then click on “BUY NOW”
  • You will be redirected to the Checkout page, fill in your details in Billing Details
  • Then choose the means of payment mentthod as per your convenience, you can pay through Paypal, Credit Card (Stripe) or Amazon Pay
  • Then wait for our Sales Team, who will contact you to give you the access to download the them

How to install free WordPress theme?

Follow the following steps for installation if you are using free theme:

1. Installation Using the WordPress Administration Panel from WordPress.org

  • Log in to the WordPress Administration Panel
  • Go to “Appearance => Themes => Add New”

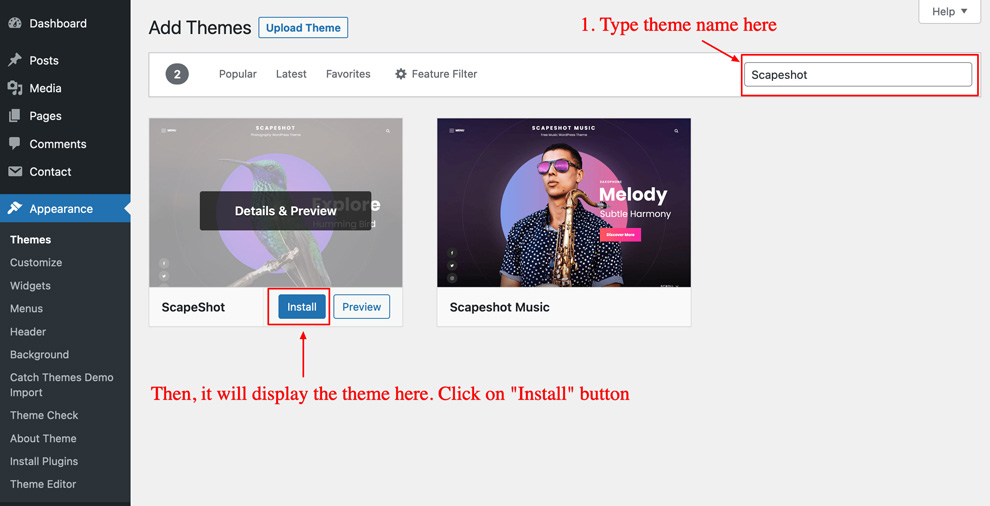
  • Type in the theme name on the “Search theme…” search box. For example, if you need to install the theme Scapeshot then type in “Scapeshot” as in the image below and Click on the “Install” button.

  • After the installation is completed, click on the “Activate” button to active the theme

2. Installation Using the WordPress Administration Panel from CatchThemes.com

  • Go to our free themes directory at https://catchthemes.com/themes/category/free/ and search for the best one you like
  • Once you go the theme that you want. Go to that theme page and then click on “Download” button to download theme zip file
  • Just for your note, some modern browser like Safari has auto zip extractor and will extract the zip file as soon as you download the zip file. In this case, open Safari and go to “Safari => Preferences” and in “General” tab, uncheck Open “safe” files after downloading. This will stop Safari from automatically unzipping the files and then you can download zip file
  • Log in to the WordPress Administration Panel
  • Go to “Appearance => Themes => Add New”

  • Click on “Upload Theme” and Browse the downloaded zip file from the desktop where you have it downloaded

  • Click on “Install Now” and then “Activate” to install the Theme

2. Manual Installation using FTP

To add a new Theme to your WordPress installation, follow these basic steps:

  • Go to our free themes directory at https://catchthemes.com/themes/category/free/ and search for the best one you like
  • Once you go the theme that you want. Go to that theme page and then click on “Download” button to download theme zip file
  • Unzip zip to your Desktop
  • Using an FTP client to access your host web server. Go to /wp-content/themes/ and make sure that you do not already have theme folder installed. If you do, then back it up and remove it from /wp-content/themes/ before uploading your copy of the theme you are going to install
  • Upload theme to /wp-content/themes/
  • Activate theme through “Appearance => Themes”, in your WordPress Dashboard

How to install plugins?

Installation Using Built in Plugin Installer

You can download plugin directly to your blog by using the Add New Themes option in the Plugins sub-menu.

  • Log in to the WordPress Administration Panel
  • Go to “Appearance => Themes =>Add New”
  • Type in the name of the WordPress Plugin or descriptive keyword, author, or tag in Search Plugins box or click a tag link below the screen.
  • Click on “Install Now” and then “Activate” to install the Theme


Installation Plugin manually

 Here are the steps for manual installation of plugin

  • Download your WordPress Plugin to your desktop
  • If downloaded as a zip archive, extract the Plugin folder to your desktop
  • With your FTP program, upload the Plugin folder to the wp-content/plugins folder in your WordPress directory online
  • Go to Plugins screen and find the newly uploaded Plugin in the list
  • Click Activate button to activate it


How to install Pro/Premium WordPress theme?

Installation Using the WordPress Administration Panel
Follow the following steps:

  1. After purchasing pro theme, go to your member My-Account page
  2. Then on the Download Section, click on the File name to download your theme zip file

  3. Note: Some modern browser like Safari has an auto zip extractor and will extract the zip file as soon as you download the zip file. In this case, open Safari and go to “Safari => Preferences” and in the “General” tab, uncheck Open “safe” files after downloading. This will stop Safari from automatically unzipping the files and then you can download the zip file
  4. Log in to the WordPress Administration Panel
  5. Go to “Appearance => Themes => Add New”

  6. Click on “Upload Theme” and Browse the downloaded .zip file from the desktop where you have it downloaded and click on “Install Now” button to start the installation process.

  7. After it’s installed, click on the “Activate” button to Active the theme
  8. Note: please Save and Active your License Key for one click update. Please don’t use Product Key in License key
  9. For this, go to “Appearance => About Theme”, and click on “License Tab”. If you don’t know the license key then you can log in to your My Account page and click on “View Details and Downloads” to view the license key
  10. Add License key under “License Key” section, click on the “Save Changes” and “Activate License” buttons

Note: You can check out the video about the upgrade process at https://youtu.be/gVvrbKJNfkE

Manual Installation using FTP
To add a new Theme to your WordPress installation, follow these basic steps:

  1. After purchasing pro theme, go to your member My-Account page
  2. Then on the Download Section, click on File name to download your theme zip file

  3. Using an FTP client to access your host web server. Go to /wp-content/themes/ and make sure that you do not already have a pro folder installed. If you do, then back it up and remove it from /wp-content/themes/ before uploading your copy of pro theme
  4. Upload Pro to /wp-content/themes/
  5. Activate  Pro theme through “Appearance => Themes”, in your WordPress Dashboard

How to update free theme to new version?

Theme Updates are very important for security and performance of our website, beside security new versions of themes can have new features or bug fixes too.
Updating free theme is very easy, if there is new version available you will get notified in your WordPress Dashboard, “Dashboard => Update” page.
Here are simple steps to update theme:

  • Go to “Appearance => Theme”
  • There you can find notification for new version of theme in top of theme screenshot itself “New Version available. Update Now”
  • Click on Update Now button, your theme will be updated to new version within few seconds

How can I switch back to the Classic Editor?

If you are not yet ready for the change and are uncomfortable with the Gutenberg Block Editor, you can switch to the Classic Editor. Simply install and activate the Classic Editor Plugin from the official WordPress Plugins Repo. Classic Editor Plugin –> https://wordpress.org/plugins/classic-editor/

How can I get the classic widgets back after updating to WordPress 5.8?

You’re likely to face changes in the Widgets setting screen after updating to WordPress 5.8. If you want to switch back to the former widget screen with classic widgets, you can install and activate the Classic Widget Plugin available on the official WordPress Plugins Repo. Get the Classic Widgets Plugin –> https://wordpress.org/plugins/classic-widgets/

How to activate license key?

  1. First, you need to get your license key. There are 2 places where you can find your license key
    • Purchase Receipt: Once you purchase the theme, you will receive the Purchase Receipt on your email which should contain the license key

    • My Account page: Once you are on the My Account page page, click on “View Details and Downloads

  2. Note: Please don’t use Product Key as License key
  3. After you find the license key, login to your site WordPress admin panel
  4. Go to “Appearance => About Theme” and click on “License Tab”

  5. Add License key under “License Key” section
  6. Click on “Save Changes” and finally click on “Activate License” buttons

How to move license key from Development Site to Live Site?

  1. First, log in to My Account page: Once you are on the My Account page, click on “View Licenses” and you will see your license details.
  2. Click on “Manage Sites” and you will see the site URL, then click on “Deactivate Site”.
  3. Then you can Install the license key on your Live Site.

Where can I find Themes Demo Data to Import

With our themes installed and activated, you can easily import your desired theme demo in just a few clicks.

A. Import Demo Content from GitHub

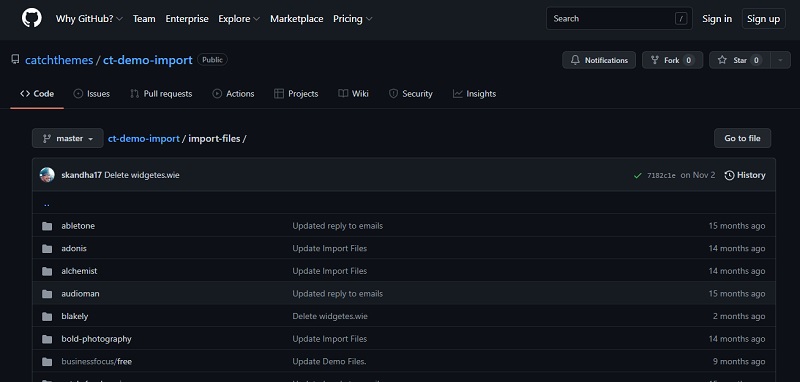
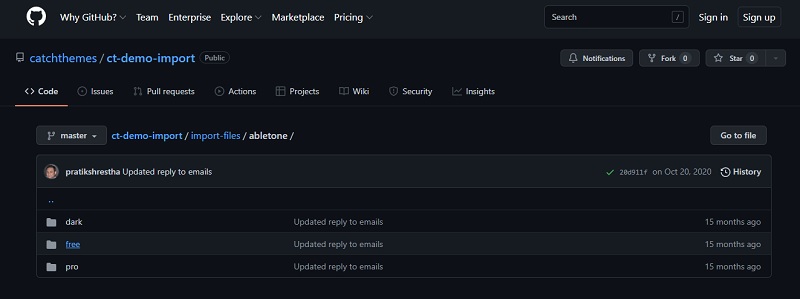
  • To import your theme demo data, visit this link: https://github.com/catchthemes/ct-demo-import/tree/master/import-files and click on the theme that you desire to import data of.

Import your desired theme demo data

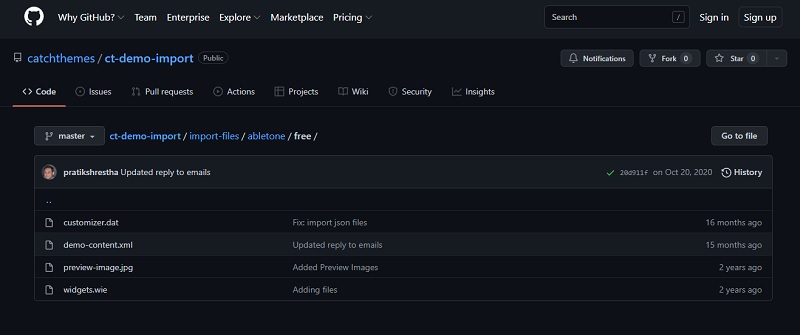
  • Then, choose the correct version of the theme and simply download the necessary demo files.

  • You need to download the .DAT, .XML, and .WIE files of the respective theme and upload them while importing your demo data.

A. Import Demo Content from Theme Page

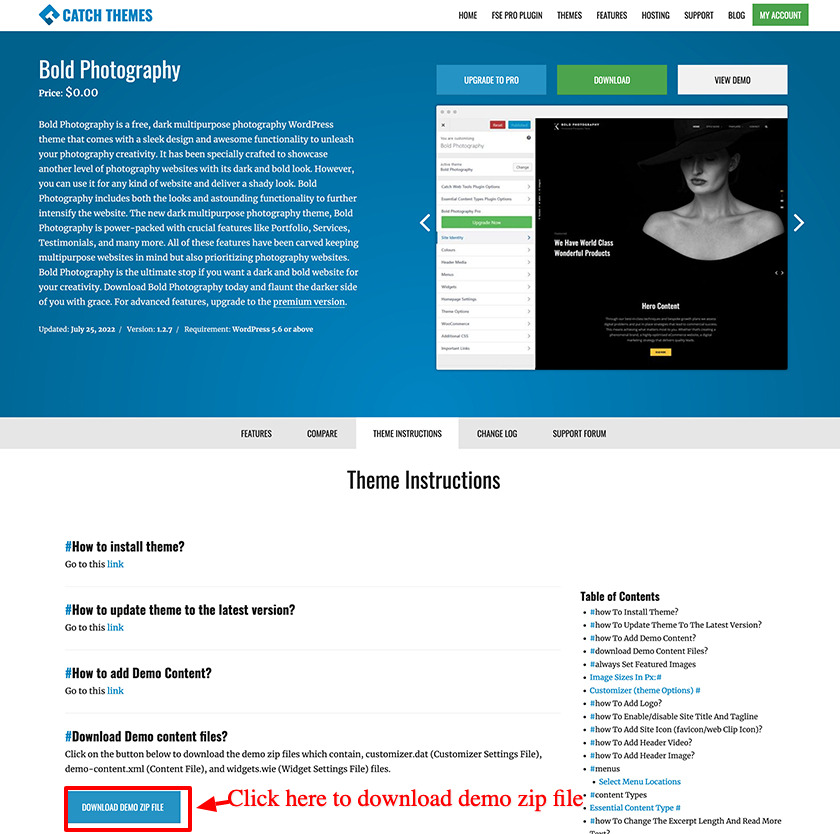
For easy access, we have started to add demo content zip files on the theme page under the Theme Instructions tab.

How to add Demo Content?

Our latest theme has a feature to add demo content in theme.
Here are the steps to add demo content:

  1. Install Catch Theme Demo Import Plugin
  2. After installation, go to “Plugins=> Catch Themes Demo Import” and click on Activate Button
  3. After activation you will find plugin in Appearance => Import Demo Data
  4. If the theme you’re currently using has a predefined demo file available, you will be presented with all the theme demos available. Click on the “Import” button and a pop-up will appear asking you to reconfirm that you’re ready to import the demo file. Click “Yes, import!”
  5. But if the theme you are using does not have any predefined import files, then you will be presented with three file upload inputs. The first one is required and you will have to upload a demo content XML file, for the actual demo import. The second one is to upload a WIE or JSON file; it is for widgets import. The third one is to choose a DAT file for importing the customizer settings. You can use our Catch Import Export plugin to export and import the customizer settings. The first file is mandatory and the rest of the two files are optional. Upload the files and click on the “Import Demo Data” button to import the demo.
  6. Finally, you will be notified by a message after the import is done

How to fix the Incompatible Archive Error?

This is WordPress 6.4.3 bug, with this changeset: https://core.trac.wordpress.org/changeset/57388. There is a bug fix and core trac ticket to follow about this issue here: https://core.trac.wordpress.org/ticket/60398. This issue will be solved in WordPress version 6.4.4 but before it’s release, you can simply install “Force using PclZip” plugin and then all the zip installation will work normally.

1. Download the plugin zip file from https://github.com/aaronjorbin/force-pclzip/archive/refs/tags/0.1.zip
2. Go to “Plugins => Add New => Upload Plugin”, then browse and locate the plugin zip file you have downloaded
3. Click on “Install Now” and then Activate the plugin.

After this, you can upload the theme zip file from “Appearance => Themes => Add New => Uploads”

Read More

4. Support

Can you help me customize my site?

We can’t provide extensive help in terms of modifications. If you are requesting modification help, which only requires us to publish 3 or 4 lines of code, we will be glad to assist you. However, if your query requires more than that amount of code to be published, we can only provide guidance and you would then need to hire a customizer. Customization questions are assigned lower priority than questions pertaining the installation, setup or usage of our products.

How to post queries in support forum?

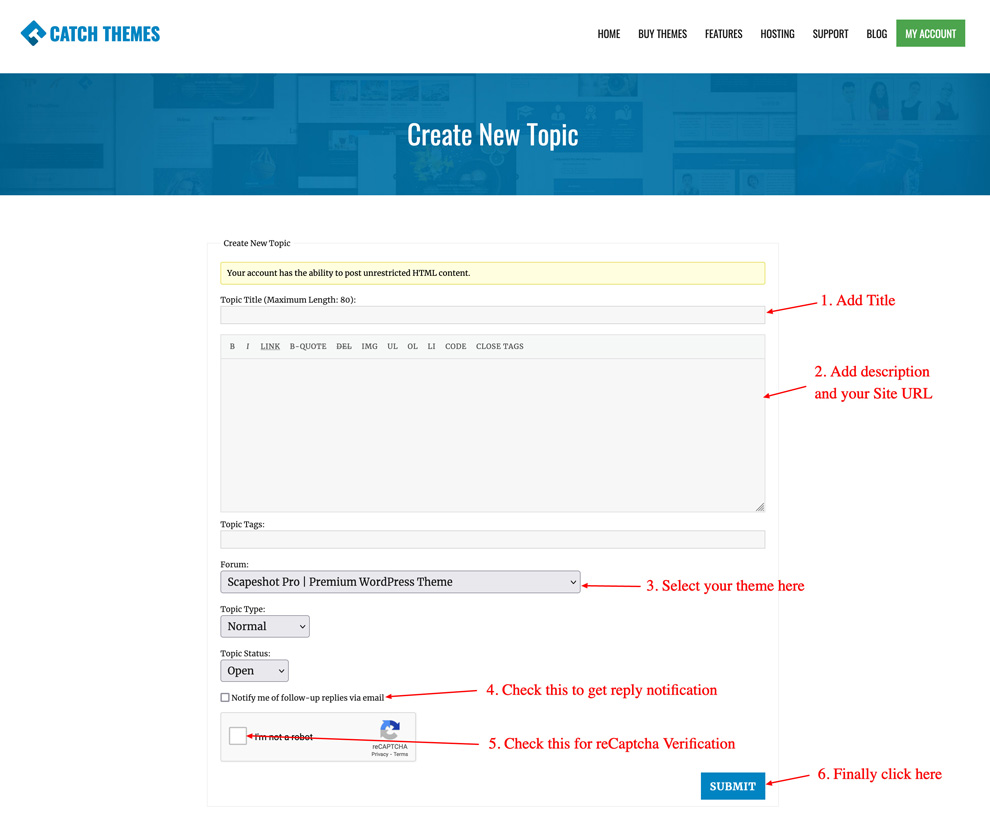
If you are having difficulties using our theme or you have any questions, you can post in our “Support Forum“, and a member of our team will get back to you shortly. Here are the simple steps to post your queries in our support forum:

  1. First, you need to login to your account at My Account
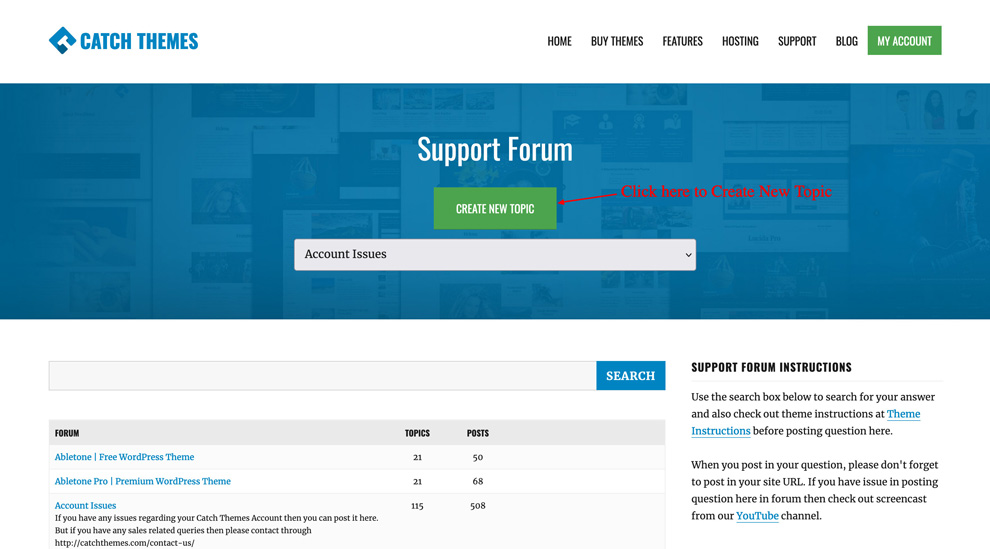
  2. Then, click on Support and Access Support Forum or go to Support Forum directly at https://catchthemes.com/support-forum/
  3. Click on the “Create New Topic” button at top of the page
  4. Then you can see support form where you can create new topic. Main import parts are:
    • Topic Title: Just add shor title about your issue
    • Description: You can type in details of the issues. Please be more descriptive and also add in your site URL so that we can insprect it and understand your issues
    • Forum: Here you need to select the Theme in which you have issue
    • Notify me of follow-up replies via email: You need to check this to get email notificaiton for all the replies
    • reCaptch: This is there to protect from spam. You need to check “I’m not a robot”
    • Submit button: Click on Submit button and your query will be posted in our form under Recent Topics

How to make screenshots?

A screenshot is an image that captures what appears on your computer screen.Screenshots can come in handy when trying to explain something to Support, or if you want to blog about something you’ve seen on your computer screen.

Here are the list of OS and steps how to take screenshots on them:

1.Windows:

  • Find the Print Screen key. (Depending on your keyboard, the key might be marked “PrtSc” or “Print Screen”)
  • When what you want to capture is displayed on the screen, press the Print Screen key
  • Open your favorite image editor (like Paint, GIMP, Photoshop, GIMPshop, Paintshop Pro, Irfanview, and others)
  • Create a new image, and press CTRL + V to paste the screenshot
  • Save your image as a JPG, GIF, or PNG file

If you are running Windows Vista or Windows 7 you also have the option of using the built in Snipping Tool. For more information on using the Snipping Tool please see this support doc.

2. MAC

Mac users have a couple of options for making a screenshot:

  • To save a screenshot of your entire screen, press CMD + Shift + 3
  • To select a particular area of the screen for your screenshot, press CMD + Shift + 4

Once you press one of the key combinations your screenshot will be saved to the Desktop.

  • Alternatively, go to Applications => Utilities => Grab, and choose the desired screenshot type from the Capture menu.

    3. Linux

  • Find the Print Screen key. (Depending on your keyboard, the key might be marked “PrtScn” or “Print Screen”)
  • Alternatively, go to Applications => Accessories => Take Screenshot
  • Save the image as a JPG, GIF, or PNG file.

4. Chrome book

Use the keyboard shortcuts below to take a screenshot.

Ctrl+ Take a screenshot of your current window
Ctrl+ Shift+ Take a partial screenshot by selecting the area you want to capture

Once you’ve finished taking a screenshot, you can then retrieve the image file in the Files app. To access the Files app, click the apps list button  in the launcher, then click the Files icon.

Support Forum

Here is the link for our official support forum: https://catchthemes.com/support-forum/

Theme instruction

Here is link for Theme Instructions: https://catchthemes.com/theme-instructions/

Change log

Here is link for Change logs: https://catchthemes.com/changelogs/

5. Site Identity

  • Go to “Appearance => Customize => Site Identity
  • To upload logo, click on “Select Logo” and if you already have logo then you can replace the exisiting logo by clicking on “Change logo”
  • Then you can either upload the image from your computer or select the existing image from your media library
  • Finally, click on “Publish”

Site Identity: How to disable Site Title and Tagline?

  • Go to “Appearance => Customize => Site Identity”
  • Uncheck “Disable Site Title and Tagline” and it will not display Site Title and Tagline
  • Finally, click on “Save & Publish

    Note: You can also edit the text of Site title and tagline

Site Identity: How to add Site Icon (Favicon/Web Clip Icon)?

  • Go to “Appearance => Customize => Site Identity => Site Icon”
  • Click on “Select Image” and then you can either upload the image from your computer or select the existing image from your media library
  • Finally, click on “Save & Publish”

6. Header Media

Header Media: How to add Header Image?

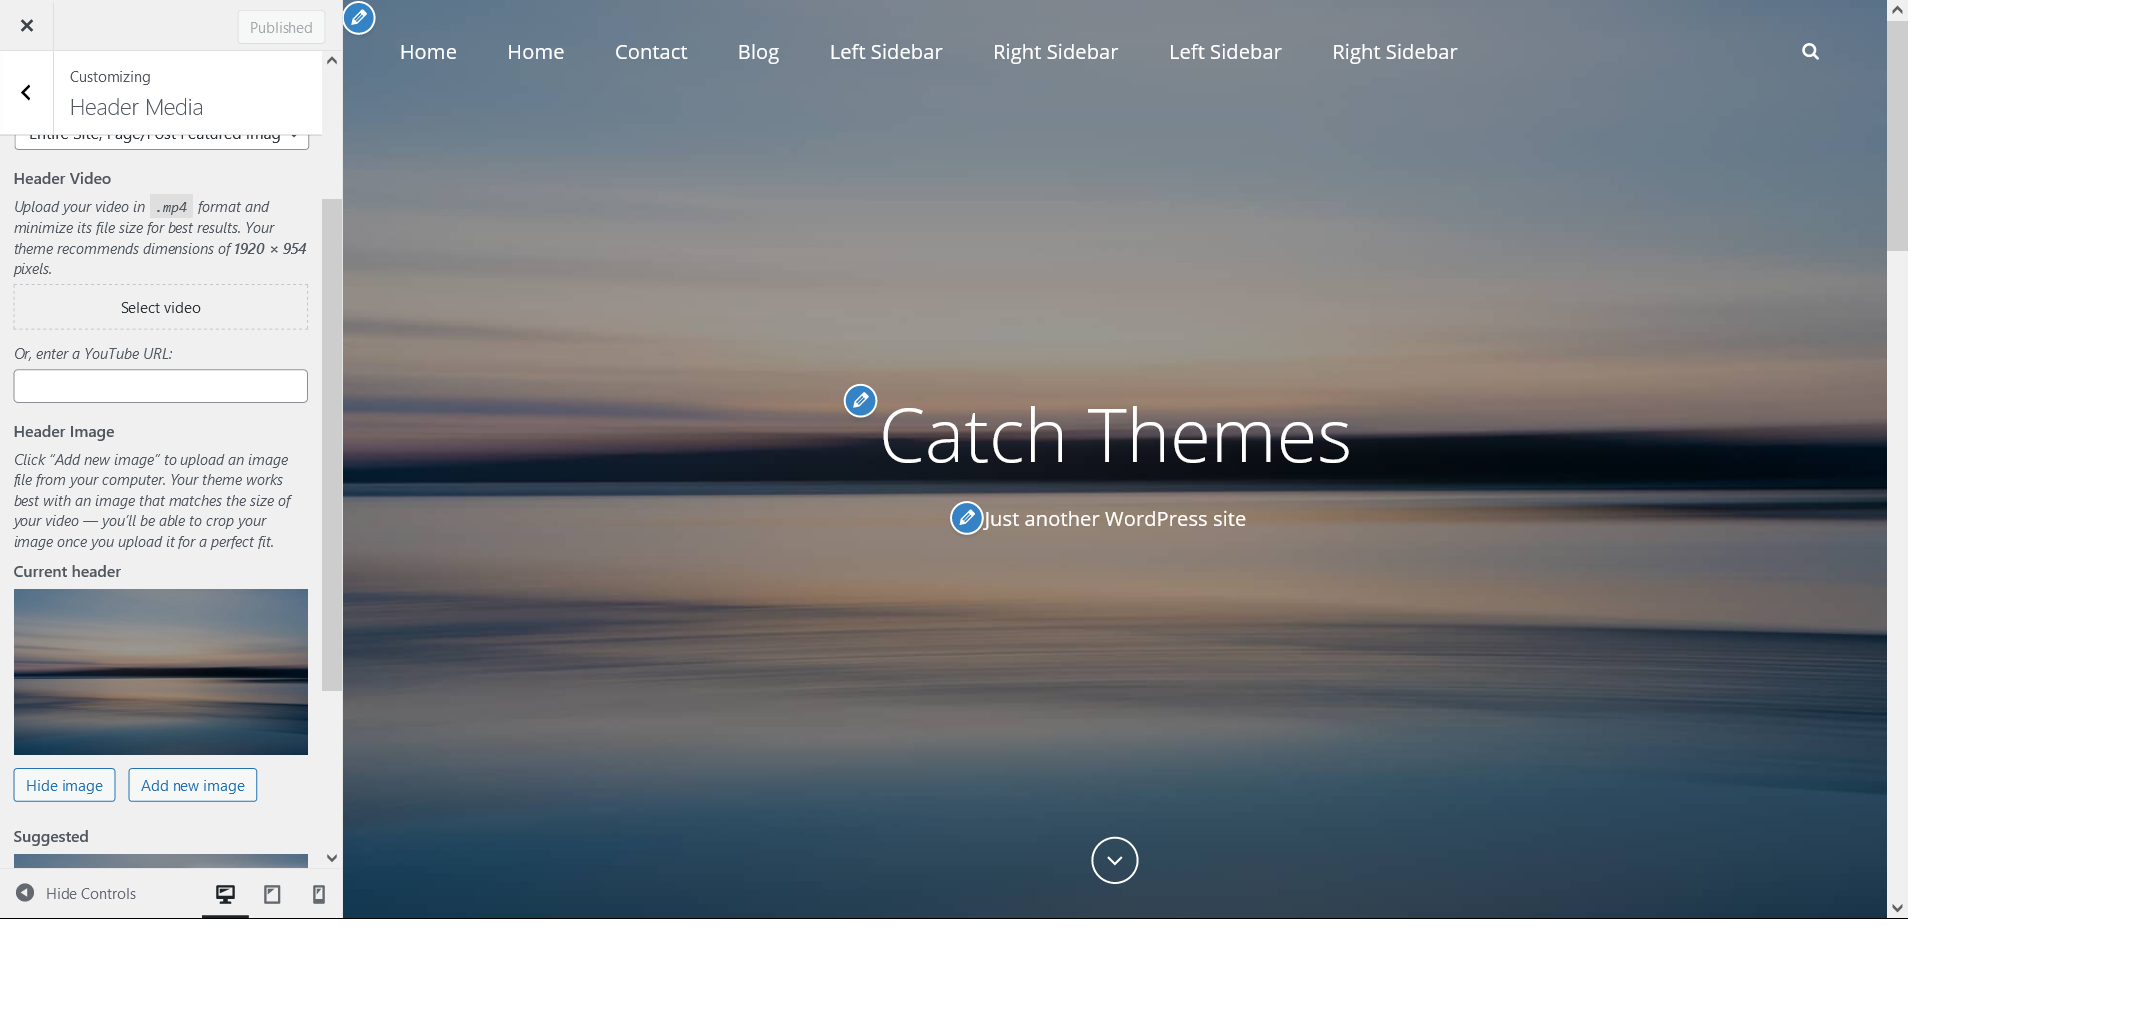
  • Go to “Appearance => Customize => Header Media”
  • To upload header image click on “Add New Image” or existing Header Image, then you can either upload the image from your computer or select the existing image from your media library
  • Finally, click on “Save & Publish”

Header Media: How to add Header Video?

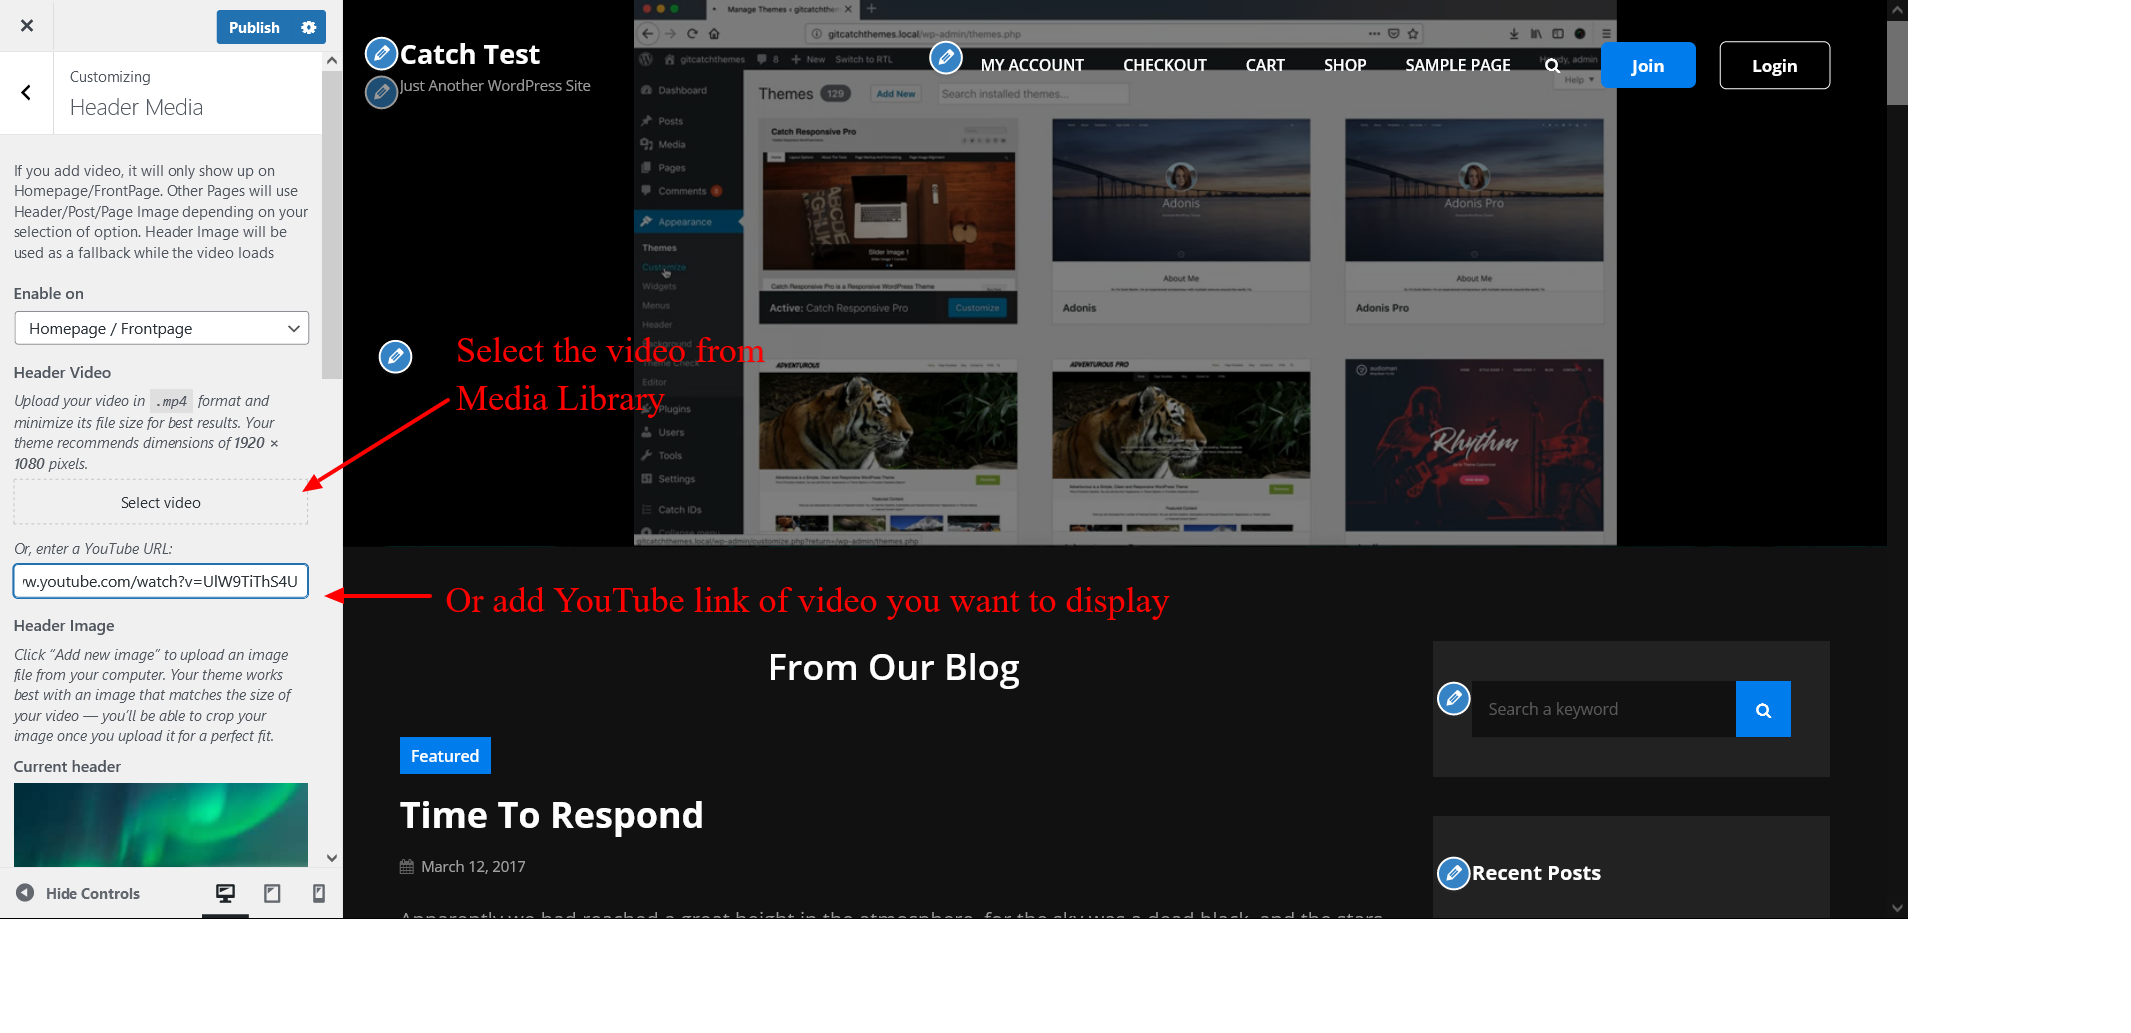
  1. Go to “Appearance => Customize => Header Media”
  2. To upload your video, click on “Select Video” option, then you can either upload the video from your computer or select the existing video from your media library, video must be less than 8mb
  3. To embed video from YouTube, you can enter YouTube URL
  4. Finally, click on “Save & Publish”

Header Image

Note: Screenshot is only for reference, options may differ according to used themes

Custom Header Image is different from site logo. It’s a large global image in the header to obtain a much more personalized look and feel. To add header image, you need to go to “Appearance => Customize => Header Media =>Header Image”. Here, you can add/change/hide Header Image, select option to Enable Featured Header Image on, Size and add in links and alt tag as per your website need.

Options to Enable Header Featured Image

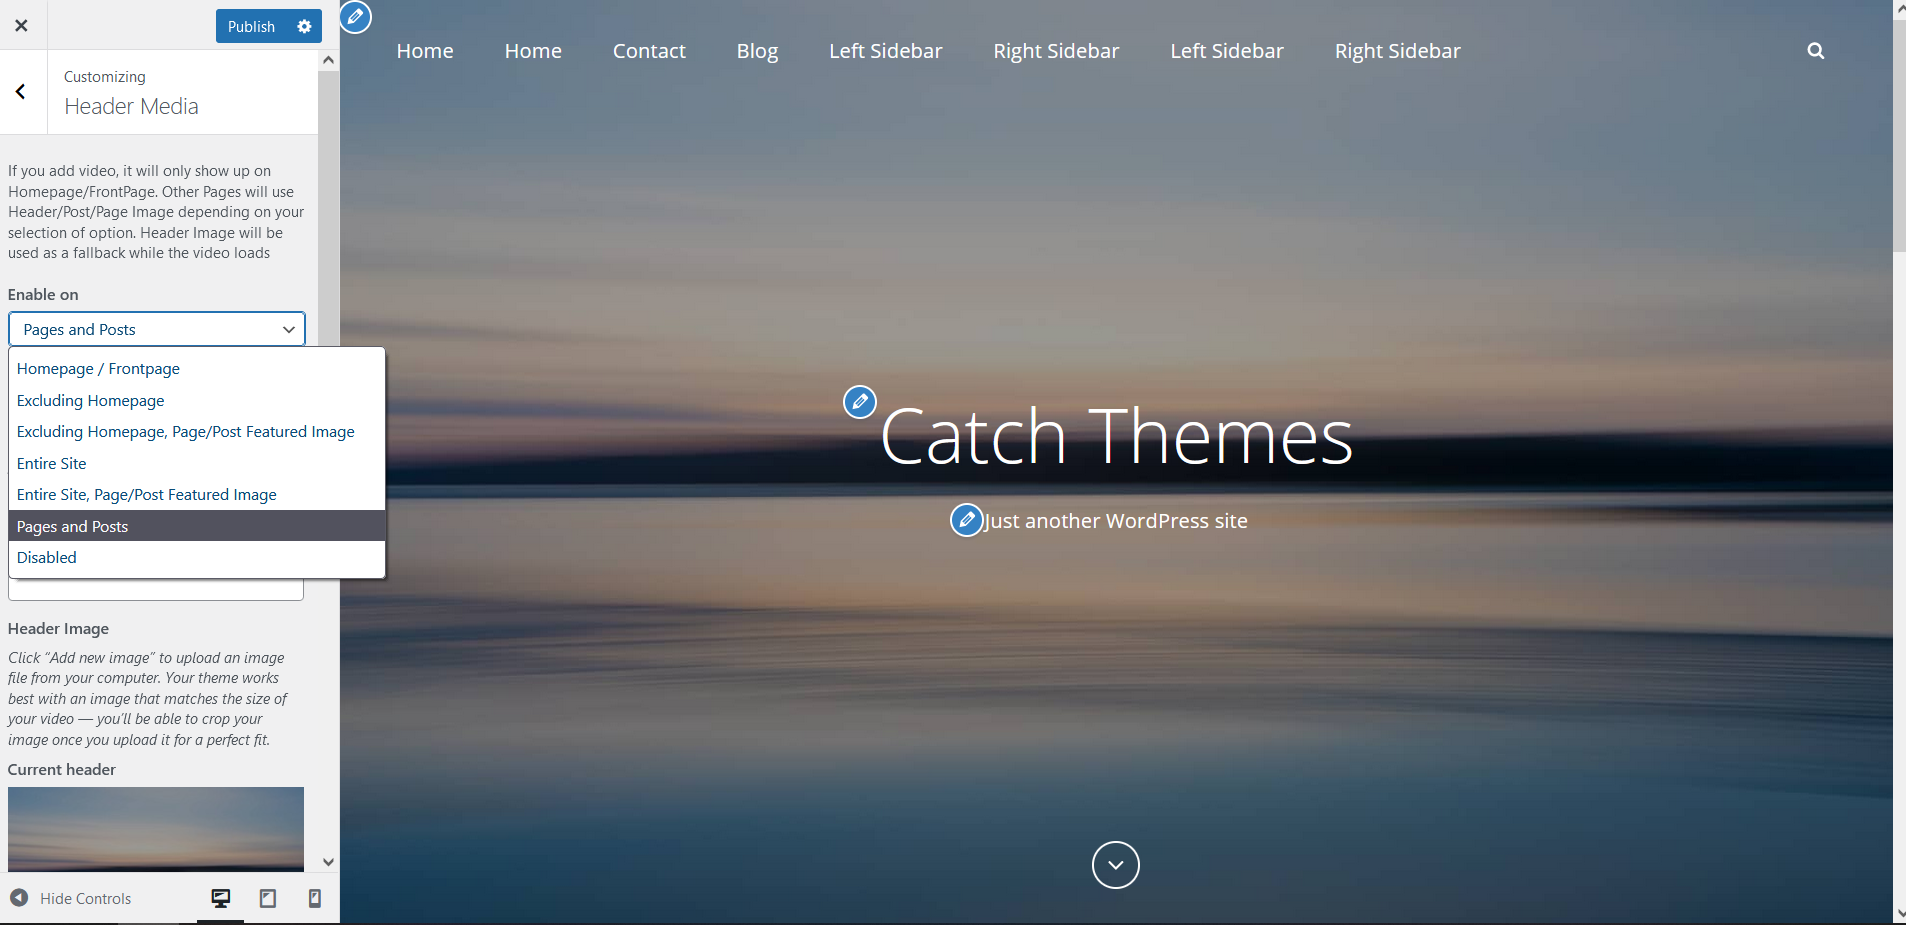
When you are in “Appearance => Customize => Header Media => Header Image”, you will see option “Enable Featured Header Image on”. There are 7 options, which gives you flexibility to add Header Image as per your website need.

Option 1: Homepage/Frontpage
This option will show header image in Homepage/Frontpage only.

Option 2: Excluding Homepage
This option will show header image throughout the site, excluding Homepage.

Option 3: Excluding Homepage, Page/Post Featured Image
This option will show header image throughout the site excluding Homepage. But in Page/Post, your header image will be replaced by Featured Image.

Option 4: Entire Site
This option will show header image throughout the site.

Option 5: Entire Site, Page/Post Featured Image
This option will show header image throughout the site. But in Page/Post, your header image will be replaced by Featured Image.

Option 6: Page and Post
This option will show Header Image in Page and Post only. But in Page/Post, your header image will be replaced by Featured Image.

Option 7: Disable
This option will disable Header Image completely.

This can be achieved through custom meta box by following the steps below:

  1. Go to Edit option of Page/Post you want to edit
  2. There you can find “Theme name” Options
  3. Then click on Header Featured Image Options
  4. You can select “Enable” option for Header Featured Image
  5. Finally Click on “Publish/Update”

7. Layout Options

Layout Options in Premium Themes

Note: Screenshot is only for reference, options may differ according to used themes

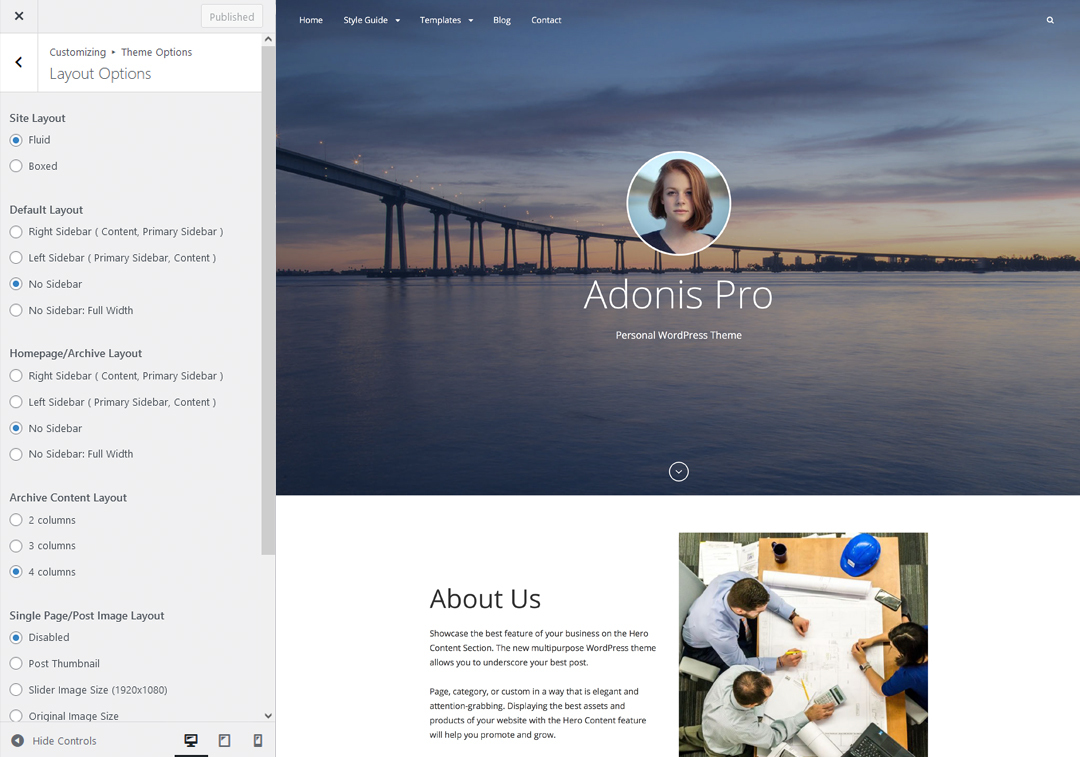
Our Premium themes has 2 Site Layout, 4 Default Layout, 4 Homepage/Archive Layout, 3 Archive Content Layout, 3 Single Page/Post Image and 4 Woocommerce Layout options image layout to choose from “Appearance => Customize => Theme Options => Layout Options”

Site Layout
Once you are in Layout Options, you can Check the option below “Site Layout” which will set your site layout.

Default Layout
Once you are in Layout Options, you can Check the box below “Default Layout Options” which will set our site layout. Further, you have the choice of selecting custom layout for individual pages and posts through “(Theme name) Options => Layout Options”, which you shall find below individual posts and pages, when you click on them for adding/editing

Archive Content Layout
Once you are in Layout Options, you can Check the box below “Archive Content Layout” which will set our layout for Archive Page. Further, you have the choice of selecting custom layout for individual pages and posts through “(Theme name) Options => Layout Options”, which you shall find below individual posts and pages, when you click on them for adding/editing

Single Page/Post Image Layout
Once you are in Layout Options, you can Check the box below “Single Page/Post Image Layout” which will set our posts/page image layout. Further, you have the choice of selecting Single Page/Post Image Layout for individual pages and posts through “(Theme name)Options => Single Page/Post Image Layout”, which you shall find below individual posts and pages, when you click on them for adding/editing.

WooCommerce Layout
Select layout for your WooCommerce pages. Option to choose from 4 Layout Options: i. Left Sidebar(Primary Sidebar,Content), ii. No Sidebar, iii. No Sidebar:Full Width and iv. Right Sidebar(Content,Primary Sidebar)

Layout Options in Free Themes

Note: Screenshot is only for reference, options may differ according to used themes

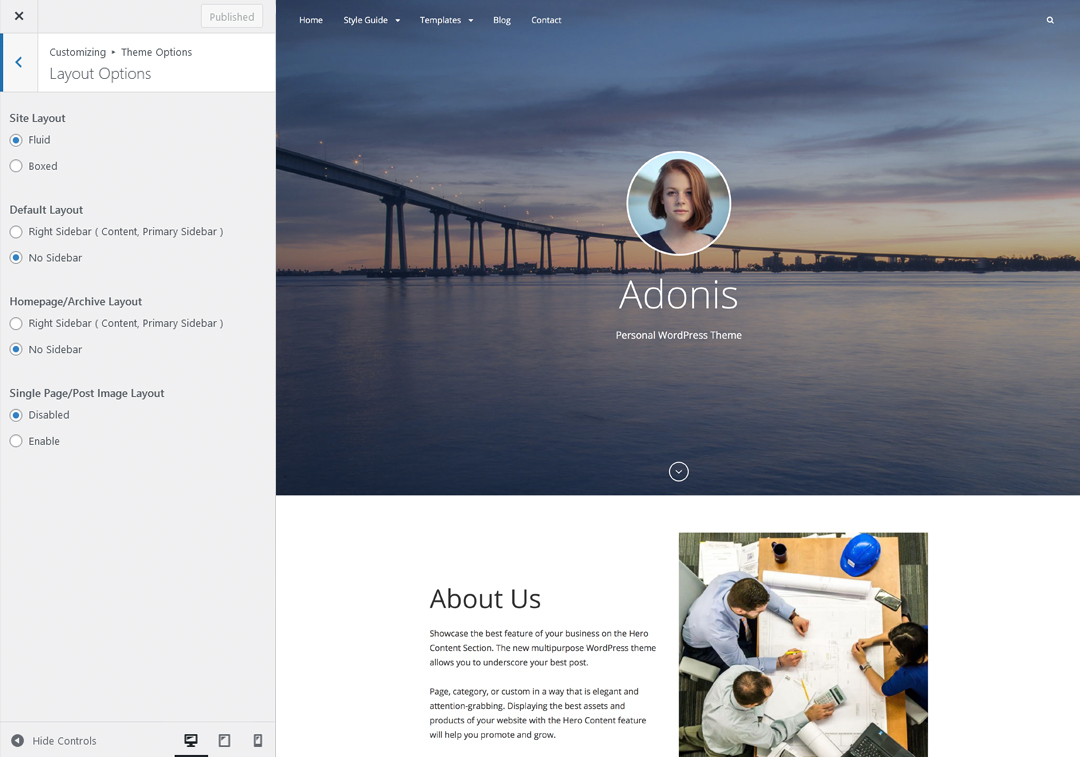
Most of our free theme has 2 Default Layout, 2 Homepage/Archive Layout and 2 Blog/Archive Layout, 2 SinglePage/ Post Image Layouts,  go to “Appearance => Customize => Theme Options => Layout Options”

Default Layout
Once you are in Layout Options, you can Check the box below “Default Layout Options” which will set our site layout. Further, you have the choice of selecting custom layout for individual pages and posts through “(Theme Name) Options => Layout Options”, which you shall find below individual posts and pages, when you click on them for adding/editing

Homepage/Archive Layout
Once you are in Layout Options, you can Check the box below “Homepage/Archive Layout Options” which will set layout for homepage/archive layout.

Blog/Archive Image Layout
Once you are in Layout Options, you can Check the box below “Blog/Archive Image Layout” which will set our Blog/Archive image layout. Further, you have the choice of selecting Blog/Archive Image Layout for individual pages and posts through “(Theme Options) Options => Blog/Archive Image Layout”, which you shall find below individual posts and pages, when you click on them for adding/editing.

Single Page/Post Image Layout
Once you are in Layout Options, you can Check the box below “Single Page/Post Image Layout” which will set our posts/page image layout. Further, you have the choice of selecting Single Page/Post Image Layout for individual pages and posts through “(Theme Name)Options => Single Page/Post Image Layout”, which you shall find below individual posts and pages, when you click on them for adding/editing.

How to select Single Page/Post Image Layout for individual Page/Post?

This can be achieved through custom meta box by following the steps below:

  1. Go to Add/Edit option of Page/Post
  2. There you can find “Theme Name” Options
  3. Then click on Single Page/Post Image Layout
  4. You can select desired option
  5. Finally Click on “Publish / Update”

8. General

What is an FTP client and how is it used?

File Transfer Protocol (FTP) is application software which is used to transfer files between a web server and a computer over a TCP-based network, such as the Internet. We recommend FileZilla, open-source software distributed free of charge under the terms of the GNU General Public License. Put simply, an FTP client is what most website owners use when they need to download, edit, and upload their website’s files. Most FTP connections require a host name, a username, and a password. These are most often supplied by web hosting providers in the following form:

Read more information about FTP Clients in the WordPress Codex.

How to Find the Post ID

Sometimes it is necessary to know the ID of a particular Post. For example, you need to know the post ID to add in the Featured Post Slider in our theme. To determine that ID, use one of these methods:

Look in your browser status bar for the ID:

  1. Go to Posts => All Posts in your WordPress Admin Panel
  2. Hover your mouse over the “item” you need the ID for.
  3. Look at the status bar (at the bottom of your browser) and then you will find at the end of the line something like “post=123”. In these cases, 123 is the Post ID.

Install a plugin:
Install and activate Catch ID’s Plugin which will display the ID in your Post admin panel.

How to change dimensions of images displayed on posts and pages?

Here are the steps to change dimensions of the images:

  • Go to Setting => Media from your WordPress dash board
  • There you can change dimensions of Thumbnail size, Medium size and Large size
  • Click on “Save Changes” to save the dimension

Regenerate Thumbnails

If you have just changed your theme then you need to regenerate image thumbnail for post published before activating this theme. You can simply install Regenerate Thumbnails Plugin.

Then Regenerate Thumbnails through “Tools => Regen. Thumbnails” in your WordPress Dashboard.

Widgets

WordPress Widgets add content and features to your Sidebars. Examples are the default widgets that come with WordPress; for Categories, Tag cloud, Search, etc.

You can add widgets to your widget area from two location

  1. Go to “Appearance => Widget”, then drag the widget to the widget area or you can click in the widget then list of widget area will appear, now you can choose desired widget area and click on “Add Widget”.
  2. Go to “Appearance => Customize => Widgets”, then you can find list of widget area. Click on the any widget area and you will see “Add a Widget” option by click on it you can find list of Widget which you can add to respected widget area.
  • To arrange the Widgets within the Sidebar, drag and drop the widgets in the order you want or click Reorder link and click up arrow and down allow of each widget and click “Done” after the arrange operation
  • To customize the Widget features, click the down arrow in the right to expand the Widget’s interface.
  • To remove the widget, click Remove from Widget’s interface in above step

How to translate your theme using WPML?

Basic Setup

Our Pro themes are WPML-compatible, that means all the text in this theme can be translated to the language of your choice. To begin, be sure you have the WPML Plugin installed and activated, along with WPML String Translation plugin.

  1. For First Time Setup
    To set up WPML for the first time, follow their Getting Started Guide.
    To begin translating, select WPML (in the Dashboard menu) => String Translation. You should see a list of the strings in the theme, with blue translation links to the right. Click these links to reveal the list of languages you use on your blog and the associated translations. Go to this link for more details.
  2. Translating your content
    To translate your posts, pages and custom data types, go to this link

How to add Featured Image in Post/Page?

  1. Open the editor of the post/page where you want to display image, and locate the Featured Image module in the bottom right corner under Page Attributes. Click on Set Featured Image.
  2. Then you can either upload the image from your computer or select the existing image from your media library and click on Set Featured Image.Click to view screenshot
  3. For more detail, click here to watch video Screencast

Webmaster Tools

We have moved Webmaster Tools to our plugin Catch Web Tools for better management and data access. So, just install Catch Web Tools plugin and activate “Webmaster Tools” from Catch Web Tools plugin dashboard. You can verify your site on Google, Yahoo and Bing by adding in the IDs in the respective boxes through “Catch Web Tools => Webmaster Tools” in your WordPress Dashboard. Further, you can add in the Google Analytic. Adding scripts in Header and Footer does not require you to edit codes through Webmaster Tools.

How to Insert Site Verification IDs?

  1. Go to “Catch Web Tools => Webmaster Tools => Site Verification” in your WordPress Dashboard
  2. Enter the Site Verification ID (Google, Yahoo, Bing) wherever you wish to verify your site
  3. Click on Save Changes button

How to Insert Analytics / Other Scripts in Header/Footer?

  1. Go to “Catch Web Tools => Webmaster Tools => Header and Footer Scripts” in your WordPress Dashboard
  2. Here you can add in various scripts like, Google, Facebook etc.
  3. Enter the script in upper text area, for text you want to load on Header
  4. Enter the script in lower text area, for text you want to load on Footer
  5. Click on Save Changes button

How to create custom menu?

  • Go to “Appearance => Menu” from your WordPress Dashboard
  • Click on “create a new menu”, give menu name and click on “Create Menu”
  • On your left side you can see option for Pages, Links and Category from there add items to your custom menu(pages, categories or links) you want to display in your custom menu and click on “Add Menu”
  • Finally click on “Save Menu” button
  • To assign menu in position then click on “Manage Location”, assign the position of menu you want to display from drop down option and click on “Save Changes”
  • Learn more at DevotePress

9. Customization

How do I customize my theme?

All our themes comes with Theme Options page which will allow you to easily customize your website with clicks. So, now you All our themes come with Theme Options page which will allow you to easily customize your website with clicks. So, now you no longer need to be a designer or a programmer to build custom websites. Theme Options allow you to toggle on and off features, adjust layouts, change colors, fonts, logo, favicon, background, add social links and custom CSS. If you want to customize our themes beyond those options available to you on the theme options page, you will need to either use your php, html, css, and javascript skills or hire a customizer who will work for you. We are unable to teach you how to code, but we are happy to point you to resources so you can learn.

Resources for learning these skills:

I downloaded a theme from Catch Themes. What do I do next?

You can view theme installation instructions on page.

It is always recommended to add featured image in your Posts and Pages. Our themes are highly dependent on Featured Images.

Setting Featured Image
1. Open the editor of the post/page where you want to display image, and locate the Featured Image module in the bottom right corner under Page Attributes. Click on Choose a Featured Image.
featured-image-button
2. Then you can either upload the image from your computer or select the existing image from your media library and click on Set Featured Image.

For more Click Here

Menus

You assign it either from “Appearance => Customize => Menus => Manage Location” or from “Appearance => Menus => Manage Location”.

Static Front Page

By default, WordPress uses the first option by showing your most recent posts on the front page. Many WordPress users want a static front page or splash page as the front page instead.

This “static front page” look is common for users desiring static or welcoming information on the front page of the site. Before you can set a static front page for you site, you have to create and publish the page that you would like to use as the static front page.

You can name it whatever you want and select your desired page template or just leave it as default. The static front page setting can be configured in the Settings => Reading screen. OR Cutomize=> Static Front Page

Additional CSS

You can add your custom CSS that will overwrite the theme CSS for further design customization through “Appearance => Customize => Additional CSS”, in your WordPress Dashboard.

Note: If you are doing heavy customization and adding lot of custom css then we recommended to build Child Theme and add it in your child theme style.css file. https://catchthemes.com/blog/create-child-theme-wordpress/

Font family

Font Family option is available in Pro themes only.

  • Go to ” Customize => Theme Options => Font Family Options
  • Select desired font below each given section
  • Finally, click on “Save & Publish”

How to Set Certain Categories to Display in Homepage/Frontpage?

  • Go to “Appearance => Customize => Theme Options => Homepage/Frontpage Options”
  • Then select the category you want, and you may select multiple categories by holding down the CTRL key(windows)/Command Key(Mac)
  • Finally, click on “Save & Publish”

How to change Pagination Options?

  • Go to “Appearance => Customize => Theme Options => Pagination Options”
  • Under Pagination Type, select desired option
  • Finally, click on “Save & Publish”

How to enable/disable update notifications?

This option is available in premium themes only.

  • Go to “Appearance => Customize => Theme Options => Update Notifier”
  • Check option “Check to disable update notifications” to disable and uncheck to enable
  • Finally, click on “Save & Publish”

How to enable/disable Zoom, Lightbox and Slider effects for WooCommerce Product Gallery?

This option is available in premium themes only.
Select layout for your WooCommerce pages. Option to choose from 4 Layout Options: There are option to choose from i. Right Sidebar (Content, Primary Sidebar), ii. LeftSidebar (Primary Sidebar, Content), iii. No Sidebar and iv.No Sidebar (Full Width)

  • Go to “Appearance => Customize => Theme Options => WooCommerce Options”
  • Check option “Check to disable Product Gallery Zoom”, to disable Product Gallery Zoom, for best result when zoom is enabled use product image of ratio 1:1
  • Check option “Check to disable Product Gallery Lightbox”, to disable Product Gallery Lightbox
  • Check option “Check to disable Product Gallery Slider”, to disable Product Gallery Slider
  • Finally, click on “Save & Publish”

Colors

This option is available in Premium Themes only.

  1. Go to “Appearance => Customize => Colors”
  2. Under Base Color Scheme, select the desired color scheme
  3. Then, choose different color for different sections as per your need
  4. Finally, click on “Save & Publish”
  1. Go to “Appearance => Customize => Theme Options => Social Links”
  2. Add links for social media under the mentioned box
  3. You can find further option to change social icon size under “Social Icon Size(px)”
  4. Finally, click on “Save & Publish”

10. Theme Options

Theme Options: Breadcrumb

  • Go to “Appearance => Customize => Theme Options => Breadcrumb”
  • Check option, “Check to enable Breadcrumb” to enable and uncheck to disable
  • Finally, click on “Save & Publish”

Comment options

  • Go to “Appearance => Customize => Theme Options => Comment Options”
  • Under “Comment Option” select desired option from Use WordPress setting, Disable in Pages and Disable Completely
  • To disable website field, check option “Check to Disable Website Field”
  • Finally, click on “Save & Publish

Theme Options: Excerpt options

  • Go to “Appearance => Customize => Theme Options => Excerpt Options”
  • Type in the Excerpt Length as in, the number of words, and Read More Text
  • Finally, click on “Save & Publish”

Featured slider allows you to highlight Page/Post/Custom or Category in slider. Page Slider option is available in free theme for other options like Post, Custom and Category options you need to upgrade your theme to Pro Version. Following are the steps to add featured slider in theme:

  • Go to “Customize => Theme Options => Featured Slider” from your WordPress Dashboard
  • Firstly to enable slider, select “Homepage/Frontpage or Entire Site” option under “Enable on” choose Entire Site or Homepage/FrontPage
  • Under “Select Slider Type”, Select Slider Type as “Post, Page , Category or Custom”
  • If you select slider as Post as slider, choose post under Post #1, Post #2 and so on
  • If you select slider as Page as slider, choose page under Page #1, Page #2 and so on
  • If you select slider as Category as slider, choose category under Select Categories
  • If you select slider as Custom, add title, link and Content for the slider
  • Finally, click on “Save & Publish”

How to change Transition Effect, Transition Delay and Transition Length on Slider?

  • Make sure featured slider is enabled
  • Go to Customize => Theme Options => Featured Slider” from your WordPress Dashboard
  • To change Transition Effect, select option under “Transition Effect
  • To change Transition Delay, change number of second(s) under “Transition Delay” as per your need
  • To change Transition Length, change number of second(s) under “Transition Length” as per your need
  • Finally, click on “Save & Publish”

How to change number of slides in featured slider?

  • Make sure featured slider is enabled
  • Go to Customize => Theme Options => Featured Slider” from your WordPress Dashboard
  • Under “No of Slides”, select the number slides as per your need
  • Finally, click on “Save & Publish”

Image Loader#

  1. Go to “Appearance => Customize => Theme Options => Featured Slider” from your WordPress Dashboard
  2. Under “Image Loader”, select “True, False or Wait” as per your need
  3. Finally, click on “Save & Publish”

Note:
True: Fixes the height overlap issue. Slideshow will start as soon as two slider are available. Slide may display in random, as image is fetch.
Wait: Fixes the height overlap issue. Slideshow will start only after all images are available.

How to change number of slides?#

  1. Make sure featured slider is enabled
  2. Go to “Appearance => Customize => Theme Options => Featured Slider” from your WordPress Dashboard
  3. Under “No of Slides”, select the number slides as per your need
  4. Finally, click on “Save & Publish”

Note: To see changes in No of Slides please refresh the customizer page

There are four Featured Content types to choose from in Pro themes: Post, Page, Category and Custom.

  • Go to “Customize => Theme Options => Featured Content” from your WordPress Dashboard
  • To enable featured content, select “Homepage/Frontpage or Entire Site” option under “Enable on”
  • Under “Select Content Type”, you need to select “Post, Page, Category, Custom” as per your need
  • If you select Post as content type, choose Post under Post 1, Post 2 and so on
  • If you select Page as content type, choose Page under Featured Page 1, Featured Page 2 and so on
  • If you select Category as content type, choose categories under Featured Select Categories
  • If you select Custom as content type, then, under Featured Content #1, Featured Content #2 and so on add “Image”, “Link”, “Title” and “Content” as per your need
  • Finally, click on “Save & Publish”

Note: Further option to change Featured Content Title(Headline), Featured Content Archive Content(Subheadline) and Select Featured Content Layout(Layout).


Hero Content

Our Pro theme supports 4 Hero Content types they are: 1. Post, 2. Page, 3. Category and 4. Custom. Free theme supports “Page” as Hero Content

  • Go to Appearance => Customize => Theme Options => Hero Content Options
  • To enable Hero Content, select option Entire Site or Homepage/Frontpage under “Enable on”
  • Under “Type”, you need to select “Post, Page, Category or Custom” as per your need
  • If you select Post as Hero content, choose Post under Post 1, Post 2 and so on
  • If you select Page as Hero content, choose Page under Featured Page 1, Featured Page 2 and so on
  • If you select Category as Hero content, choose categories under Featured Select Categories
  • If you select Custom as Hero content, then, under Featured Content #1, Featured Content #2 and so on add “Title”, “Content” and “Image Link”and as per your need
  • Finally, click on “Save & Publish”

How to enable/disable Scroll up feature?

  • Go to “Appearance => Customize => Theme Options => Scrollup Options”
  • Check option “Check to disable Scroll Up”
  • Finally, click on “Save & Publish”

How to edit search option text?

  1. Go to “Appearance => Customize => Theme Options => Search Option
  2. Under “Search Text” edit the search text as desired
  3. Finally, click on “Save & Publish”

WooCommerce Layout and Sidebars

Transform your WordPress website into a thoroughbred eCommerce store. Delivering enterprise-level quality and features, backed by a name you can trust. Say “hello” to the WooCommerce eCommerce plugin.

WooCommerce is a powerful, extendable eCommerce plugin that helps you sell anything.

How to change layout for WooCommerce pages?

  1. Go to “Appearance => Customize => Theme Options => Layout Options”
  2. Under “WooCommerce Layout” select the desired option
  3. Finally, click on “Save & Publish”

How to add different widgets to WooCommerce pages?

  1. Go to “Appearance => Widgets”
  2. Add Widgets to “WooCommerce Primary Sidebar”
  3. Finally, click on “Save” on each added widget

Portfolio

How to enable Portfolio? #

  1. Go to Appearance => Customize => Theme Options => Portfolio
  2. To enable Portfolio, select option Entire Site or Homepage/Frontpage under “Enable Portfolio on”
  3. Under “Select Type”, you need to select “Post, Page, Category or Image” as per your need
  4. Finally, click on “Save & Publish”

How to select portfolio layout?#

  1. Make sure Portfolio is enabled
  2. Go to “Appearance => Customize => Theme Options => Portfolio” from your WordPress Dashboard
  3. Under “Select Portfolio Layout”, select portfolio layout
  4. Finally, click on “Save & Publish”

How to edit or remove Headline and Sub-headline for Portfolio?#

  1. Make sure portfolio is enabled
  2. Go to “Appearance => Customize => Theme Options => Portfolio” from your WordPress Dashboard
  3. Under “Headline for Portfolio”,you can change the text as needed or Leave field empty if you want to remove Headline
  4. Under “Sub-headline for Portfolio”, you can change the text as needed or Leave field empty if you want to remove Headline
  5. Finally, click on “Save & Publish”

How to change number of portfolio?#

  1. Make sure portfolio is enabled
  2. Go to “Appearance => Customize => Theme Options =>Portfolio” from your WordPress Dashboard
  3. Under “No of Portfolio”, select the number portfolio as per your need
  4. Finally, click on “Save & Publish”

Note: To see changes in No of Portfolio please refresh the customizer page.

Post (Portfolio)#

Select Post Portfolio to highlight your posts as Portfolio. First you need to create post and add featured image to you post.

  1. Make sure portfolio is enabled
  2. Under “Type”, you need to select “Post Content”
  3. Then, add in Post ID in Post 1, Post 2 and so on
  4. Finally, click on “Save & Publish”

Note: Post Portfolio is determined according to Number of Portfolio.

Page (Portfolio)#

Select Page Portfolio to highlight your page as Portfolio.

  1. Make sure portfolio is enabled
  2. Under “Page 1, Page 2, Page 3 and so on”, select desired page to show
  3. Finally, click on “Save & Publish”

Note: Page Portfolio is determined according to Number of Portfolio.

Category (Portfolio)#

Category Portfolio is created to highlight your posts from specific categories in portfolio. So, first you need to create a Post, add Featured Image to the post and assign posts to specific category.

  1. Make sure portfolio is enabled
  2. Then select the category you want, and you may select multiple categories by holding down the CTRL key(windows)/Command Key(Mac)
  3. Finally, click on “Save & Publish”

Image Portfolio#

Image Portfolio is used to highlight the custom image, link and other content as Portfolio.

  1. Make sure portfolio is enabled
  2. Under “Portfolio #1, Portfolio #2 and so on”, select desired image, link, title and content
  3. Finally, click on “Save & Publish”

Note: Image Portfolio is determined according to Number of Portfolio.

Promotional Headline

How to enable promotion headline and choose the type?

  1. Go to “Appearance => Customize => Theme Options => Promotion Headline”
  2. Enable Promotion Headline by click option under “Enable On”, entire site, homepage/frontpage, About Page template or Homepage
  3. Then under “Type” choose Post, Page, Category or Image as per your need
  4. If you choose “Type” as Post, choose post under Post on to display your post as Promotion Headline
  5. If you choose “Type” as Page, choose page under Page display your page as Promotion Headline
  6. If you choose “Type” as Category, choose category under “Categories” drop down to display your categories as Promotion Headline
  7. If you choose “Type” as Image, choose Image, edit Link, Title, Content, Button Text, Button Link under respective headings to display your custom data as Promotion Headline
  8. Finally, click on “Save & Publish”

How to add Services in theme?

Follow the following steps:

  1. First Go to Appearance => Customize => Theme Options => Service
  2. Under Enable on : you can select Homepage / Frontpage, entire site or completely disable it.
  3. Under Select Content Type: You can select form Post, Page, Category, or Custom post type (requires essential content types plugin).
  4. Under Service Archive Title: Provide the name for the service.
  5. Under Service Archive Content : Additional details about the service.
  6. If you select content type as “Page”, choose the page under Page1, Page2 and so on as your service
  7. If you select content type as “Post”, choose the post under Post 1, Post 2 and so on as your service
  8. If you select content type as “Category”, choose the categories under “Select Categories” as your service
  9. If you select content type as “Image” then add Image, Link, Title, Content, More Button Text in respective headings
  10. Finally, click on “Save & Publish”

Note: To change number of services to be shown change option from No of items

  1. Make sure Services is enabled
  2. Go to “Appearance => Customize => Theme Options => Services” from your WordPress Dashboard
  3. Under “Select Items Layout”, you can select your desired layout from
  4. Finally, click on “Save & Publish”

How to add Testimonials in theme?

Our Premium themes support Page, Post, Category, Custom and Custom Post Types as Testimonials.

Following are the instructions to set up testimonials in your theme:

How to enable Testimonial? #

  1. Go to “Appearance => Customize => Theme Options => Testimonial”
  2. Under “Enable Testimonial on” select Homepage/Frontpage or Entire Site
  3. Then under “Select Type” select “Post”, “Jetpack Testimonial Custom Post Type”, “Page”, “Category” or “Image”
  4. Finally, click on “Save & Publish”

How to select layout for testimonial? #

  1. Go to “Appearance => Customize => Theme Options => Testimonial”
  2. Make sure Testimonial option is enabled
  3. Then under “Select Testimonial Layout” select the desired columns you want to display in testimonial “1 column or 2 columns”
  4. Finally, click on “Save & Publish”

How to change Headline and Sub-headline for Testimonial?#

  1. Make sure testimonial option is enabled
  2. Go to “Appearance => Customize => Theme Options => Testimonial” from your WordPress Dashboard
  3. Under “Headline”, you can add desired text or leave it empty if you don’t want to disable fields”
  4. Under “Sub-headline”, you can add desired text or leave it empty if you don’t want to disable fields”
  5. Finally, click on “Save & Publish”

Post (Testimonial)

  1. Go to “Appearance => Customize => Theme Options => Testimonial”
  2. Make sure Testimonial option is enabled
  3. Under “Select Type” select “Post”
  4. Then Under Featured Post1, Featured Post2 and so on add Post Id, you want to display as testimonial
  5. Finally, click on “Save & Publish”

Page (Testimonial)

  1. Go to “Appearance => Customize => Theme Options => Testimonial”
  2. Make sure Testimonial option is enabled
  3. Under “Select Type” select “Page”
  4. Then Under Featured Page 1, Featured Page 2 and select the page, you want to display as testimonial
  5. Finally, click on “Save & Publish”

Category (Testimonial)

  1. Go to “Appearance => Customize => Theme Options => Testimonial”
  2. Make sure Testimonial option is enabled
  3. Under “Select Type” select “Category”
  4. Then select the category you want, and you may select multiple categories by holding down the CTRL key(windows)/Command Key(Mac)
  5. Finally, click on “Save & Publish”

Custom (Testimonial)

  1. Go to “Appearance => Customize => Theme Options => Testimonial”
  2. Make sure Testimonial option is enabled
  3. Under “Select Type” select “Custom”
  4. Under “Testimonial #1, Testimonial #2 and so on”, select desired image, link, title
  5. Finally, click on “Save & Publish”

Custom Post Type

To use this featured, install Essential Content Type Plugin

How to select number of Testimonial?#

  1. Make sure Testimonial is enabled
  2. Go to “Appearance => Customize => Theme Options => Testimonial” from your WordPress Dashboard
  3. Under “No of items”, select number of testimonial you want to display
  4. Finally, click on “Save & Publish”

Note: To see changes in No of Testimonial please save and refresh the page.

Note: To move testimonial above footer check option “Check to Move above Footer” and to enable slider in courses check option “Check to Enable Slider”

How to add Contact Info?

Some of our themes have option to add Contact Info, so here are the steps:

  1. Go to Theme Options => Customize => Contact Info
  2. Enable Contact Info on Homepage/Frontpage or Entire Site
  3.  Then add Title, Description, Phone, Email, Address, Link , Map Image and Link under respective field
  4. Further option to move contact info above the content
  5. Finally Save & Publish

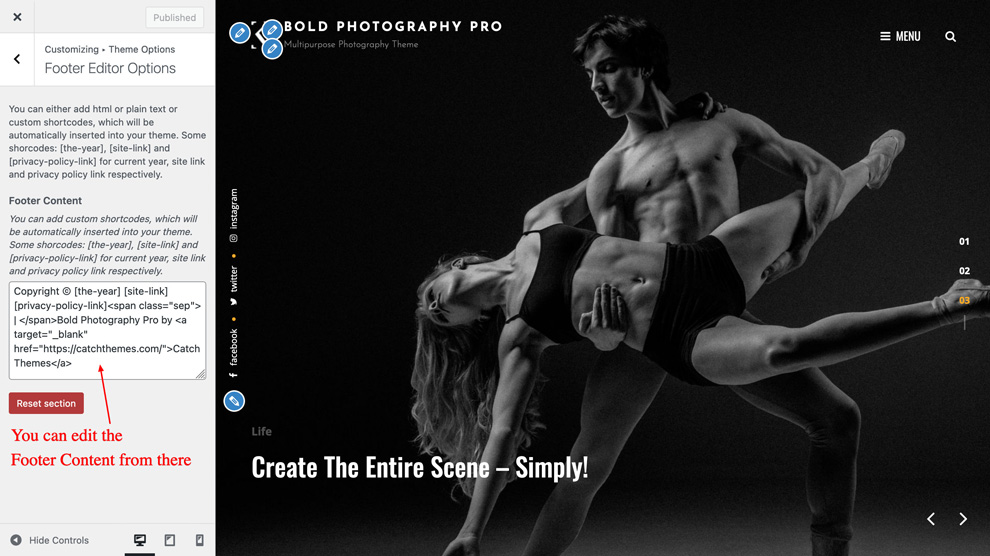
Option to edit footer content is available in our Premium themes only. Here are the steps to edit footer content:

  1. Go to “Appearance => Customize => Theme Options => Footer Editor Options”

  2. Under “Footer Content”, you can either add html or plain text
  3. Finally, click on “Save & Publish”

How to add News section?

Some of our themes have News option. There are four News types to choose from in Pro themes: Post, Page, Category and Custom.

  • Go to “Customize => Theme Options => News” from your WordPress Dashboard
  • To enable featured content, select “Homepage/Frontpage or Entire Site” option under “Enable on”
  • Under “ Type”, you need to select “Post, Page, Category, Image” as per your need
  • If you select Post as content type, choose Post under Post 1, Post 2 and so on
  • If you select Page as content type, choose Page under Page 1, Page 2 and so on
  • If you select Category as content type, choose categories under Featured Select Categories
  • If you select Custom as content type then, under News #1,  News#2 and so on add “Image”, “Link”, “Title” , “Content” and “More Button” as per your need
  • Finally, click on “Save & Publish”

    Note: Further option to move  news above the footer.

How to add Stats in Theme?

Some of our themes contains Stats option.
Here are steps to add Stats in theme:

  • Go to “Customize => Theme Options => Stats” from your WordPress Dashboard
  • To enable featured stats, select “Homepage/Frontpage or Entire Site” option under “Enable on”
  • Under “ Type”, you need to select “Post, Page, Category, Custom” as per your need
  • If you select Post as stats type, choose Post under Post 1, Post 2 and so on
  • If you select Page as stats type, choose Page under Page 1, Page 2 and so on
  • If you select Category as stats type, choose categories under Select Categories
  • If you select Custom as stats type then, under Stat#1,  Stat#2 and so on add “Image”, “Link”, “Title” , “Content”, “More Button Text”, “Button Text” and “Button Link”as per your need
  • Finally, click on “Save & Publish”Note: Further option to move  stats above the footer, change headline and sub-headline.

How to add Team?

Some of our themes contact Team options. Here are steps to add Team in theme:

  • Go to “Customize => Theme Options => Team” from your WordPress Dashboard
  • To enable featured stats, select “Homepage/ FrontPage or Entire Site” option under “Enable on”
  • Under “ Type”, you need to select “Post, Page, Category, Image” as per your need
  • If you select Post as team type, choose Post under Post 1, Post 2 and so on
  • If you select Page as team type, choose Page under Page 1, Page 2 and so on
  • If you select Category as team type, choose categories under Select Categories
  • If you select Custom as stats type then, under Team#1,  Team#2 and so on add  “Title” , “Position”, “Content”, “Button Text” and “Button Link”as per your need
  • Finally, click on “Save & Publish”Note: Further option to move above the footer, change headline and sub headline.

How to add Events in theme?

Some of our theme supports Event and Pro supports 4 events types they are: 1. Post, 2. Page, 3. Category and 4. Custom. For Events, go to “Appearance => Customize => Theme Options => Events”.

How to enable Events?#

  1. Go to “Appearance => Customize => Theme Options => Events” from your WordPress Dashboard
  2. To enable events, select “Homepage/Frontpage or Entire Site” option under “Enable on”
  3. Under “Select Content Type”, you need to select “Post, Page, Category or Custom” as per your need
  4. Finally, click on “Save & Publish”

Note: You can further add Event Date, Date Link Links by using edit option of page/post

Post (Events)

Post is created to highlight your Post in events. So, first you need to create a Post and then add Featured Custom to the Post.

How to enable Post Content?#

  1. Make sure Events is enabled
  2. Under “Select Content Type”, you need to select “Post”
  3. Then, add in Post ID in Featured Post 1, Featured Post 2 and so on
  4. Finally, click on “Save & Publish”

Note:
When you select post, make sure your Post have Featured Image. Click here to watch our Video Screencast to add Featured Image.

Page (Events)

Page is created to highlight your Page in Events. So, first you need to create a Page and then add Featured Image to the Page.

How to enable Page Content?#

  1. Make sure Events is enabled
  2. Under “Select Content Type”, you need to select “Page”
  3. Then, select Page in Featured Page 1, Featured Page 2 and so on
  4. Finally, click on “Save & Publish”

Note:
When you select page, make sure your Page have Featured Image. Click here to watch our Video Screencast to add Featured Image.

Category (Events)

Category content is created to highlight your posts from specific categories in the Events. So, first you need to create a Post, add Featured Image to the post and assign posts to specific category.

How to enable Category Content?#

  1. Make sure Events is enabled
  2. Under “Select Content Type”, you need to select “Category”
  3. Then, select Categories
  4. Finally, click on “Save & Publish”

Note:
When you select categories, make sure your Posts in those categories have Featured ImageClick here to watch our Video Screencast to add Featured Image.

Custom(Events)

Custom Content is created to highlight independent images in the Events. This option gives you full control to upload your own independent image, with title (optional), content (optional), optional link and target. Just use the following simple steps to add in the Featured Image Content.

How to enable Featured Image Content?#

  1. Make sure Events is enabled
  2. Under “Select Content Type”, you need to select “Custom”
  3. Then, under Events#1, Events#2 add  title, day date, day month, content and more text under respective header
  4. Finally, click on “Save & Publish”
  1. Go to “Appearance => Customize => Theme Options => Footer Editor Options”

  2. Under “Footer Content”, you can either add html or plain text
  3. Finally, click on “Save & Publish”

Note: To reset Footer Content check option “Check to reset Footer Content”

How to add Professional in theme?

Some of our theme supports Professional options. In our premium theme Post, Page, Category and Custom as Professional.
Following are the instructions to set up professional in your theme:

How to enable professionals and choose the type?

  1. Go to “Appearance => Customize => Theme Options => Professionals”
  2. Enable Professional by click option under “Enable On”, entire site, homepage/frontpage, About Page template or Homepage and About Page Template
  3. Then under “Type” choose Post, Page, Category or Custom as per your need
  4. If you choose “Type” as Post, choose post under Post #1, Post#2 or so on to display your post as Professionals
  5. If you choose “Type” as Page, choose page under Page 1, Page 2 or so on to display your page as Professionals
  6. If you choose “Type” as Category, choose category under “Select Categories” drop down to display your categories as Professionals
  7. If you choose “Type” as Custom, choose Image, edit Link, Title, Subtitle, Content, More Link Button Link under respective headings to display your custom data as Professionals
  8. Further option to change Title and Description of Professionals, option to change number of items to be displayed
  9. Finally, click on “Save & Publish”

How to add Reservation in theme?

Some of our theme supports reservation. In Premium themes there are 3reservation types to choose from Page, Post and Custom.

How to enable Reservation and choose the type?

  1. Go to “Appearance => Customize => Theme Options => Reservation”
  2. Enable Reservation by click option under “Enable On”, entire site, homepage/frontpage, About Page template or Homepage and About Page Template
  3. Then under “Type” choose Post, Page, Category or Custom as per your need
  4. If you choose “Type” as Post, choose post under dropdown of “Post” to display your post as Reservation
  5. If you choose “Type” as Page, choose under dropdown of “Page” to display your post as Reservation
  6. If you choose “Type” as Custom, add custom shortcodes form Cotact form 7 or from Jetpack
  7. Further option to change Title and Description of Reservation
  8. Finally, click on “Save & Publish”

Some of our theme supports Page, Post and Category as Gallery. To add galley you need to add our free plugin catch gallery

A. How to add Gallery on the Page/Post using Catch Gallery?

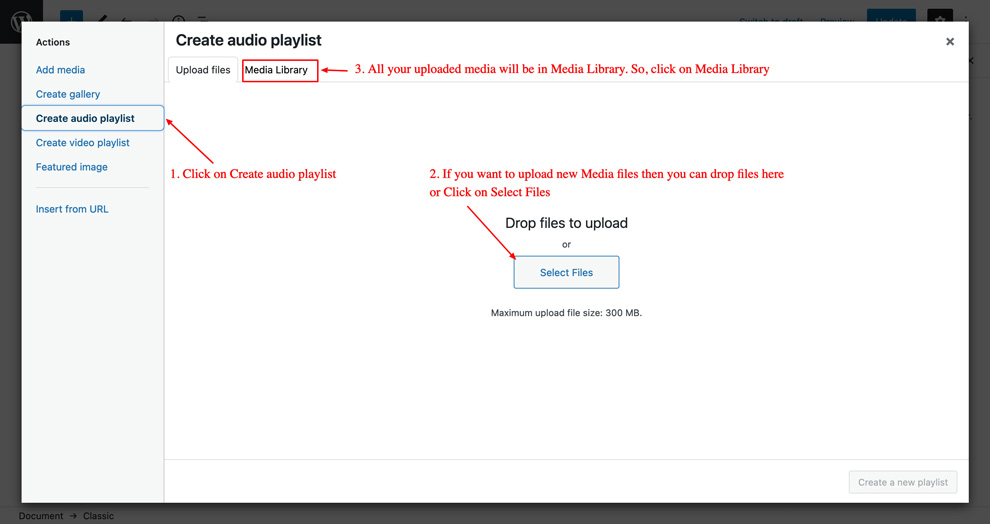
You can create your own gallery on the Page or on the Post as per your requirement. Install and activate Catch Gallery Plugin

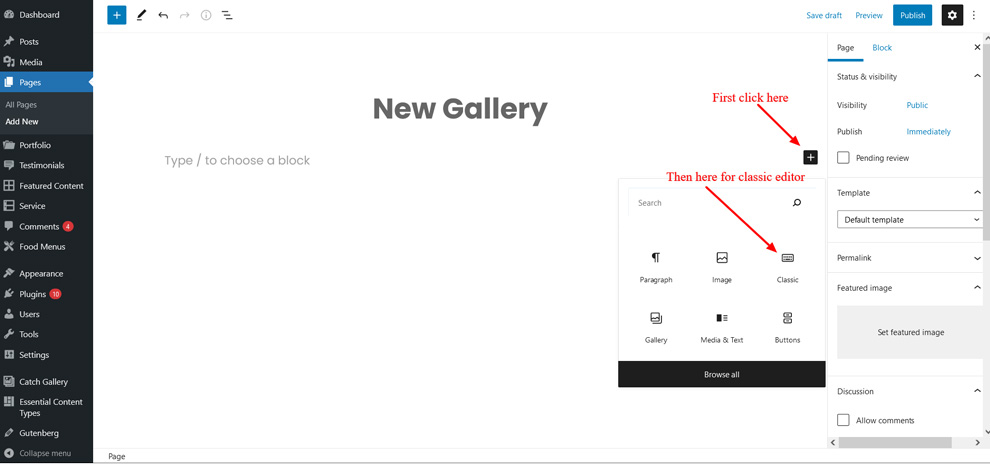
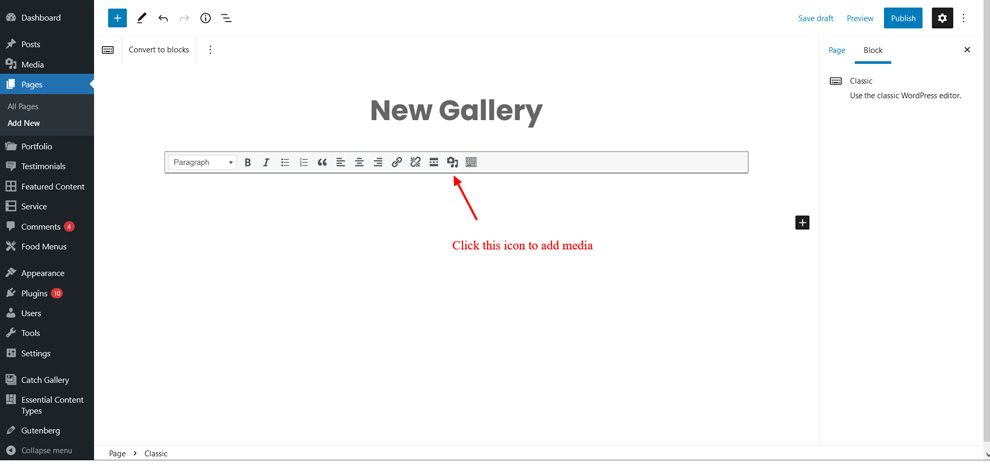
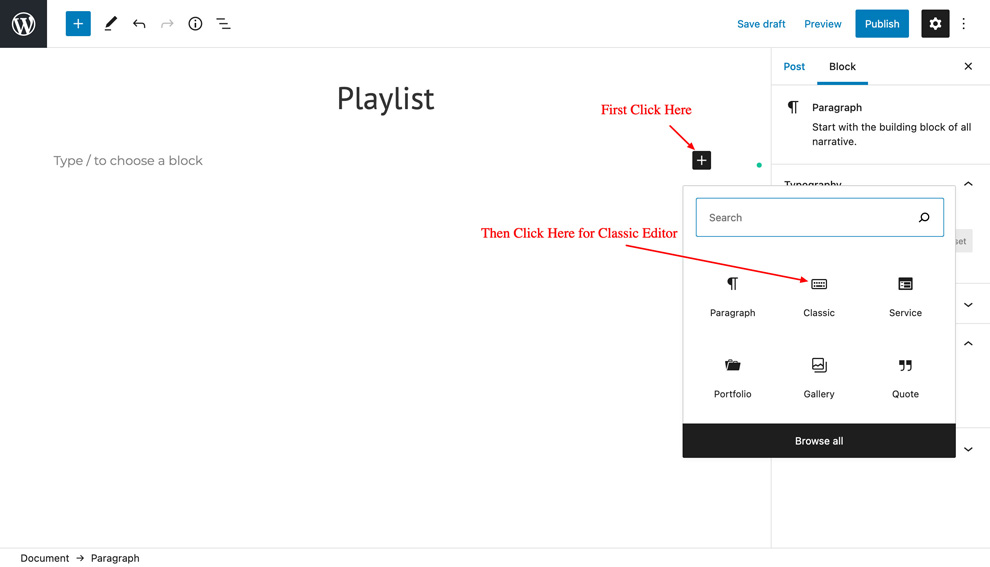
  1. Open the page/post where you want to create Gallery, click on Plus Icon Plus Icon and “Classic” to add the classic block.
  2. Click on “Add Media” Icon Add Media Icon.
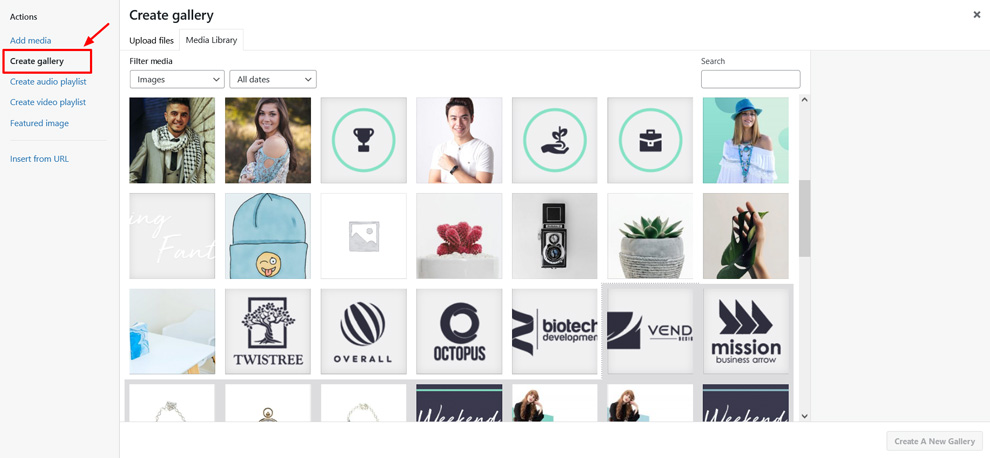
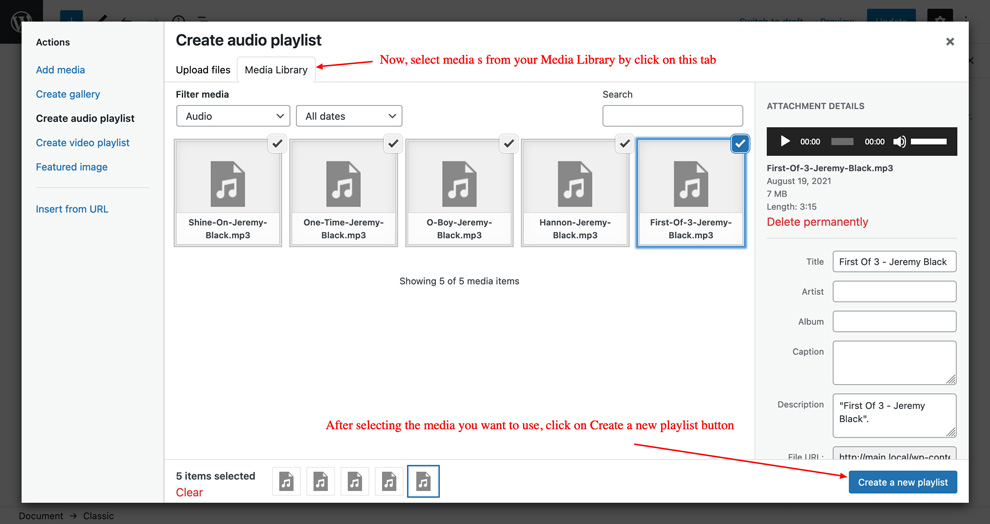
  3. Click on the “Create Gallery” button (on your left) and if you need to upload new images then you can do it here from the “Upload Files” tab or if you want to use existing images in your site then you can select it from “Media Library” tab
  4. After selecting images for the Gallery, you need to click on the “Create a new gallery” button (on bottom left)
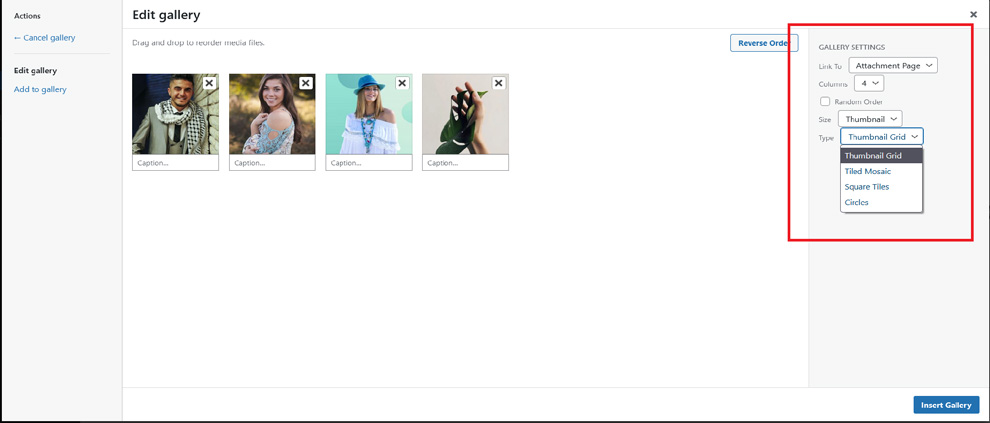
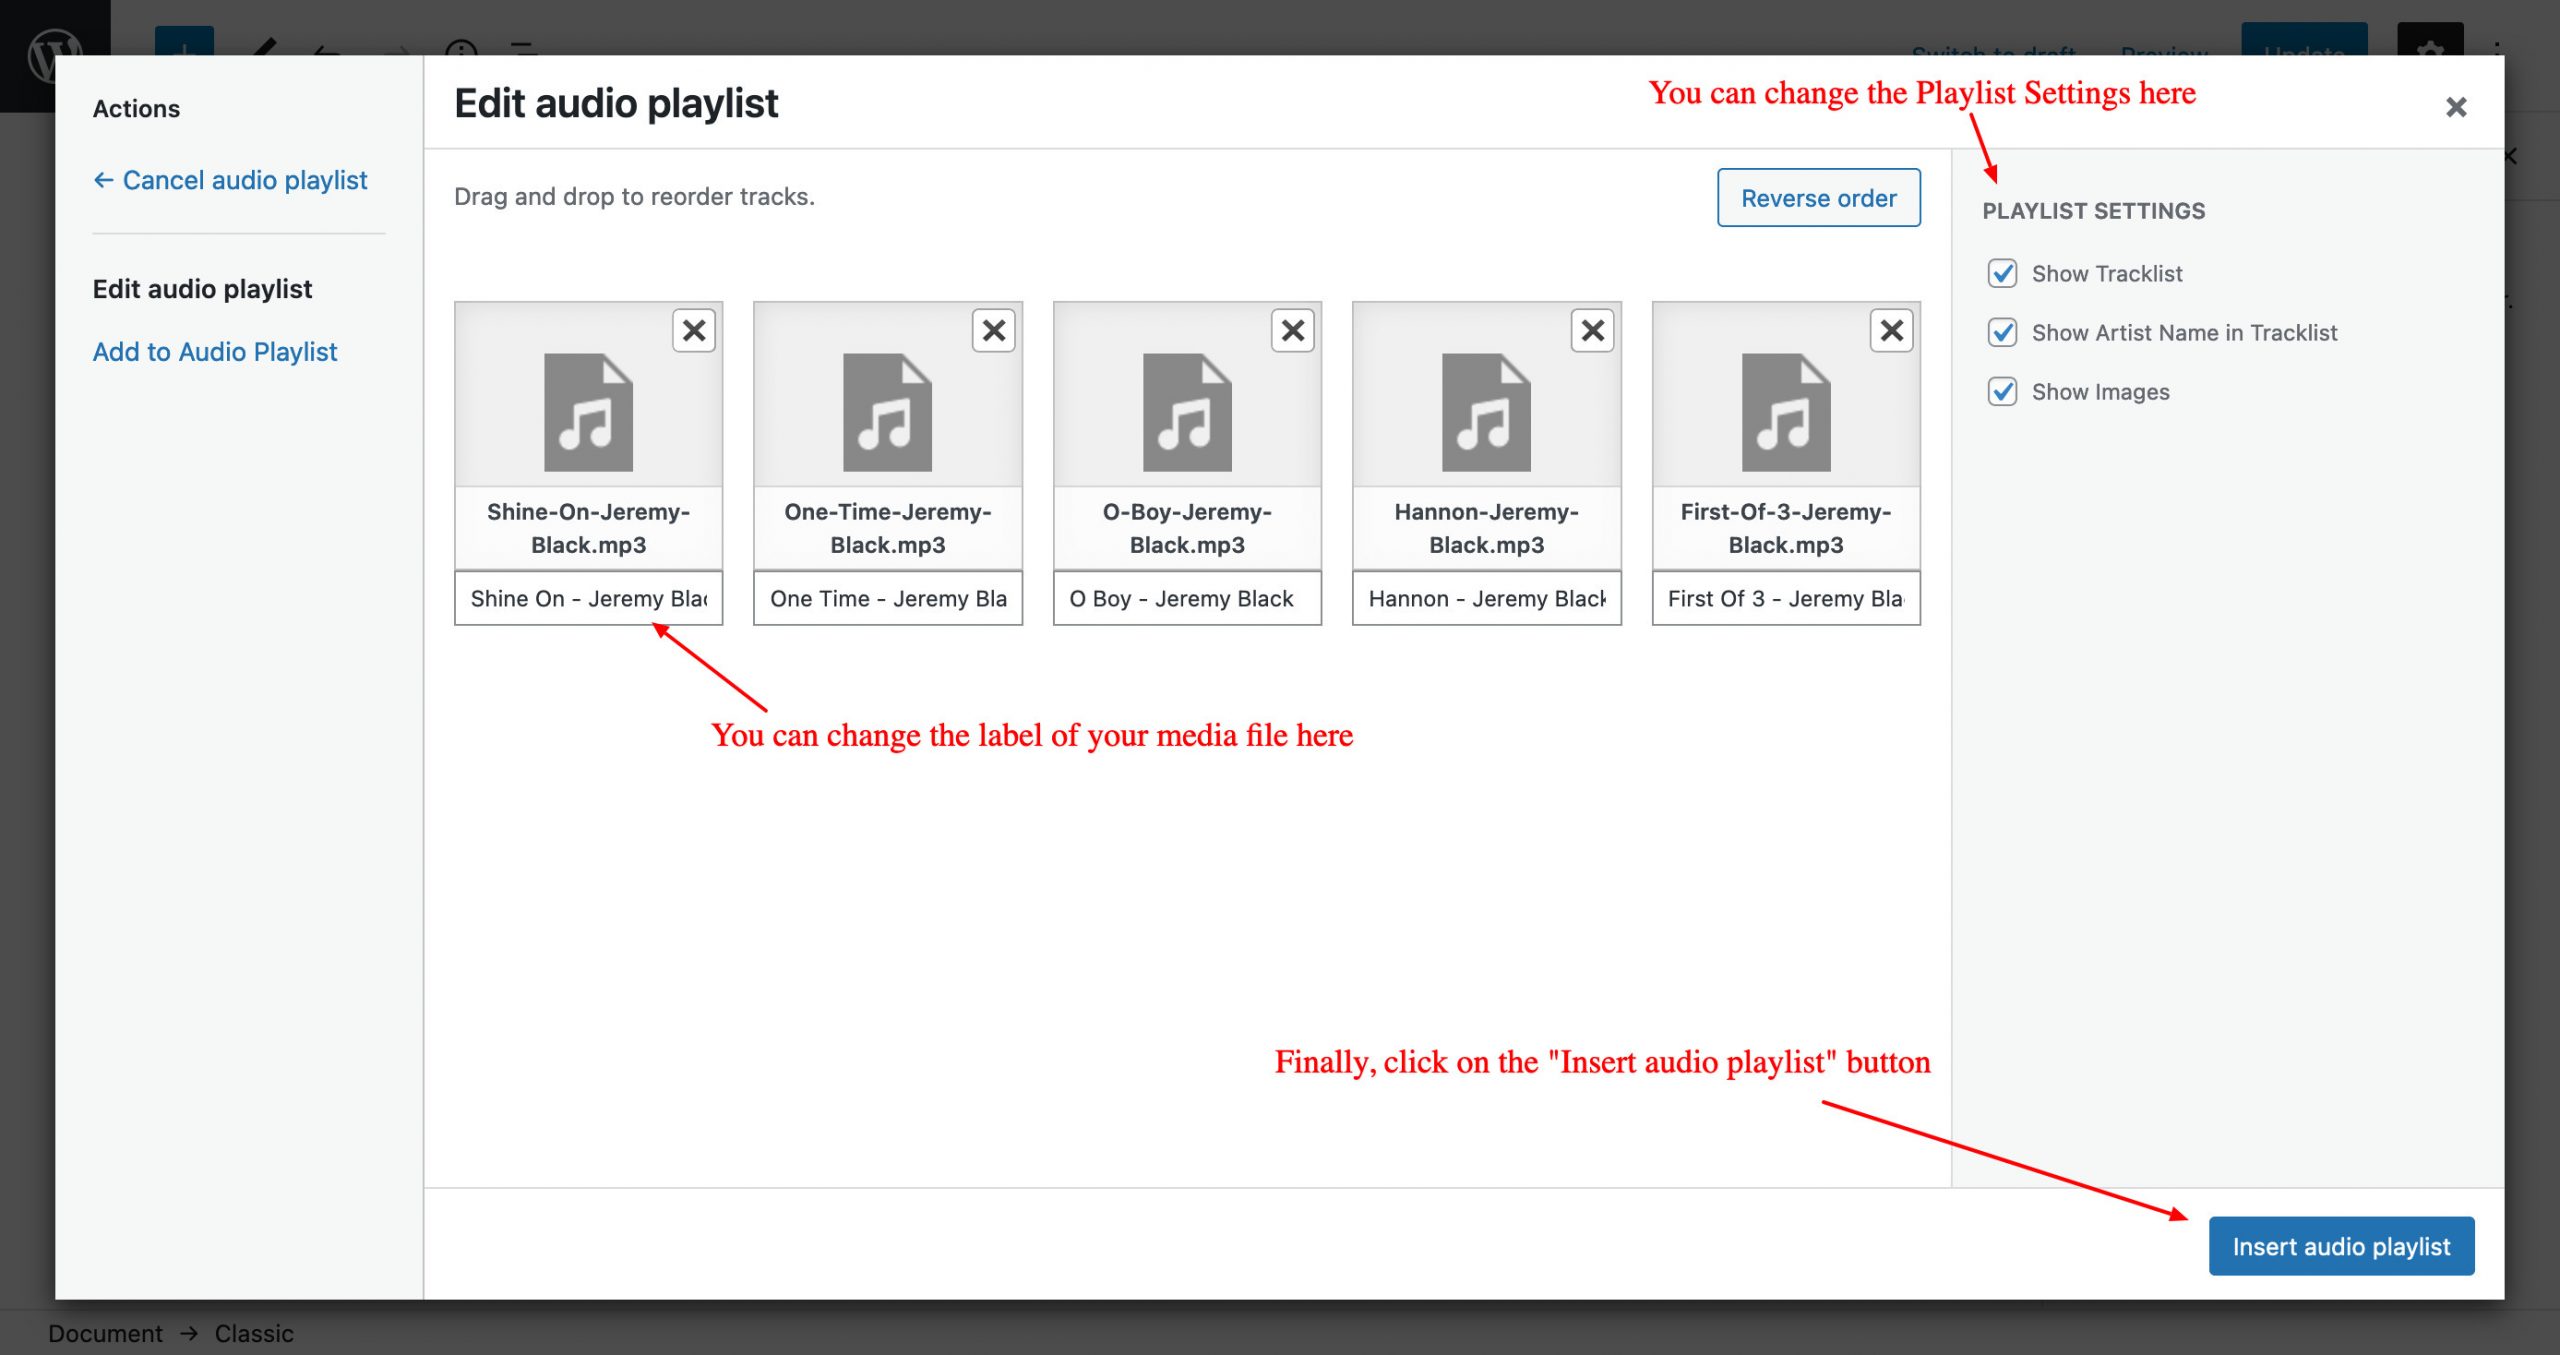
  5. Further option to change image galleries in three four styles: thumbnail grid, a tiled mosaic, a square tiled, and a circular grid
  6. Finally, click on the “Insert gallery” button, publish or update your page/post.

Note: If you choose the Type as “Tiled Mosaic” then your “Columns” settings will not work as well as you need to select “Size” as “Large” or “Full” as if the image size you selected is small then it will show gallery as distorted.

B. How to add Gallery Section on your site?

  1. Go to “Appearance => Customize => Theme Options => Gallery”
  2. Make sure that you have installed and activated Catch Gallery Plugin
  3. To enable gallery select the option under “Enable on”, then select type as Page, Post or Category as per your need
  4. If you select type as “Page” then choose the page you want to display as gallery
  5. If you select type as “Post” then choose the post you want to display as gallery
  6. If you select type as “Category” then select the categories you want to display as gallery
  7. Finally, click on “Save & Publish”

Courses

How to enable Courses?#

  1. Go to “Appearance => Customize => Theme Options => Courses”
  2. Under “Enable Courses On” select option Homepage/Frontpage or Entire Site
  3. Finally, click on “Save & Publish”

Note: To move courses above footer check option “Check to Move above Footer” and to enable slider in courses check option “Check to Enable Slider”

How to select Courses Content Types?#

  1. Go to “Appearance => Customize => Theme Options => Courses”
  2. Under “Select Content Type” select Post, Page, Category or Content as per your need
  3. Finally, click on “Save & Publish”

How to select Courses Layout?#

  1. Go to “Appearance => Customize => Theme Options => Courses”
  2. Under “Select Courses Layout” select option Homepage/Frontpage or Entire Site
  3. Finally, click on “Save & Publish”

How to select Courses Layout?#

  1. Go to “Appearance => Customize => Theme Options => Courses”
  2. Under “Select Courses Layout” selection option 2columns, 3columns or 4columns
  3. Finally, click on “Save & Publish”

Post

Post is created to highlight your Post in the Courses. So, first you need to create a Post and then add Featured Image to the Post.

How to set Post as courses?#

  1. Make sure courses is enabled
  2. Under “Select Courses Type”, select “Post”
  3. Then, add in Post ID in Featured Post 1, Featured Post 2 and so on
  4. Finally, click on “Save & Publish”

Note:
When you select post, make sure your post have Featured Image. Click here to watch our Video Screencast to add Featured Image.

Page

Page is created to highlight your Page in the Courses. So, first you need to create a Page and then add Featured Image to the Page.

How to set Page as Courses?#

  1. Make sure courses is <a href=”#enable-coursesenabled
  2. Under “Select Courses Type”, select “Page”
  3. Then add Featured Pages in “Featured Page 1”, “Featured Page 2” and so on
  4. Finally, click on “Save & Publish”

Note:
When you select page, make sure your page have Featured Image. Click here to watch our Video Screencast to add Featured Image.

Category

Category is created to highlight your posts from specific categories in the courses. So, first you need to create a Post, add Featured Image to the post and assign posts to specific category.

How to set Category as Courses?#

  1. Make sure courses is enabled
  2. Under “Select Courses Type”, Select “Category”
  3. Then, select Categories
  4. Finally, click on “Save & Publish”

Note:
When you select categories, make sure your posts in those categories have Featured Image. Click here to watch our Video Screencast to add Featured Image.

Custom

Image is created to highlight independent images in the courses. This option gives you full control to upload your own independent image, with title (optional), content (optional), optional link and target. Just use the following simple steps to add in the Image in courses.

How to set Custom as Courses?#

  1. Make sure courses is enabled
  2. Under “Select Courses Type”, Select “Custom”
  3. Then, upload Image, add in link, title, content as per your need
  4. Finally, click on “Save & Publish”

Note:
When you select page, make sure your page have Featured Image. Click here to watch our Video Screencast to add Featured Image.

How to edit Headline and Subheadline for Courses?#

  1. Make sure courses is enabled
  2. Under “Headline for Courses” add the desired headline and under “Subheadline for Courses” add the sub-headline
  3. Finally, click on “Save & Publish”

How to change Number of Courses?#

  1. Make sure courses is enabled
  2. Under “No of Courses” change the number of Courses as per you need
  3. Finally, click on “Save & Publish”

How to Display/Hide Content?#

  1. Make sure courses is enabled
  2. Go to “Appearance => Customize => Theme Options => Courses” from your WordPress Dashboard
  3. Under “Display Content”, you can select “Show Excerpt, Show Full Content or Hide Content” to display excerpt as content, whole content as content or not display content respectively, as per you need
  4. Finally, click on “Save & Publish”

Logo Slider

How to enable Logo Slider? #

  1. Go to Appearance => Customize => Theme Options => Logo Slider
  2. To enable Logo Slider, select option Entire Site or Homepage/Frontpage under “Enable Logo Slider on”
  3. Under “Logo Slider Type”, you need to select “Post, Page, Category or Custom” as per your need
  4. Finally, click on “Save & Publish”

Note: For best effect, make sure all the images are of same size on logo slider.

How to change number of logo slider items?#

  1. Make sure logo slider is enabled
  2. Go to “Appearance => Customize => Theme Options => Logo Slider” from your WordPress Dashboard
  3. Under “No of Items”, select the number items you wish to add in slider
  4. Finally, click on “Save & Publish”

How to change number of visible items in logo?#

  1. Make sure logo slider is enabled
  2. Go to “Appearance => Customize => Theme Options => Logo Slider” from your WordPress Dashboard
  3. Under “No of visible items”, select the number items you wish to visible in slider
  4. Finally, click on “Save & Publish”

How to change Transition Delay and Transition Length on Logo Slider?#

  1. Make sure logo slider is enabled
  2. Go to “Appearance => Customize => Theme Options => Logo Slider” from your WordPress Dashboard
  3. To change Transition Delay, change number of second(s) under “Transition Delay” as per your need
  4. To change Transition Length, change number of second(s) under “Transition Length” as per your need
  5. Finally, click on “Save & Publish”

Post (Logo Slider)#

Select Post to highlight your posts as Logo Slider. First you need to create post and add featured image to you post.

  1. Make sure logo slider is enabled
  2. Under “Logo Slider Type”, you need to select “Post”
  3. Then, add in Post ID in Post 1, Post 2 and so on
  4. Finally, click on “Save & Publish”

Note: Post is determined according to Number of Logo Slider.

Page (Logo Slider)#

Select Page to highlight you page content as Logo Slider. First you need to create page and featured image to you page.

  1. Make sure logo slider is enabled
  2. Under “Logo Slider Type”, you need to select “Page”
  3. Under “Page #1, Page #2, Page #3 and so on”, select desired page to show
  4. Finally, click on “Save & Publish”

Note: Page is determined according to Number of Logo Slider.

Category (Logo Slider)#

Category is created to highlight your posts from specific categories in slider. So, first you need to create a Post, add Featured Image to the post and assign posts to specific category.

  1. Make sure logo slider is enabled
  2. Under “Logo Slider Type”, you need to select “Category”
  3. Then select the category you want, and you may select multiple categories by holding down the CTRL key(windows)/Command Key(Mac)
  4. Finally, click on “Save & Publish”

Custom(Logo Slider)#

Image is used to highlight the custom image, link as Logo Slider.

  1. Make sure logo slider is enabled
  2. Then under “Logo Slider Type”, you need to select “Custom”
  3. Under “Slide #1, Slide #2 and so on”, select desired image, link, title
  4. Finally, click on “Save & Publish”

Note: Image is determined according to Number of Logo Slider.

Our Professors

How to enable our professors?

  1. Go to “Appearance => Customize => Theme Options => Our Professors”
  2. To enable our professors, select “Homepage/Frontpage or Entire Site” option under “Enable on”
  3. Under “Select Content Type”, Select Content Type as “Post, Page , Category or Custom” as per your need
  4. Finally, click on “Save & Publish”

How to select layout for Our Professors?

  1. Higher Education Pro currently supports two layouts: 2 columns, 3 columns and 4 columns
  2. Make sure Portfolio is enabled
  3. Go to “Appearance => Customize => Theme Options => Our Professors” from your WordPress Dashboard
  4. Under “Select Portfolio Layout”, select portfolio layout as “2 columns or 3 columns or 4 columns”
  5. Finally, click on “Save & Publish”

Post (Our Professors)#

Post is created to highlight your post as Our Professors Section.

  1. Go to “Appearance => Customize => Theme Options => Our Professors”
  2. Make sure Our Professors option is enabled
  3. Under “Select Content Type”, Select Content Type as “Post”
  4. Then, under Featured Post 1, Featured Post 2 so on, add the desired “Post Id”
  5. Finally, click on “Save & Publish”

Page (Our Professors)

Page is created to highlight your page as Our Professors Section.

  1. Go to “Appearance => Customize => Theme Options => Our Professors”
  2. Make sure Our Professors option is enabled
  3. Under “Select Content Type”, Select Content Type as “Page”
  4. Then, under Featured Page 1, Featured Page 2 so on, select the desired “Page”
  5. Finally, click on “Save & Publish”

Category (Our Professors)#

Category is created to highlight your posts from specific categories in Our Professor section. So, first you need to create a Post, add Featured Image to the post and assign posts to specific category.

  1. Go to “Appearance => Customize => Theme Options => Our Professors”
  2. Make sure Our Professors option is enabled
  3. Under “Select Content Type”, Select Content Type as “Category”
  4. Then select the category you want, and you may select multiple categories by holding down the CTRL key(windows)/Command Key(Mac)
  5. Finally, click on “Save & Publish”

Custom(Our Professors)#

Image is used to highlight the custom image, link as Our Professors Section.

  1. Make sure Our Professors option is enabled
  2. Then under “Select Content Type”, you need to select “Custom”
  3. Under “Professor #1, Professor #2 and so on”, select desired image, link, title
  4. Finally, click on “Save & Publish”

How to change Headline and Sub-headline for Our Professors?

  1. Make sure Our Professors option is enabled
  2. Go to “Appearance => Customize => Theme Options => Our Professors” from your WordPress Dashboard
  3. Under “Headline”, you can add desired text or leave it empty if you don’t want to disable fields”
  4. Under “Sub-headline”, you can add desired text or leave it empty if you don’t want to disable fields”
  5. Finally, click on “Save & Publish”

How to change number of items in Our Professors?

  1. Make sure Our Professors option is enabled
  2. Go to “Appearance => Customize => Theme Options => Our Professors” from your WordPress Dashboard
  3. Under “No of Items” you can select number of item your want to display in our professors
  4. Finally, click on “Save & Publish”

How to change Pagination Options?

  1. Go to “Appearance => Customize => Theme Options => Pagination Options”
  2. Under “Pagination Type”, select desired option
  3. Finally, click on “Save & Publish”

Note: WP-PageNavi Plugin is recommended for Numeric Option(But will work without it).
Infinite Scroll Options requires JetPack Plugin with Infinite Scroll module Enabled.

How to add Food Menu?

Some of our theme supports Food Menu options. In our premium theme Post, Page, Category and Custom as Food Menu.
Following are the instructions to set up Food Menu in your theme:

  1. Go to “Appearance => Customize => Theme Options => Food Menu”
    Enable Food Menu by click option under “Enable On”, entire site, homepage/frontpage, About Page template or Homepage and About Page Template
  2. Then under “Select Type” choose Post, Page, Category or Custom as per your need
  3. If you choose “Type” as Post, choose post under Post #1, Post#2 or so on to display your post as Food Menu
  4. If you choose “Type” as Page, choose page under Page 1, Page 2 or so on to display your page as Food Menu
  5. If you choose “Type” as Category, choose category under “Select Categories” drop down to display your categories as Food Menu
  6. If you choose “Type” as Custom, choose Image, edit Link, Title, Subtitle, Content, More Link Button Link under respective headings to display your custom data as Food Menu
  7. Further option to change Title and Description of Food Menu, option to change number of items to be displayed
  8. Finally, click on “Save & Publish”

News Ticker

How to enable News Ticker?#

  1. Go to “Appearance => Customize => News Ticker” from your WordPress Dashboard
  2. To enable news ticker, select “Homepage/Frontpage or Entire Site” option under “Enable News Ticker on”
  3. Under “Select Ticker Type”, Select Ticker Type as “Post News Ticker, Page News Ticker, Category News Ticker or Custom Text News Ticker”
  4. Finally, click on “Save & Publish”

Post

Post News Ticker is created to highlight your Post in ticker. So, first you need to create a Post and then add Featured Image to the Post.

How to enable Post News Ticker?#

  1. Make sure news ticker is enabled
  2. Under “Select Ticker Type”, Select Ticker Type as “Post News Ticker”
  3. Then, add in Post ID in Post 1, Post 2 and so on
  4. Finally, click on “Save & Publish”

Note:
When you select post, make sure your post have Featured Image. Click here to watch our Video Screencast to add Featured Image.

Page

Page News Ticker is created to highlight your Page in ticker. So, first you need to create a Page and then add Featured Image to the Page.

How to enable Page News Ticker?#

  1. Make sure news ticker is enabled
  2. Under “Select Ticker Type”, Select Ticker Type as “Page News Ticker”
  3. Then, select Page in Page 1, Page 2 and so on
  4. Finally, click on “Save & Publish”

Category

Category News Ticker is created to highlight your posts from specific categories in the ticker. So, first you need to create a Post, add Featured Image to the post and assign posts to specific category.

How to enable Category News Ticker?#

  1. Make sure news ticker is enabled
  2. Under “Select Ticker Type”, Select Ticker Type as “Category News Ticker”
  3. Then, select Categories
  4. Finally, click on “Save & Publish”

Custom

Custom Text News Ticker is created to highlight custom texts and links as news ticker.

How to enable Custom News Ticker?#

  1. Make sure news ticker is enabled
  2. Under “Select Ticker Type”, Select Ticker Type as “Custom Text News Ticker”
  3. Then, add Link & Title in News Ticker#1, News Ticker#2 and so on
  4. Finally, click on “Save & Publish”

How to determine news ticker position?#

  1. Go to “Appearance => Customize => News Ticker” from your WordPress Dashboard
  2. To enable ticker, select “Homepage/Frontpage or Entire Site” option under “Enable News Ticker on”
  3. Under “News Ticker Position”, Select position as “Below Menu or Above Content”
  4. Finally, click on “Save & Publish”

How to change Transition Effect?#

  1. Go to “Appearance => Customize => News Ticker” from your WordPress Dashboard
  2. To enable ticker, select “Homepage/Frontpage or Entire Site” option under “Enable News Ticker on”
  3. Under “Transition”, Select the desired effect
  4. Finally, click on “Save & Publish”

How to change number of news ticker?#

  1. Go to “Appearance => Customize => News Ticker” from your WordPress Dashboard
  2. To enable ticker, select “Homepage/Frontpage or Entire Site” option under “Enable News Ticker on”
  3. Then under “No of News Ticker” select the number of news ticker as per need
  4. Finally, click on “Save & Publish”

How to add Contact Form?

To use this feature, you need to install and activate plugins like WPForms Plugin.

Follow these steps to showcase testimonial on your site:

  1. First you need to install and active WPForms plugins
  2. After that, you can find “WP Forms” settings page in WordPress Dashboard
  3. To create a new form, click on the Add New button, and this will launch the WPForms Form Builder
  4. For more check out WP Form instructions page, Click here

Section Sorter

Section Sorter option is available in our Premium Themes.

The Sections Sorter is a feature that allows you to organize various sections on your website by manually sorting them. You can now rearrange and put forward the section that you want your visitors to see first.

You can sort the sections of your theme by visiting “Customize => Theme Options => Sections Sorter”.

Simply drag and drop the sections to your desired position and display them orderly. Also, another cool feature in this option is that you can not only rearrange the order but also can quickly edit those sections from Sections Sorter option if you want any changes.

How to add App Section in Theme?

Some of our premium themes supports App Section, you can choose Page, Post, Category and Custom as App Section

  1. Go to “Appearance => Customize => Theme Options => App Section”
  2. Under “Type” select Page, Post, Category or Image as per your need
  3. If you select “Post” as type select the post you want to display in App Section
  4. If you select “Page” as type select the page you want to display in App Section
  5. If you select “Category” as type select the category you want to display in App Section
  6. If you select “Custom” as type select “App Link type” from Image or button and “App Link Layout” from layout two or layout one, then select “App Image First”, “App Image First link” edit Title, Content and background image as per you need
  7. Further Option to change “Content Position” and “Text Alignment” as per you need
  8. You can also add Logo Image, enable/disable Box design, enable/disable Display Title and edit Display content as per your requirement
  9. Finally, click on “Publish”

How to add Playlist?

You can create your own playlist on the Page or on the Post as per your requirement.

A. How to add Playlist on the Page/Post?

  1. Open the page/post where you want to create Playlist, click on Plus Icon Plus Icon and “Classic” to add the classic block.
  2. Click on “Add Media” Icon Add Media Icon.
  3. Click on the “Create audio playlist” button (on your left) and if you need to upload new media files then you can do it here from the “Upload Files” tab or if you want to use existing media files in your site then you can select it from “Media Library” tab
  4. After selecting media files from your Media Library, you need to click on the “Create a new playlist” button (on bottom left)
  5. Now, you will see “Edit audio playlist” screen where you can make final changes to Media name and check Playlist Settings on the right. Finally, click on the “Insert audio playlist” button.

B. How to add Playlist Section on your site

  • Go to “Customize=> Theme Options => Playlist”
  • Under “Type” choose Page, Post, Category or Custom as per you need
  • If you choose “Page” as type then under “Page” choose the page you want to display as playlist
  • If you choose “Post” as type then under “Post” choose the post you want to display as playlist
  • If you choose “Category” as type then under “Category” choose the categories you want to display as playlist
  • To add playlist, open the edit page of post,page or category you have selected, on the left hand side you will find “Add Media” button click on that
    Inside “Add Media” you will find Create Audio Playlist option, from there you can choose you audio to add in playlist
  • Finally, “Save & Publish”
  • 11. Custom Post Types

    How to add Testimonials using Custom Post Types?

    To use this featured, install Essential Content Type Plugin.

    Follow these steps to showcase testimonial on your site:

    1. First you need to install Essential Content Type
    2. After that you can find Essential Content Type option in your WordPress Dashboard
    3. Click on “Essential Content Type”, there you can see “Testimonial” option then you need to on the button of Testimonials option(This option is enabled by default)
    4. Then go to “Customize => Testimonial” and choose number of items to show in frontpage
    5. Finally, click on “Save & Publish”

    How to use Featured Content using Custom Post Type?

    1. To use this featured, install Essential Content Type
    2. After that you can find Essential Content Type option in your WordPress Dashboard
    3. Click on “Essential Content Type”, there you can see “Featured Content” option then you need to click on the button of Featured Content option(This option is enabled by default)
    4. Then click on “Add New” and create your own content, click on Publish
    5. Then go to “Appearance => Customize => Theme Options => Featured Content”, make sure featured content is enabled
    6. Under “Type”, you need to select “Custom Post Type”
    7. Then, under Featured Content #1, Featured Content #2 and so on add the content you have made
    8. Finally, click on “Save & Publish”


    How to add Portfolio in using Custom Post Type?

    Follow these steps to showcase projects on your site:

    1. First you need to install Essential Content Type
    2. After that you can find Essential Content Type option in your WordPress Dashboard
    3. Click on “Portfolio=> Add new”, to add new Portfolio items
    4. Then go to “Customize => Theme Options=> Portfolio” and choose number of items to show in frontpage/Homepage or Entire site
    5. Then go to “Customize => Theme Options=> Portfolio” and choose number of items to show in frontpage/Homepage or Entire site
    6. Select Portfolio items Under Portfolio 1, Portfolio 2 and so on.
    7. Finally, click on “Save & Publish”

    Note: To edit Portfolio Archive Title, Acrhive Content and Archive Featured Image, go to Customize => Portfolio”

    How to add Service using Custom Post Type?

    Follow these steps to showcase projects on your site:

    1. First you need to install Essential Content Type
    2. After that you can find Essential Content Type option in your WordPress Dashboard
    3. Click on “Essential Content Type”, there you can see “Service” option then you need to on the button of Service option(This option is enabled by default)
    4. Then click on “Add New” and create your own content, click on Publish
    5. Then go to “Appearance => Customize => Theme Options => Service”, make sure service is enabled
    6. Under “Select Content Type”, you need to select “Custom Post Type”
    7. Then, under Service #1, Service #2 and so on add the content you have made to display as service
    8. Finally, click on “Save & Publish”

    Note: To change number of services to be shown change option from No of items

    How to add Food Menu using Custom Post Type

    1. To use this featured, install Essential Content Type
    2. After that you can find Essential Content Type option in your WordPress Dashboard
    3. Click on “Essential Content Type”, there you can see “Food Menu” option then you need to click on the button of Featured Content option, then you can see Food Menu option in your WordPress Dashboard
    4. First you need to create section, click on “Food Menu => Menu Section” to create your own menu section, there you can add “Name”, “Slug” and “Description” for your menu
    5. Then, click on “Add Many Items” select the section under “Add the section” to which you want to add your menu items, add name price as per your need and , click on Add these new menu items
    6. Then go to “Appearance => Customize => Theme Options => Menu Option”, select type as Custom Post Type under Menu 1, Menu 2 and so on add your menu sections.
    7. Finally, click on “Save & Publish”

    How to add Service in Homepage/Frontpage using Essential Content Type?

    Follow these steps to showcase services on your site:

    1. First you need to install Essential Content Type
    2. After that you can find Essential Content Type option in your WordPress Dashboard
    3. Click on “Essential Content Type”, there you can see “Service” option then you need to on the button of Service option(This option is enabled by default)
    4. Then click on “Add New” and create your own content, click on Publish
    5. Then go to “Appearance => Customize => Theme Options => Service”, make sure services is enabled
    6. Under “Select Content Type”, you need to select “Custom Post Type”
    7. Then, under Service #1, Service #2 and so on add the content you have made to display as service
    8. Finally, click on “Save & Publish”

    Note: To change number of services to be shown change option from No of items