
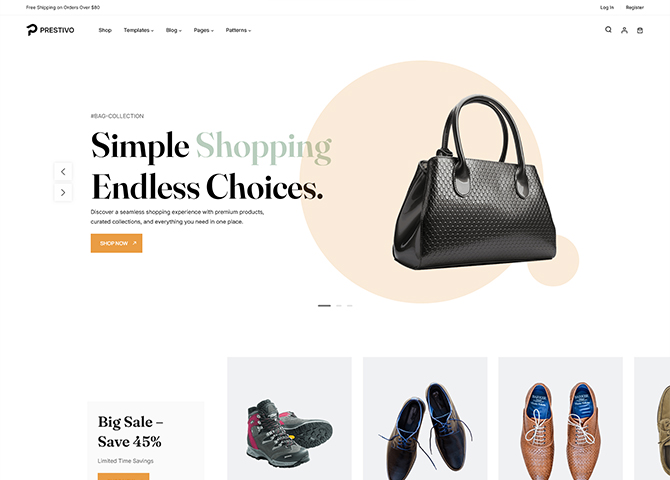
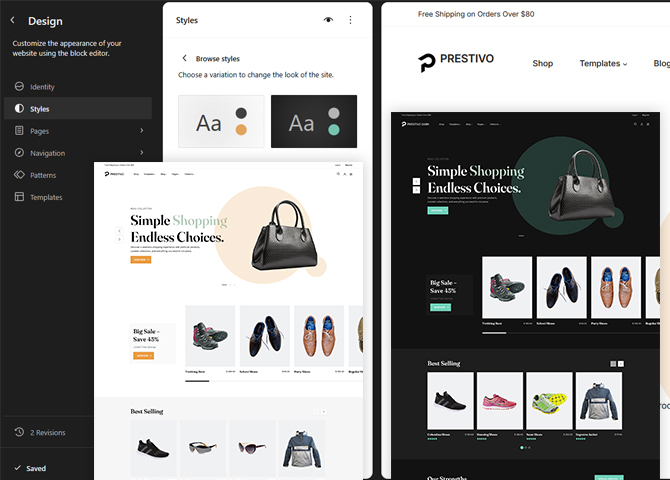
Prestivo is a premium eCommerce WordPress block theme for merchants who want a clean, uncluttered storefront and complete visual control. Built for full site editing and fully compatible with WooCommerce, it ships every template an online store needs, including product archives, single product with an optional vertical gallery, product categories, product search results, cart, checkout, and order confirmation, alongside blog layouts with a left sidebar, right sidebar, or no sidebar at all. Edit any of it in the WordPress Site Editor and change layouts, colors, and typography visually without writing a line of code. Prestivo includes 34 block patterns, 27 templates, and 16 template parts, among them Shop Header, Featured Category, New Collection, Offer Banner, Products Top Rated, Cross-Sells Products, Upsells Products, Shopping Features, Secure Transactions, and Product FAQ, plus a custom Slider block for building storefront hero sections. Light and Dark global styles switch your entire store between two polished looks in a single click. The simple, clean design keeps attention where it belongs, on your products, while lightweight, SEO-friendly markup keeps pages fast and fully responsive across phones, tablets, and desktops.
Features
Responsive Design
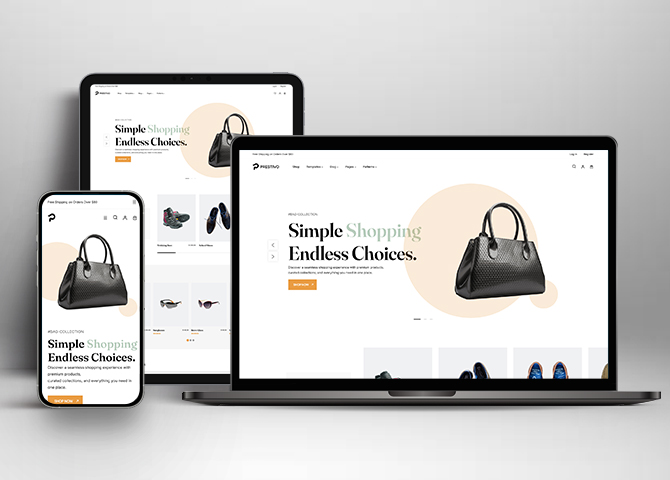
One of the key features of our themes is that your website will magically respond and adapt to different screen sizes delivering an optimized design for iPhones, iPads, and other mobile devices. No longer will you need to zoom and scroll around when browsing on your mobile phone.
Webmaster Tools
Webmaster Tools option helps you to minutely manage your site. Firstly, it helps to verify the site in Google, Yahoo and Bing. Additionally, whether it is something like site optimization, keeping track of your site traffic or overseeing and altering your display settings, you can call the shots for you site through Webmaster tools. These tools also allow you to add to your site Header and Footer Scripts like Google Analytics, Site Stats, Facebook, twitter and much more.
Incredible Support
We have a great line of support team and support documentation. You do not need to worry about how to use the themes we provide, just refer to our Tech Support segment. Further, if you need to do advanced customization to your website, you can always hire our theme customizer!
Featured Content
Featured Content allows you to highlight your recent & popular posts on your website. It can either be displayed on Homepage or the entire site. You can add your title and sub-title for featured content, select the number of featured content, display Meta, select multiple categories, and enjoy displaying your featured & recent posts.
Hero Content
You can now display the best assets of your website with the Hero Content feature. The feature allows you to highlight the most important content in a fashion that is easily attention-grabbing. You can enable the hero content either on Homepage or the entire site. Hero Content - the easiest way to display your strengths.
WordPress Standard Codes
Our code is secure and optimized. We do proper data validation and sanitization and follow core theme guidelines. Our developers are active contributors to WordPress theme review and WordPress core. Our themes will always be updated as things change in WordPress.
Testimonials
People are always curious about what your goods and services are really like. Since customer testimonials are candid and not by the company promoting the product, they assist in building trust. You can display testimonials on Homepage, the entire site or disable it completely.
Sections Sorter
Sections Sorter allows you to organize various sections on your website by manually sorting them. Simply drag and drop the sections to your desired position and display them orderly.The cool feature in this option is that you can not only rearrange the order but also can quickly edit those sections from Sections Sorter option if you want any changes.
Footer Editor
Footer Editor Options enables you to edit the content of the footer easily. You can either add HTML, plain text, or custom shortcodes which will be inserted into your theme automatically. You can use shortcodes like [the-year], [site-link] and [privacy-policy-link] for the current year, site link and privacy policy link respectively.
Full Site Editing
Customize your whole website design directly from the Front-End and build something magical. Change your site layout and add blocks/patterns directly on the site whilst working on the page content. Super easy to create dynamic content!
Custom Blocks
Enhance the pages of your website with the blocks. Generally, these custom blocks are more dynamic and have amazing designs. Create a page independently.
Multiple Block Patterns
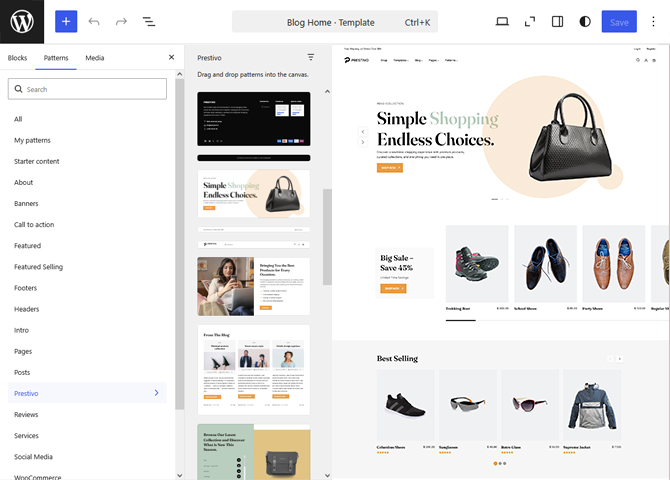
Comes with a collection of predefined block design layouts, available from the patterns tab of the block inserter. Create an elegant layout that combines different blocks. Build Gracefully!
More Features
- Responsive Design
- Webmaster Tools
- Page Templates
- Color Options
- Featured Thumbnail
- Threaded Comments
- Dropdown Menu
- Gravatar Ready
- Localized for translations
- Custom Header / Logo
- Custom Menu
- Custom Footer
- Custom Background
- Custom Layout
- Custom Homepage
- Custom CSS
- Support
- WooCommerce Ready
- Hero Content
- Logo Slider
- Testimonials
- Featured Content
- WordPress Standard Codes
- Sections Sorter
- Products
- Full Site Editing
- Block Based Theme
- Site Editor
- Patterns
- Blocks
- Template Editing
- Global Styles
Free Vs Pro (Premium)
| Free | Features | Pro (Premium) |
|---|---|---|
| Responsive Design | ||
| Super Easy Setup | ||
| Browse Style and Demo: Default | ||
| Browse Style and Demo: Dark | ||
| Color Options | ||
| Custom Block: Slider | ||
| Pattern: 404 Header | ||
| Pattern: Archive Header | ||
| Pattern: Blog Header | ||
| Pattern: Cross Sells Products | ||
| Pattern: Featured Category | ||
| Pattern: Featured Content | ||
| Pattern: Footer Widgets With CTA | ||
| Pattern: Footer Widgets | ||
| Pattern: Footer | ||
| Pattern: Header Media | ||
| Pattern: Header Top | ||
| Pattern: Header | ||
| Pattern: Hero Content Full Width | ||
| Pattern: Hidden 404 | ||
| Pattern: Hidden Archive Heading | ||
| Pattern: Hidden Blog Heading | ||
| Pattern: Hidden Comments | ||
| Pattern: Hidden No Results | ||
| Pattern: Hidden Post Heading | ||
| Pattern: Hidden Post Meta | ||
| Pattern: Hidden Post Navigation | ||
| Pattern: Hidden Producct Taxonomy Heading | ||
| Pattern: Hidden Search Heading | ||
| Pattern: Hidden Search | ||
| Pattern: Latest Posts | ||
| Pattern: New Collection | ||
| Pattern: Offer Banner Featured Category | ||
| Pattern: Offer Banner | ||
| Pattern: Our Identity | ||
| Pattern: Our Strength | ||
| Pattern: Post Header | ||
| Pattern: Product Faq | ||
| Pattern: Products On Sale Carousel | ||
| Product Top Rated | ||
| Pattern: Promotional Headline | ||
| Pattern: Search Header | ||
| Pattern: Secure Transaction | ||
| Pattern: Shop Header | ||
| Pattern: Shopping Features | ||
| Pattern: Sidebar Products | ||
| Pattern: Sidebar | ||
| Pattern: Slider Featured | ||
| Pattern: Taxonomy Product Header | ||
| Pattern: Up Sells Products | ||
| Pattern: Woo Features | ||
| Page Template: Page Home Blogging | ||
| Page Template: Page Home | ||
| Frontpage Template: Template Home | ||
| Frontpage Template: Template Home Blogging | ||
| Template: Archive Product | ||
| Template: Blog No Sidebar Full Width | ||
| Template: Blog No Sidebar | ||
| Template: Blog Sidebar on Left | ||
| Template: Blog Sidebar on Right | ||
| Template: Order Confirmation | ||
| Template: Page Blog | ||
| Template: Page Cart | ||
| Template: Page Checkout | ||
| Template: Page Full | ||
| Template: Page No Title | ||
| Template: Product Search Results | ||
| Template: Single Page No Sidebar Full Width | ||
| Template: Single Page Sidebar On Left | ||
| Template: Single Post No Sidebar Full Width | ||
| Template: Single Post Sidebar On Left | ||
| Template: Single Post Sidebar On Right | ||
| Template: Single Product Vertical Gallery | ||
| Template: Single Product | ||
| Template: Taxonomy Product Category | ||
| Parts: Comments Post Page | ||
| Parts: Footer Width Widgets and CTA | ||
| Parts: Footer Width Widgets | ||
| Parts: Footer | ||
| Parts: Header Top | ||
| Parts: Header | ||
| Parts: Page Content | ||
| Parts: Post Content | ||
| Parts: Post Meta | ||
| Parts: Post Template Query Loop | ||
| Parts: Primary Search | ||
| Parts: Product Collection Style 2 | ||
| Parts: Product Collection | ||
| Parts: Product Cross/Up Sells | ||
| Parts: Sidebar Products | ||
| Parts: Sidebar |
Theme Instructions
1. Installation & Activation
Go to this link.
Step 1 — Download the theme
- Go to your Catch Themes My Account page.
- Under Downloads, click the file name to download
prestivo.zip.
Safari users: Safari may auto-unzip downloads. Go to Safari → Settings → General and uncheck “Open ‘safe’ files after downloading” so you keep the original ZIP file.
Step 2 — Install & activate the theme
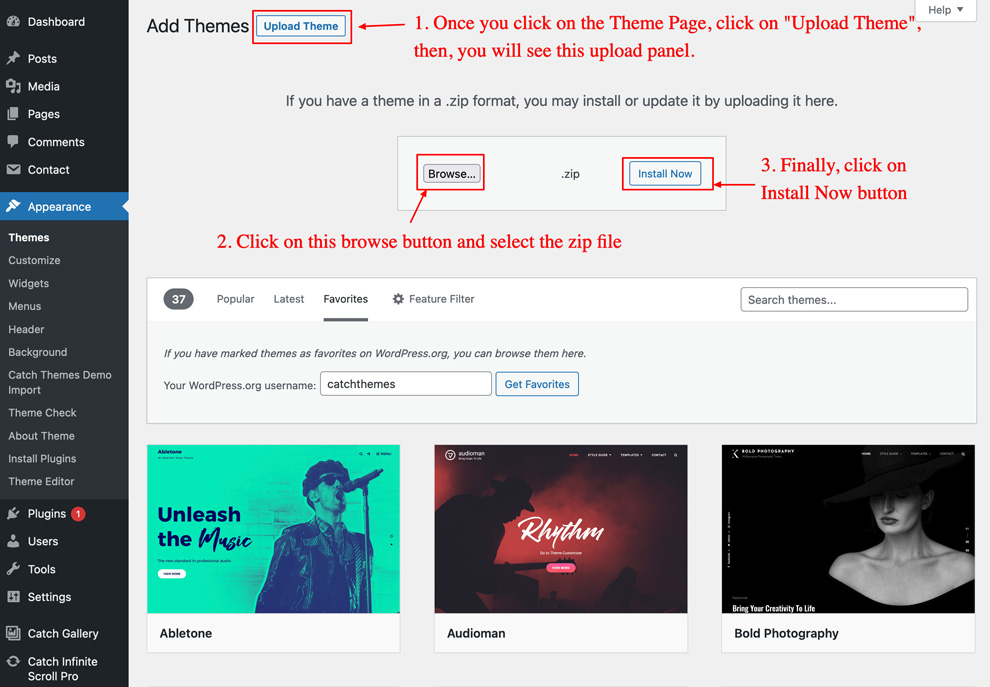
- In WordPress, go to Appearance → Themes → Add New → Upload Theme.
- Click Choose File, select
prestivo.zip, and click Install Now. - When installation finishes, click Activate.
Step 3 — Add your License Key (for one-click updates)
- Find your license key on your My Account → View Details and Downloads page.
- In WordPress, go to Appearance → Prestivo License.
- Paste the key into the License Key field, then click Save Changes and Activate License.
Step 4 — (Optional) Install supporting plugins
- WooCommerce — only if you plan to sell. Plugins → Add New → search “WooCommerce” → Install → Activate, then run its setup wizard.
- Contact Form 7 — only if you will use the Contact Form pattern. Install it the same way (see Section 18).
2. The Theme Info Page
After activation you get a dedicated theme dashboard at Appearance → Prestivo. It is your home base for theme details, demo import, license key and helpful links.
3. Updating the Theme & License Key
With a saved, activated license key, updates arrive automatically:
- When an update is available, you will see it under Dashboard → Updates or Appearance → Themes.
- Click Update Now.
No license key means no automatic updates. You can still update manually by uploading the newer ZIP. Your content lives in the database, not the theme, so it stays safe — but always take a full backup before updating if you have added custom code.
4. Frequently Asked Questions
Many common questions about block themes and Full Site Editing — how the Site Editor works, templates and template parts, patterns, global styles, and more — are answered in the official Catch Themes FSE FAQ.
Read the full FAQ here: https://catchthemes.com/fse-faq/
5. Understanding the Site Editor
Everything in this theme is edited in one place: Appearance → Editor (the Site Editor). There is no Customizer. Learn these four building blocks first — the rest of this guide refers to them constantly.
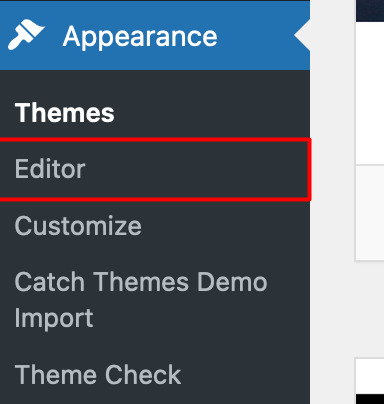
If you are on Site Front-End then you will see WP Admin Bar on the top of the page, click on “Edit Site” to open the Site Editor.

- [+] (top-left) — the Inserter. Add blocks and patterns here.
- List View (rows icon, top-left) — an outline of every block on the page. The easiest way to select a section without clicking around.
- Settings (gear, top-right) — options for the selected block (size, colors, spacing).
- Styles (half-moon, top-right) — site-wide colors and fonts.
- Save (blue button, top-right) — nothing goes live until you click this and confirm the items to save.
- Once the theme is installed and license key activated.
- Open the importer: go to Appearance → Prestivo.
- Import: click the Import button which will open the import setup wizard and also checks for required plugin needed for demo and then click on strong>Import button. Leave the tab open and do not refresh while it runs — a full import can take a few minutes.
- When it finishes, visit your site. The homepage, menus, and sample content are already set up. Now replace the demo text and images with your own.
- Run it on a fresh site. The importer adds the demo’s pages, posts, and images; it will not delete your existing content, but mixing demo content into an established site can get messy.
- Make sure recommended plugins (for example Contact Form 7, and WooCommerce if your demo includes a shop) are active first, so all demo sections import correctly.
- After importing, check Settings → Reading to confirm the homepage, and review your menu under the header’s Navigation block.
- Go to Pages → Add New and give the page a title, for example “Home”.
- Click the [+] inserter (top-left) and open the Patterns tab.
- Choose the Pages category. You will see complete page layouts:
- Page Home — for eCommerce store
- Page Home Blogging — content- and blog-focused homepage
- Click the layout you want — the entire page is inserted instantly.
- Click any text or image to edit it, replacing the demo content with your own.
- Click Publish, then set the page as your homepage (next section).
- Go to Settings → Reading.
- Under Your homepage displays, select A static page.
- Set Homepage to the page you just built (for example, “Home”).
- (Optional) Set Posts page to a blank page named “Blog” to hold your blog feed.
- Click Save Changes.
- Open Appearance → Editor → Patterns → Template Parts.
- Open the part you want to change (for example, Header or Footer).
- Open List View, select the top-level header or footer block, and use the options menu (three dots) → Replace to choose a different design from the Patterns inserter.
- Click Save.
- Open Editor → Patterns → Template Parts → Header.
- Click the Site Logo block, then choose Replace and upload or select your logo.
- Drag the blue handles, or use the Settings (gear) panel, to set the logo width. Click Save.
- In the Site Editor, click the Navigation block in your header (or open Editor → Navigation).
- Use the [+] inside the block to add pages, custom links, categories, or submenus.
- Drag items to reorder them. Drag an item slightly to the right (indent) to turn it into a dropdown sub-item.
- Click Save.
- None — normal content width (about 780px).
- Wide width — stretches wider (up to about 1400px).
- Full width — edge to edge across the screen (great for hero and banner sections).
- 404 Header
- Archive Header
- Blog Header
- Cross-Sells Products
- Featured Category
- Featured Content
- Footer Widgets With CTA
- Footer Widgets
- Footer
- Header Media
- Header Top
- Header
- Hero Content Full Width
- Latest Posts
- New Collection
- Offer Banner Featured Category
- Offer Banner
- Our Identity
- Our Strength
- Page Home Blogging
- Page Home
- Post Header
- Product FAQ
- Products On Sale – Carousel
- Products Top Rated
- Promotional Headline
- Search Header
- Secure Transactions
- Shop Header
- Shopping Features
- Sidebar Products
- Sidebar
- Featured Slider
- Taxonomy Product Header
- Upsells Products
- Woo Features
- Click on the Block inserter (+) icon in the top toolbar and Click on Patterns. Browse the Patterns and select the one that you like to add.
- Click on the Block inserter (+) icon to the right of an empty block, after that Click on the Browse All button, and finally Click on Patterns. Browse the Patterns and select the one that you like to add.
- Click on the Block inserter (+) icon in between blocks, after that Click on the Browse All button, and finally Click on Patterns. Browse the Patterns and select the one that you like to add.
- Clicking on the section itself
- List View
- Footer Interface Bar
- Synced — one master copy. Edit it once and every place it appears updates (perfect for a call-to-action you repeat across pages).
- Not synced — inserts a fresh, independent copy each time, which you can then edit freely.
- Open List View (the rows icon, top-left) and click the block or section you want to copy. List View makes it easy to select the right group rather than one small block inside it.
- Click the options menu (three dots) on the toolbar or in List View.
- Choose Duplicate. An exact copy appears directly below the original.
- Edit the copy’s text, image, or link, then click Save.
- Keyboard: select a block and press Ctrl + Shift + D (Windows) or ⌘ + Shift + D (Mac) to duplicate.
- Copy between pages: select the section, press Ctrl/⌘ + C, open the other page, and press Ctrl/⌘ + V.
- Reorder: use the up/down arrows in the toolbar, or drag the block in List View.
- Remove: the same options menu has Delete (or press Shift + Alt + Z).
- Click [+] → Patterns, search Slider (or Featured Slider), and click it.
- It is best used at the top of the page with Full width alignment — select the slider and choose Full width from the toolbar if it is not already.
- Open List View to see each slide. Click a slide to edit its background image (select the image/Cover block → Replace), its heading text, and the Enroll Now button label and link.
- To add or remove slides, select a slide in List View and use Duplicate or Delete from its options menu (three dots).
- Click Save. Keep slide text short so it stays readable on phones.
- Click [+] → Patterns, search Featured Category, and click it.
- To Edit the pattern, click on “Edit Pattern” button.
- Select the category. The Left column will show the Category Title, Category Description, and button. The Right column will just display the products from selected category.
- Click Save.
- Click [+] → Patterns, search Products Top Rated, and click it.
- It will display the Products with top rating. You can change the Title
- Click Save
- Click [+] → Patterns, search Our Strength, and click it.
- It will display the default content, click on it to replace with your own content.
- Click Save
- Click [+] → Patterns, search New Collection, and click it.
- Change the headings, colors and image as per your need.
- Click Save
- Click [+] → Patterns, search Our Identity, and click it.
- It will display the default content, click on it to replace with your own content.
- Click Save
- Click [+] → Patterns, search Promotional Headline, and click it.
- It will display the default content, click on it to replace with your own content.
- Click Save
- Click [+] → Patterns, search Products On Sale, and click it.
- Change the heading and % on Sale Settings as per your need.
- Click Save
- Cross-Sells Products
- Featured Category
- New Collection
- Offer Banner Featured Category
- Products On Sale – Carousel
- Products Top Rated
- Upsells Products
- Woo Features
| Building block | What it is | Where to find it |
|---|---|---|
| Templates | The layout of a type of page — the blog, a single post, the 404 page, the shop. | Editor → Templates |
| Template Parts | Reusable chunks shared across templates — Headers, Footers, Sidebars. Change one and it updates everywhere it is used. | Editor → Patterns → Template Parts |
| Patterns | Pre-designed sections (a hero, a pricing table, a team grid) you drop into any page or post. | The [+] Inserter → Patterns tab |
| Styles | Global colors, fonts, and spacing, plus the one-click Dark style variation. | Editor → Styles (half-moon icon) |
Getting around the editor
Golden rule: if a change is not showing on your live site, you almost certainly forgot to click Save.
6. Quick Start: Build Your Homepage in 5 Minutes
What you already have: as soon as you activate the theme, your site shows a fully designed homepage (the slider and home sections), so you are not starting from a blank screen.
Two ways to get started: import the entire demo site in one click, or build your pages one section at a time. Both are explained below — you can preview the finished result on the live demo.
Option A — One-click demo import (fastest)
Prestivo supports has a built need one-click demo import. It recreates the demo site for you — pages, sample posts, images, menus, and the homepage — so you only need to replace the demo content with your own.
Before you import:
Option B — Build from patterns
Prefer to build it yourself? Every section is available as a pattern, and each one comes pre-filled with the demo images and text, so inserting a full-page pattern instantly looks like the demo. The fastest route is to start from a full-page pattern:
7. Setting Your Homepage (Static Front Page)
Good to know: the theme ships with a designed homepage built in. If you set your own static page as the homepage (above), WordPress uses that page instead of the built-in design — which is usually what you want once you have built your own Home page. The built-in design then still appears on your Posts page (your blog).
Prefer to reuse the built-in home design? The theme includes editable home templates — Template Home and Template Home (Blogging). Create a page, then in the right sidebar open Page → Template and assign one of them, so your homepage keeps the theme’s ready-made layout that you can edit.
8. Headers & Footers
Headers and footers are Template Parts, so editing one updates it across your whole site.
Switching to a different header or footer
Available headers
Header, Header Top, and Checkout Header.
Available footers
Footer, Footer With Widgets, and Footer With Widgets And CTA.
Note: this is a block theme, so there is no Appearance → Widgets screen. The “widgets” in the footer are simply blocks (recent posts, navigation, social icons, text, and so on) that you edit directly inside the footer template part.
9. Logo, Site Title & Menus
Add your logo
Site title, tagline & favicon
Set your Site Title, Tagline, and Site Icon (the small favicon shown in the browser tab) under Settings → General. Once a logo is in place you can hide the text title from the Site Logo / Site Title block settings.
Navigation menus
On phones and tablets the menu automatically collapses into a tap-to-open icon, so you do not need a separate mobile menu.
10. Editing Content: Spacing, Layout & Alignment
Once a pattern is on the page, you shape it with three controls that appear for almost every block.
Width & alignment
Select a block and use the alignment button in its toolbar:
Spacing (padding & margin)
In the Settings (gear) → Dimensions panel you can set padding (space inside a block) and margin (space outside it). The theme provides ready-made spacing presets that scale down nicely on smaller screens, so picking a preset is usually better than typing a fixed pixel value.
Block spacing (gap)
For groups, columns, and rows, the Block spacing control sets the gap between the items inside — handy for tightening or loosening a grid of cards.
Colors, borders & typography per block
The Settings panel also lets you override Color (text, background, link), Typography (size, line height), and Border for the selected block. For consistency, prefer the theme’s preset colors and font sizes over custom values — presets update automatically when you switch styles or to Dark mode.
11. Using Block Patterns
Patterns are pre-built sections you insert anywhere. There are 36 in total, grouped into Pages, Headers, Footers, Featured sections, Banners, Sliders, and WooCommerce.
Insert a pattern
After opening site editor, there are 3 ways you can add Blocks and Pattern in you website:

Once the section is selected you can edit its content or if you want to customize the section’ properties/options, click the three dots and select your desired action. Duplicate, Remove, Copy or Add desired section before or after the current section.
Go to this link to know more about adding blocks and patterns
Edit Pattern Content
First, click on the pattern you wish to edit/customize
You can select the section/content in three ways
For the full pattern, after you select the pattern that you want to edit, click on “Edit pattern” button. Then you can edit each section inside the pattern.
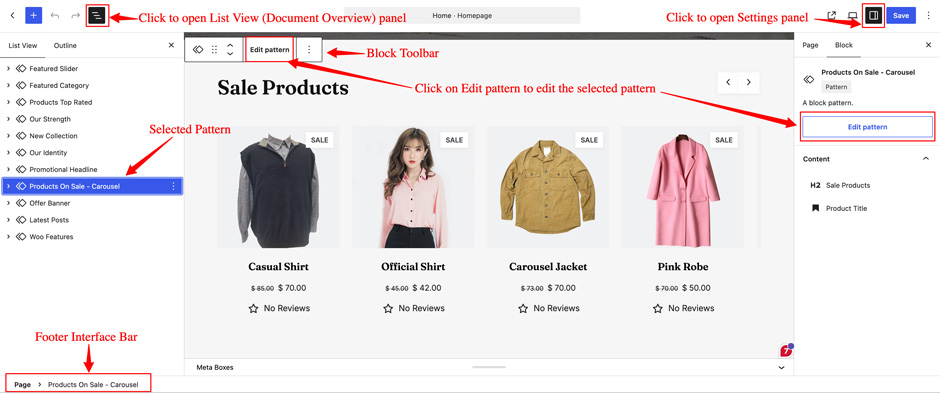
Once the section is selected you can edit its content or if you want to customize the section’ properties/options, click the three dots and select your desired action. Duplicate, Remove, Copy or Add desired section before or after the current section.
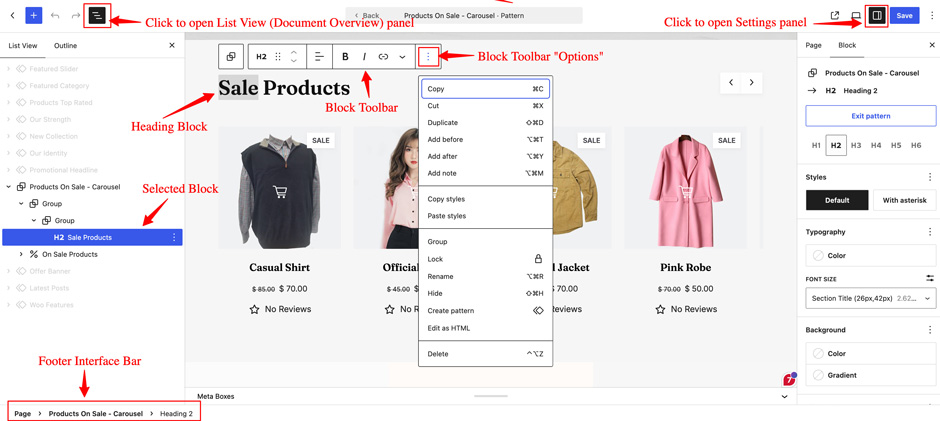
Replace a section with a different pattern
Select the section in List View, open the options menu (three dots) → Replace, and choose another pattern.
Save your own reusable / synced patterns
Built a section you want to reuse? Select it, open the options menu (three dots) → Create pattern, give it a name, and choose:
Find your saved patterns later under [+] Inserter → Patterns → My patterns, or manage them in Editor → Patterns.
How to duplicate a section or block
Duplicating is the fastest way to repeat something you have already styled — another service card, another pricing column, another slide, or a whole section.
Handy shortcuts:
Tip: to repeat the same section across several pages and have one edit update them all, save it as a synced pattern instead of duplicating (see above).
Worked examples: adding specific patterns
The steps below all start the same way: open the page or post you are editing, click the [+] inserter, open the Patterns tab, and type the pattern’s name in the search box. Click the result to drop it in, then edit it in place. You can preview every pattern live on the theme demo.
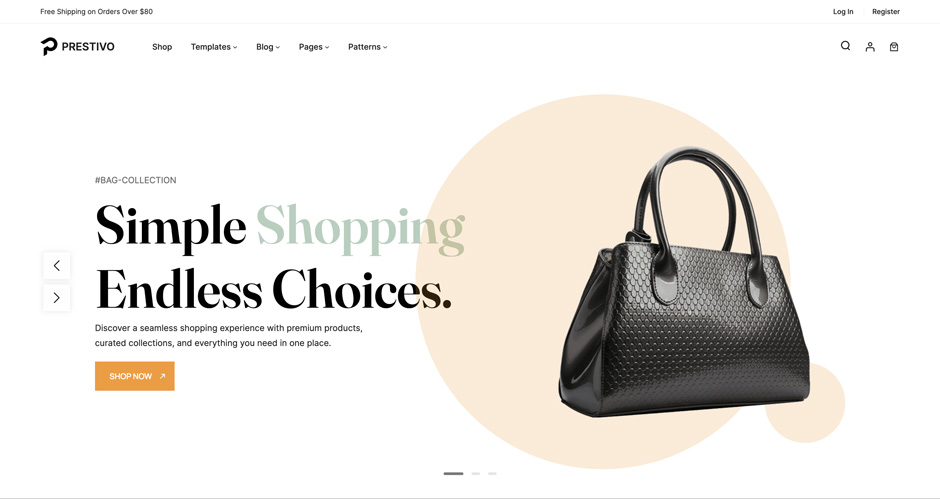
How to add Featured Slider pattern?
This is the big rotating image banner at the very top of the demo homepage (“Simple Shopping”, “Endless Choices”, with an Shop Now button).
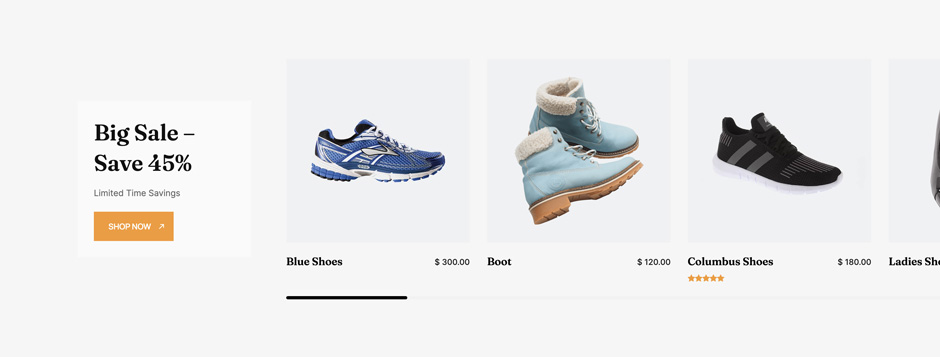
How to add Featured Category pattern?
This patterns requires WooCommerce plugin. Then you need to add product and assign category for those product. This patterns highlight the products from the selected category.
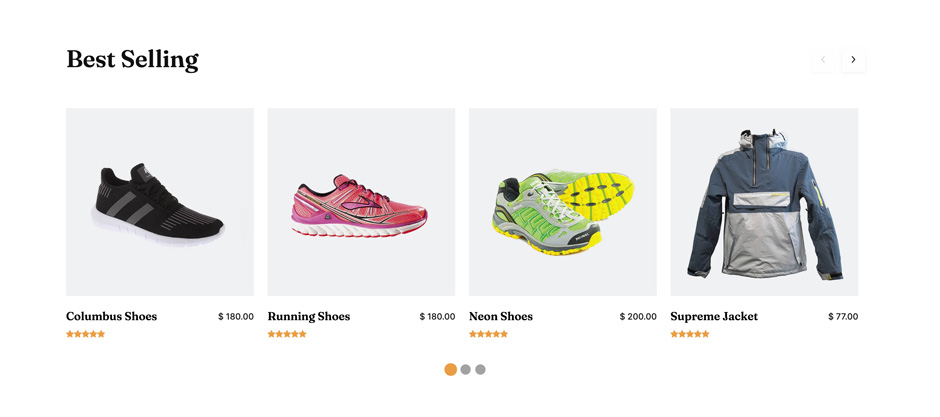
How to add Products Top Rated pattern?
This patterns requires WooCommerce plugin. Then you need to add product and your products need to have rating. This patterns shows the product with high ratings.
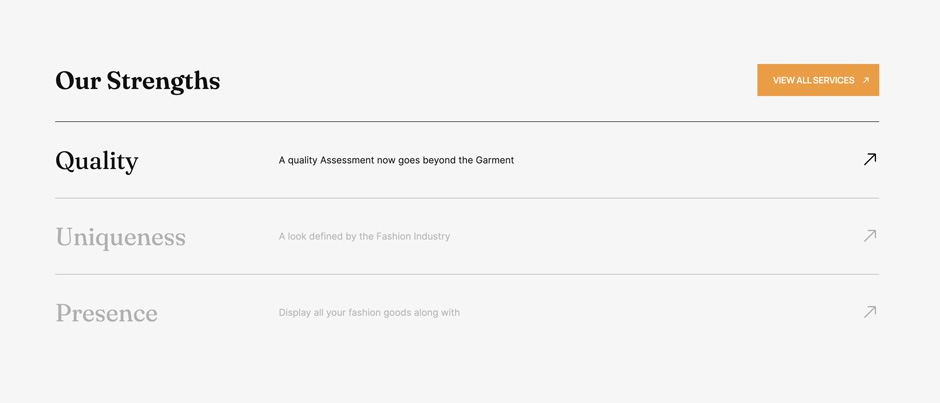
How to add Our Strength pattern?
This patterns will showcase your strengths or any important information. This pattern consist of columns block with headings, paragraph and button. Use it as per your need.
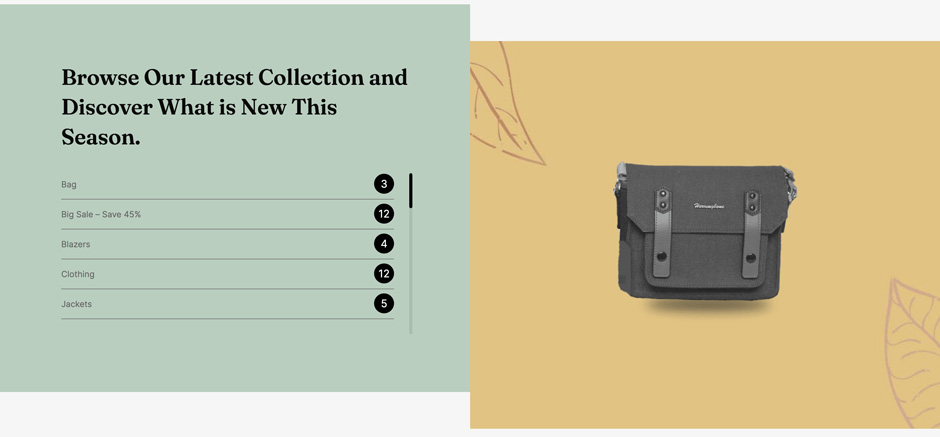
How to add the New Collection pattern?
This patterns requires WooCommerce plugin. This pattern uses columns blocks and consists of Heading, Product Category List, and Image. This pattern helps to display the new collection.
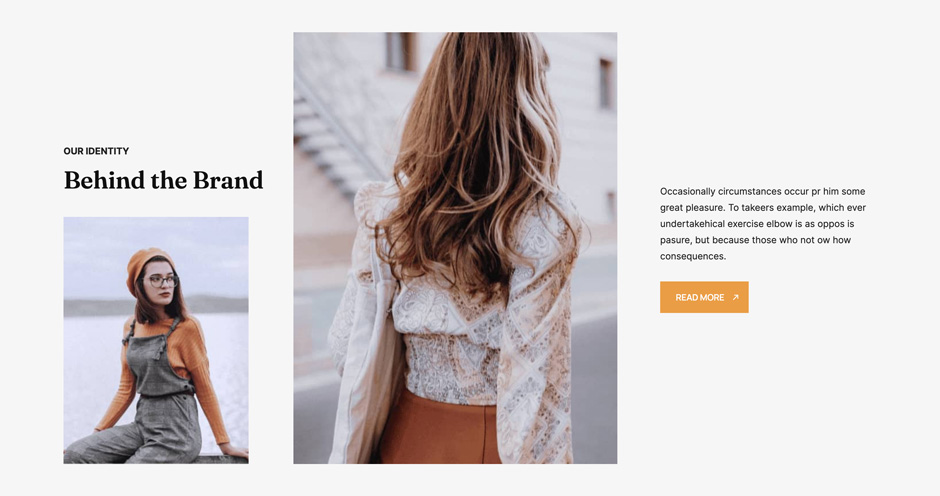
How to add Our Identity pattern?
This patterns will showcase your company details or any important information. This pattern consist of headings, images, paragraph and button blocks. Use it as per your need.
How to add Promotional Headline pattern?
Prestivo supports Promotional Headline pattern, this pattern allows you to display the your promotional banner to your audience in the most amazing way possible. By default it will load the cover image, heading, paragraph, and button blocks. You can edit all those as per your need.

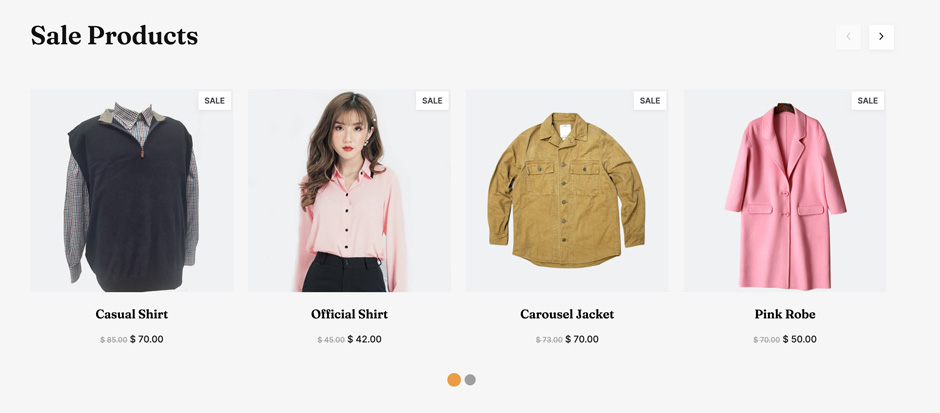
How to add Products On Sale pattern?
This patterns requires WooCommerce plugin. This pattern helps to display the producs on sale
WooCommerce Block Supported Patterns
Prestivo supports WooCommerce Blocks. You will have to install and activate WooCommerce Plugin to use these pattern. You can add Featured Products in these patterns.
Here are the patterns that supports WooCommerce Blocks:
Change Log
1.0 (Released: September 08, 2026)
- Initial Release
Satisfaction Guarantee
We make sure our customers are fully satisfied with our WordPress themes and meet their expectations. If you are not satisfied with your purchase, you are entitled to our 30-Day 100% Money Back Guarantee. No risks, Buy with Confidence!