Furnitrix is an elegant free eCommerce WordPress block theme for full site editing. This block-based theme comes with a stunning design. The theme is perfect for all types of online stores that display their products and services online. Furnitrix is a WooCommerce-ready theme that is fully compatible with the WooCommerce plugin. The theme is fully responsive so, your online stores will look beautiful on all devices. It includes highly customizable features and sections that will show your product in a pleasing way. Moreover, there are 17+ block patterns, 17 Templates, and 11 Templates Parts. Some of the block patterns are 404 Header, Archive Post Header, Blog Header, Featured Content, Featured Products, Header Media, Hero Content, Hidden 404, Post Header, Shop Header, Footer Three Columns, Sidebar Products, and many more. Furnitrix is a perfect theme to create an enticing and professional online shop. It comes with everything to showcase all the products and grab your visitors attention.
Features
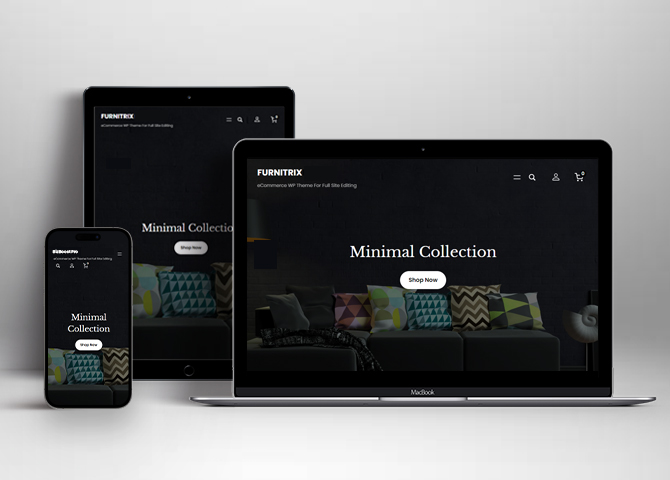
Responsive Design
One of the key features of our themes is that your website will magically respond and adapt to different screen sizes delivering an optimized design for iPhones, iPads, and other mobile devices. No longer will you need to zoom and scroll around when browsing on your mobile phone.
Incredible Support
We have a great line of support team and support documentation. You do not need to worry about how to use the themes we provide, just refer to our Tech Support segment. Further, if you need to do advanced customization to your website, you can always hire our theme customizer!
Featured Content
Featured Content allows you to highlight your recent & popular posts on your website. It can either be displayed on Homepage or the entire site. You can add your title and sub-title for featured content, select the number of featured content, display Meta, select multiple categories, and enjoy displaying your featured & recent posts.
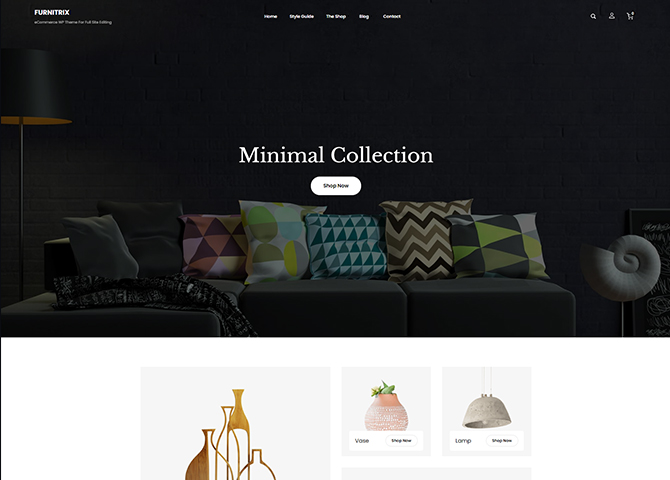
Hero Content
You can now display the best assets of your website with the Hero Content feature. The feature allows you to highlight the most important content in a fashion that is easily attention-grabbing. You can enable the hero content either on Homepage or the entire site. Hero Content - the easiest way to display your strengths.
WordPress Standard Codes
Our code is secure and optimized. We do proper data validation and sanitization and follow core theme guidelines. Our developers are active contributors to WordPress theme review and WordPress core. Our themes will always be updated as things change in WordPress.
Footer Editor
Footer Editor Options enables you to edit the content of the footer easily. You can either add HTML, plain text, or custom shortcodes which will be inserted into your theme automatically. You can use shortcodes like [the-year], [site-link] and [privacy-policy-link] for the current year, site link and privacy policy link respectively.
Full Site Editing
Customize your whole website design directly from the Front-End and build something magical. Change your site layout and add blocks/patterns directly on the site whilst working on the page content. Super easy to create dynamic content!
Custom Blocks
Enhance the pages of your website with the blocks. Generally, these custom blocks are more dynamic and have amazing designs. Create a page independently.
Multiple Block Patterns
Comes with a collection of predefined block design layouts, available from the patterns tab of the block inserter. Create an elegant layout that combines different blocks. Build Gracefully!
More Features
- Responsive Design
- Page Templates
- Featured Thumbnail
- Threaded Comments
- Dropdown Menu
- Gravatar Ready
- Localized for translations
- Custom Header / Logo
- Custom Menu
- Custom Footer
- Custom Layout
- Custom CSS
- Support
- WooCommerce Ready
- Hero Content
- Featured Content
- Products
- Full Site Editing
- Block Based Theme
- Site Editor
- Patterns
- Blocks
- Template Editing
Free Vs Pro (Premium)
| Free | Features | Pro (Premium) |
|---|---|---|
| Responsive Design | ||
| Super Easy Setup | ||
| Color Options | ||
| Case Study (Block) | ||
| Skills Bar (Block) | ||
| Masonry (Block) | ||
| Popup Video (Block) | ||
| Header Search (Block) | ||
| Header Social (Block) | ||
| Icons (Block) | ||
| Date (Block) | ||
| Slider (Block) | ||
| Tabs (Block) | ||
| Accordion (Block) | ||
| Countdown (Block) | ||
| Playlist (Block) | ||
| 404 Header | ||
| Archive Header | ||
| Archive Post Header | ||
| Blog Header | ||
| CTA Video | ||
| CTA | ||
| Featured Category | ||
| Featured Content | ||
| Featured Products | ||
| Featured Slider | ||
| Footer Default | ||
| Footer Four Columns | ||
| Footer Three Columns | ||
| Grid Blog Post | ||
| Header Default | ||
| Header Media | ||
| Header Transparent | ||
| Header with Cart | ||
| Hero Content | ||
| Hidden 404 | ||
| How it Works | ||
| Latest Products | ||
| Logo Slider | ||
| Logo With No Title | ||
| Logo | ||
| Post Header | ||
| Product Reviews | ||
| Search Header | ||
| Shop Header | ||
| Sidebar Products | ||
| Sidebar | ||
| Stats | ||
| Testimonials | ||
| WooCommerce Features |
Theme Instructions
Installation
You can download Furnitrix free theme through Dashboard > Appearance > Themes > Add New > Furnitrix. Simply click on the ‘Install’ button and wait for a few seconds to ‘Activate’ the theme.
Frequently Asked Question
Before starting please visit our Frequently Asked Question link, to know more about Full Site Editing Themes
How to add Demo Content?
- First download the demo xml zip file
- Extract the zip file and you will get free.xml file
- Go to “Tools => Import” in the WordPress dashboard
- Click on the WordPress “Run Importer” link in the list of importers
- Select the xml file you have downloded
- Finally, click on “Upload file and import” button
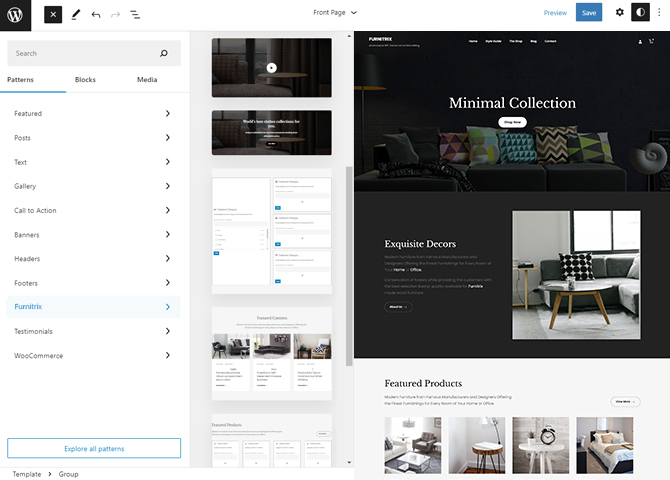
Inserting/Adding Furnitrix Patterns
Dashboard >> Editor >> ‘+’ Toolbar (Top Left) >> Patterns >> Select Furnitrix from the dropdown menu >> Add/Insert Furnitrix Patterns accordingly
Editing Pattern Content
First, click on the pattern content you wish to edit/customize
You can select the section/content in three ways
- Clicking on the section itself
- List View
- Footer Interface Bar
Once the section is selected you can edit its content or if you want to customize the section’ properties/options, click the three dots and select your desired action. Duplicate, Remove, Copy or Add desired section before or after the current section.
How to work with Furnitrix Blocks and Patterns
After opening site editor, there are 3 ways you can add Blocks and Pattern in you website:
There are three ways to add a block and patterns using the Block Inserter (+) icon.
- Click on the Block and pattern inserter (+) icon in the top toolbar and Click on Patterns. Browse the Patterns and select the one that you like to add.
- Click on the Block and pattern inserter (+) icon to the right of an empty block, after that Click on the Browse All button, and finally Click on Patterns. Browse the Patterns and select the one that you like to add.
- Click on the Block and pattern inserter (+) icon in between blocks, after that Click on the Browse All button, and finally Click on Patterns. Browse the Patterns and select the one that you like to add.
Once the section is selected you can edit its content or if you want to customize the section’ properties/options, click the three dots and select your desired action. Duplicate, Remove, Copy or Add desired section before or after the current section.
Go to this link to know more about adding blocks and patterns
WooCommerce Block supported patterns
Furnitrix supports WooCommerce Blocks. You will have to install and activate WooCommerce Plugin to use these pattern. You can add Featured Products in these patterns.
Here are the patterns that supports WooCommerce Blocks:
- Featured Products
- Sidebar Products
- Shop Header
Further instruction about WooCommerce Block supported patterns are below
How to add WooCommerce products category to the pattern?
Furnitrix supports WooCommerce blocks, in the above mentioned pattern you can add the products category and descriptions along with button that redirects to the products.
After activating theme, by default few patterns that supports WooCommerce will be activated. You can choose WooCommerce Featured product patterns directly from the pattern.
Here is how you display featured category to the pattern:
- Drag and drop the pattern you want to add in the section or click on “+” Sign and add desired pattern
- After adding WooCommerce supported pattern you will find “Featured Category” option you can search the category of the product you want to display and add
- Finally click on done and Save changes
Featured Products

Featured Products pattern in Furnitrix is woocommerce pattern, you can add list of your featured products along with its image and price in it
Here is how you add featured products pattern:
- Click on “+” sign on the top bar to display Blocks and Pattern, Click on Pattern
- Select “Furnitrix” to see list of pattern provided by Furnitrix
- Scroll down and to find “Featured Product”, click to add Featured Products on your website or drag and drop
- After adding this pattern, you will find featured product options there you can select the product category, select the product category to add it in featured product
- Finally click on done and Save changes
Sidebar Products
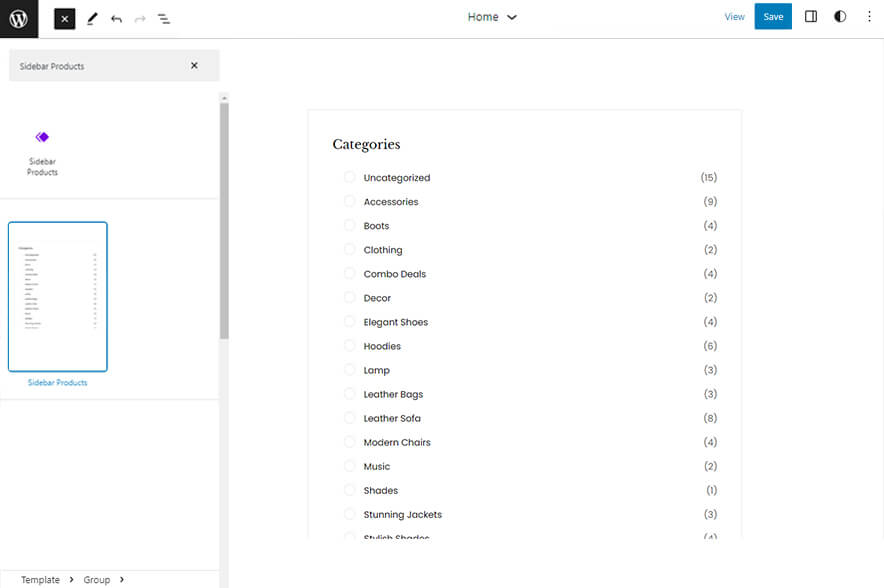
Sidebar Products pattern allows you to select and display product category along with the list of category in sidebar.
- Click on “+” sign on the top bar to display Blocks and Pattern, Click on Pattern
- Select “Furnitrix” to see list of pattern provided by Furnitrix
- Scroll down and to find “Sidebar Products”, click to add Sidebar Products on your website or drag and drop
- To add category with sidebar, go to the front end of the page and select the category you wish to add in shop
- Finally, click Save to save changes
List of Pattern supported by Furnitrix
- 404 Header
- Archive Header
- Archive Post Header
- Blog Header
- Featured Content
- Featured Products
- Footer Default
- Footer Three Columns
- Header Default
- Header Media
- Header Transparent
- Hero Content
- Hiddnen 404
- Post Header
- Search Header
- Shop Header
- Sidebar Products
- Sidbebar
- Subscribe
Hero Content
Furnitrix supports Hero Content pattern, here you can add image with title and text.
Here is how you add hero content in your website:
- Click on “+” sign on the top bar to display Blocks and Pattern, Click on Pattern
- Select “Furnitrix” to see list of pattern provided by Furnitrix
- Scroll down and to find “Hero Content”, click to add hero content on your website or drag and drop on desired area
- Edit Hero Content accordingly by adding Images, Title, Descriptions button and button links
- For more advance setting click on setting button on top left section
- Make Required changes and click on Save
Featured Content
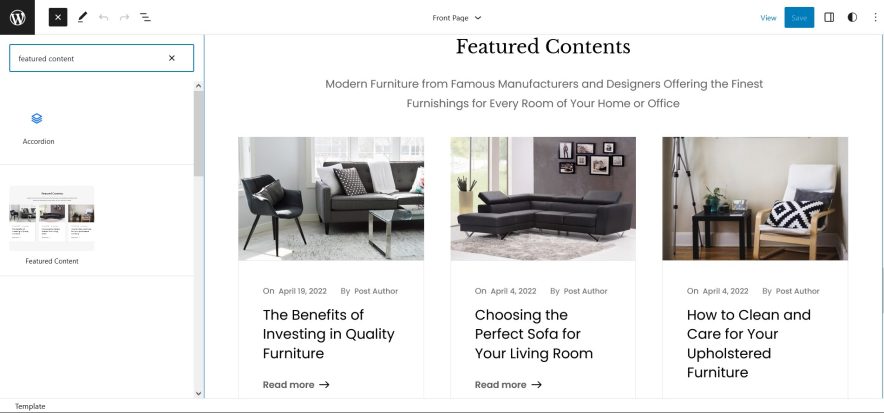
Furnitrix supports Featured content pattern, this pattern can be used to highlight the desired content with description and image.
Here is how you add it to your website:
- Click on “+” sign on block pattern tab to display Blocks and Pattern, Click on Pattern
- Select “Furnitrix” to see list of pattern provided by Furnitrix
- Scroll down to find Featured Content, click to add desired area or drag and drop
- After adding Featured you can edit its text, replace image according to you need
- After adding Featured Content you can edit its text, replace image and change stats according to you need
- For more advance option click on top left setting icon, there you can change Media & Text Setting, Media Width, Color
- Finally, click “Save” to save changes
Footer Three Columns
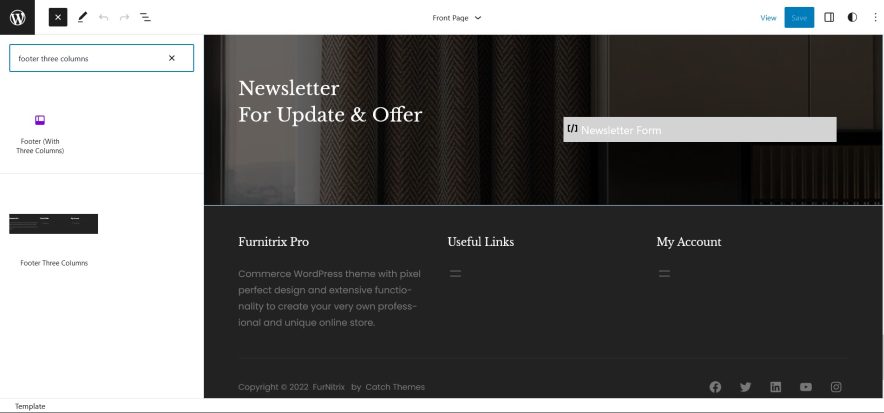
The Footer Three Columns pattern allows you to insert a section that you can display right above your default footer. In the pattern, by default, there are three columns and you can use the columns to add quick information and also your contact info including your social icons.
- Click on “+” sign on the top bar to display Blocks and Pattern, Click on Pattern
- Select “Furnitrix” to see list of pattern provided by Furnitrix
- Scroll down and to find “Footer Three Columns”, click to add Footer Three Columns on your website or drag and drop
- Edit Footer Three Columns accordingly by changing text, social links, add recent posts
- Finally click Save, to save changes
Footer Default
Footer default pattern in Furnitrix allows you to edit copyright information.
Here is how you add it to your website:
- Click on “+” sign on the top bar to display Blocks and Pattern, Click on Pattern
- Click on dropdown menu and select “Furnitrix” to see list of pattern provided by Furnitrix
- Scroll down and to find “Footer Default”, click to add pattern or drag and drop to place it in desired area
- Edit footer default by clicking on the content itself, you can replace the copyright information, change links and you can also add Navigation
- Finally, click “Save” to save changes
Templates in Furnitrix
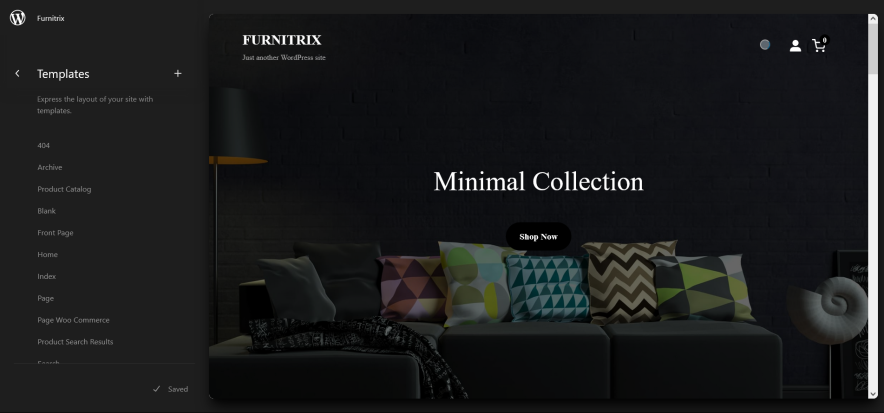
You can find 18 Templates provided by our Furnitrix theme. You can customize these templates if you feel like changing anything on a certain template and wish to see those changes across your site.
- 404: Displays when no content is found
- Archive: Displays post categories, tags, and other archives
- Product Catalog
- Blank: The blank template can be used for displaying the contents of a post or page
- Front Page: Displays homepage
- Home: Displays posts on the homepage, or on the Posts page if a static homepage is set
- Index: Displays Posts
- Page: Displays a single page
- Page (with Products)
- Products Search Results
- Search: Displas search results
- Single
- Single Page (Sidebar on Right)
- Single Post (Sidebar on Right)
- Single Product
- Products by Attribute
- Products by Category
- Products by Tag
Template Parts in Furnitrix

There are 12 Template Parts in Furnitrix
- All Products
- Footer (with three columns)
- Footer
- Header
- Header (Default)
- Header Transparent
- Header with Cart
- Mini Cart
- Page Content
- Post Content
- Sidebar
- Sidebar Products
Change Log
2.2 (Released: June 23, 2026)
- Bug Fixed: Welcome panel background color issue in theme admin page
- Bug Fixed: Mobile menu spacing and layout issues on small screens
- Updated: Renamed border-color slug to border-default-color to avoid conflict with WordPress core styles naming
- Updated: WordPress 7.0 ready
2.1 (Released: March 13, 2026)
- Added: Product FAQ pattern
- Added: Secure Transactions pattern
- Added: Shopping Features pattern
- Bug Fixed: Block Attempt recovery issue on patterns
- Updated: Single Product template with newly added patterns
2.0 (Released: January 28, 2026)
- Added: New product collection template part
- Bug Fixed: PHP standardization in patterns
- Bug Fixed: Spacing issue in patterns
- Updated: Product search result header
- Updated: All the classic/static WooCommerce product patterns, parts, templates
- Updated: theme.json file
1.2.1 (Released: January 01, 2026)
- Updated: WordPress 6.9 ready
1.2 (Released: May 19, 2025)
- Added: Order confirmation template
- Added: Featured category with products slider pattern
- Updated: Year in footer
- Updated: WordPress 6.8 ready
1.1 (Released: September 12, 2024)
- Added: Cart & Checkout Template
- Updated: WordPress 6.6 ready
1.0.1 (Released: May 11, 2023)
- Added: Info buttons and message
1.0 (Released: May 09, 2023)
- Initial Release