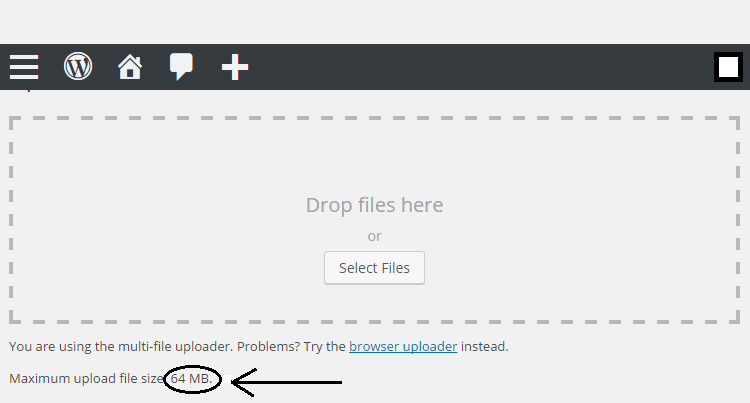
The built-in media players in WordPress make it easy to upload media files into your posts and make it a powerful platform to stream video and audio. However, you may realize that there is a maximum limit for uploads. To know your site’s upload limit, visit Media on your Dashboard and click on Add New. An upload box will appear beneath which you will see “Maximum upload file size”(see picture below). This is the maximum size of files you can upload. By default, this number ranges anywhere from 2MB to 128MB and dictates how big an uploaded file can be. So, if you find that you have a smaller limit, you may want to increase your upload limit to accommodate larger media files. Therefore, we will show you in this article, how you can increase maximum file upload size in WordPress.
Basically, there are three ways to can increase maximum file upload size in WordPress. Read on to find out how you can achieve this.
Tweak the Theme Functions File
One way to increase maximum file upload size in WordPress is to modify the theme functions file. Just add the following code in the theme function’s file and your upload limit will increase.
| 1. | @ini_set( ‘upload_max_size’ , ’64M’ ); |
| 2. | @ini_set( ‘post_max_size’, ’64M’); |
| 3. | @ini_set( ‘max_execution_time’, ‘300’ ); |
Create or Edit an existing php.ini file
Sometimes the first method to increase maximum file upload size in WordPress may not work. If you are on a shared host, a php.ini file will not be visible in your directory. In that case, you can create a file named php.ini and upload it in the root folder. In that file add the following code:
| 1. | upload_max_filesize = 64M |
| 2. | post_max_size = 64M |
| 3. | max_execution_time = 300 |
This method is found to be effective for many users. If it doesn’t work for you, try reducing the size to a lesser number, say, 16 MB.
Try .htaccess
If none of the php.ini solutions worked, the solution to increase maximum file upload size in WordPress may lie in your htaccess file. Before you edit your htaccess file, make sure you have a backup. Changing this can cause an Internal Server Error or a blank white screen, and you can re-upload your original htaccess file to remove it.
Open or create the .htaccess file in the root folder and add the following code:
| 1. | php_value upload_max_filesize 64M |
| 2. | php_value post_max_size 64M |
| 3. | php_value max_execution_time 300 |
| 4. | php_value max_input_time 300 |
Save this back to your server. Then go to Media -> Add New to see if your maximum upload size has taken effect. If there are any problems, upload the backup htaccess file you saved locally.
Multisite Solution
If your website is a WordPress multisite installation and your php.ini is in OK but are still unable to upload large files, you can follow the steps below.
Go to Settings and then click on Network Settings.
Under Upload Settings section, in the Max upload file size, increase the field value to a higher kilobyte value. For an instance, inserting 9000 will increase the upload limit to 9 megabyte (MB).
Conclusion
The above methods are tried and tested by many users across the internet. However, if these methods to increase maximum file upload size in WordPress do not work for you, your last resort may be to contact your local host to do it for you.
Hope this article has been helpful. If you have anything to add to this, please write it in the comments.